Showing posts with label vista. Show all posts

Wednesday, May 19, 2010

My Windows Vista/7 Power Settings

Here are my power settings on Windows Vista or Windows 7. I find the default setting annoying or inadequate, especially the Start menu power button triggering sleep.


  • Lid Close Action
    • On Battery: Sleep
    • Plugged in: Do nothing


  • Power Button Action
    • On Battery: Hibernate
    • Plugged in: Hibernate


  • Sleep Button
    • On Battery: Sleep
    • Plugged in: Hibernate


  • Start menu power button
    • On Battery: Shut down
    • Plugged in: Shut down

Wednesday, October 28, 2009

Ethernet File Transfer between Windows XP and Windows Vista

I found it hard to set up file transfer between Windows XP and Windows Vista using direct Ethernet connection. Sometimes, Windows Vista can see a Windows XP machine, but Windows XP somehow can't see a Windows Vista machine. I connected a PC running Windows XP and a PC running Windows Vista with a Ethernet crossover cable.


Setting Up Windows XP for direct Ethernet connection


  1. Make sure that the following items are enabled in the Local Area Connection Properties dialog.

    • Client for Microsoft Networks
    • File and Printer Sharing for Microsoft Networks
    • Internet Protocol (TCP/IP)

    LAN Properties

    You can open the Local Area Connection Properties dialog by opening Control Panel, Choosing Network and Internet Connections category, clicking Network Connections icon, right-clicking the icon for your Ethernet connection and choosing Properties from the right-click menu.


  2. Select Internet Protocol (TCP/IP) and click Properties. Internet Protocol (TCP/IP) Properties dialog will show up. Click Use the following IP address and specify IP address and subnet mask. Then, click OK to close the Internet Protocol Properties dialog.

    Windows XP TCP/IP Properties
  3. Open the Advanced tab and click the Settings button in Windows Firewall area.

    LAN Advanced Properties
  4. Windows Firewall window will show up. Open the Exceptions tab and make sure that File and Printer Sharing is enabled. Click OK to close Windows Firewall window. Then, click the Close button in the Local Area Network Properties window.
  5. Now connect the PC running Windows XP to a PC running Windows Vista with a Ethernet crossover cable.
  6. In the Network Connections window, click and select the icon for your Ethernet connection. In the left pane of the Network Connections window, click Set up a home or small office network. Keep clicking the Next button until you reach the Select a connection method step. Choose Other. Then choose "This computer belongs to a network that does not have an Internet connection" and click Next.
  7. Make sure that your Computer name is unique. Click Next.
  8. Type a Workgroup name that will be shared with a PC running Windows Vista. Click Next.
  9. Turn on the file and printer sharing. Click Next.
  10. Review your network settings and click Next.
  11. Select "Just finish the wizard." Click the Finish button to close the wizard.


Setting Up Windows Vista for direct Ethernet Connection


  1. Open the Control Panel. Under the Network and Internet category, select View network status and tasks. In the left pane, click Manage network connections. Right-click the icon for your Ethernet connection and choose Properties.
  2. In the Local Area Connection Properties dialog, make sure the following items are enabled.
    • Client for Microsoft Networks
    • File and Printer Sharing for Microsoft Networks
    • Internet Protocol Version 4 (TCP/IPv4)
    • Link-Layer Topology Discovery Responder
    • Link-Layer Topology Discovery Mapper I/O Driver

  3. Select Internet Protocol Version 4 (TCP/IPv4) and click Properties. Click Use the following IP address and enter unique values for IP address and Subnet mask.

    Windows Vista TCP/IPv4 Properties
  4. Go back to the Network and Sharing Center. Unidentified network will be shown. Click Customize and choose Private.
  5. In the Sharing and Discovery area, make sure that you have the following settings.

    • Network discovery: On

      Expand the Network discovery section and verify that the workgroup is the same as with Windows XP.
    • File Sharing: On
    • Public folder sharing: On

      Expand this section and enable Turn on sharing so anyone with network access can open, change, and create files
    • Printer sharing: On or Off
    • Password protected sharing: Off

      To avoid unnecessary problems, check it off.
    • Media sharing: On

Tuesday, September 29, 2009

GRUB: Booting and Activating Windows Vista/7

This post describes a way to activate Windows Vista/7 with Grub and SLIC loader. In order to successfully activate Windows Vista/7, you essentially need the following 3 things.


  • OEM SLIC code

    Every SLIC code is 374 bytes. It can be extracted from the BIOS by using the SLIC Dump ToolKit on a PC running legitimate Windows.
  • OEM Certificate (*.xrm-ms) that matches with the corresponding SLIC code
  • Valid 25-digit Windows key


Once these 3 things are obtained, you need a program to insert the SLIC code into memory to emulate OEM BIOS. I found an executable file called wow.exe whose job is to insert a SLIC code into BIOS. Also, GRUB.EXE is needed to find Windows partition and to boot Windows.


Because wow.exe and grub.exe are DOS executables, DOS should be booted first and run wow.exe and grub.exe in turn. grub.exe will chain-load Windows bootmgr, and then Windows will start. FreeDOS is preferred to MS-DOS because it works better with GRUB. Download a floppy image containing FreeDOS kernel and FreeCOM command processor below.


Inserting SLIC data into wow.exe with XVI32


wow.exe has a SLIC table embedded in itself beginning at $A58. Start XVI32 and open wow.exe. Start another XVI32 and open a SLIC table which should be 374 bytes.

With the XVI32 window showing a SLIC.table, open the Edit menu, click the beginning of file, select Block mark from the Edit menu, go to the end of file and select Block mark again. Open the Edit menu, open the Clipboard submenu and select Copy.

With the XVI32 window showing wow.exe, go to $A58, open the Edit window, select Block <n> chars..., enter 374 and click OK. Select Block delete from the Edit menu. Then, open the Edit menu, open the Clipboard submenu, and choose Paste. Go to $A38 and select Overwrite string... and enter the new 14-character OEM identifier which should match the string starting at $A62. Save the file wow.exe.


Open the FreeDOS floppy image with WinImage. Insert wow.exe into the floppy image. Create a batch file called AUTOEXEC.BAT with a text editor and put the following contents in it.


@ECHO OFF
WOW
GRUB

Save the file AUTOEXEC.BAT and insert in into FreeDOS floppy image.


Assuming that Windows 7 is installed, open a Command Prompt as administrator. Create an arbitrary file in C:\Boot, for example, with the filename win7. This file will be used to find the Windows partition (useful in mutiple-Windows environment).


copy nul C:\Boot\win7

Then, create a new text file MENU.LST with the following contents:


timeout 0
default 0
fallback 0
hiddenmenu

title Windows 7
find --set-root /boot/win7
chainloader /bootmgr

Save the file as MENU.LST and insert it into the floppy image with WinImage. Save the floppy image and quit WinImage.


With GRUB installed into MBR, type the following GRUB commands at boot time to boot Windows with BIOS-inserted SLIC code. Assume memdisk and freedos.flp is in the (hd0,3) partition.


kernel (hd0,3)/boot/grub/memdisk
initrd (hd0,3)/boot/grub/freedos.flp


Activating Windows


Once Windows has started, find the OEM certificate (*.xrm-ms) and 25-character Windows key that match the SLIC table just loaded into BIOS. Open a command prompt as administrator and type the following commands to activate Windows:


slmgr -ilc oemcert.xrm-ms
slmgr -ipk XXXXX-XXXXX-XXXXX-XXXXX-XXXXX

Hopefully, Windows will be activated.

Monday, September 21, 2009

To Create Windows Vista/7 Boot Floppy

Windows Vista and Windows 7 are overly complicated pieces of software, and thus bring a bunch of boot problems with them. In preparation for such problems, it is wise to create a boot floppy for Windows Vista or Windows 7. Floppy drives are hard to find in new computers, and are being phased out in favor of USB thumb drives. If your computer doesn't have a built-in floppy drive, you can get a USB floppy drive and use it to create a boot floppy. If you don't have a floppy drive, download a floppy image from the links below and use it with a bootloader, such as GRUB.


To create a Windows Vista/7 boot floppy, follow these steps:


  1. Insert a blank floppy diskette into your floppy drive. If your floppy drive is a USB type, connect it to your computer.
  2. Click Computer in the Start menu. This opens Computer in Windows Explorer.
  3. Right-click on Floppy Disk Drive (A:) and choose Format... from the menu.
  4. Click Start in the Format window.
  5. Copy C:\bootmgr to A:\. The file bootmgr is also located on Windows Vista/7 installer CD. You may have to unhide bootmgr before copying it if it is hidden.
  6. Create a new folder A:\BOOT.
  7. Open a Command Prompt and run the following commands to copy C:\BOOT\BCD.

    bcdedit /export A:\BOOT\BCD

  8. Reboot your computer with the boot floppy. You'll be able to get back to Windows Vista/7.


For those who can't create their own boot floppy for lack of a floppy drive, here's my boot floppy image:


You can use it with GRUB like this:


kernel (hd0,4)/boot/grub/memdisk bigraw
initrd (hd0,4)/boot/grub/vstaboot.bin
boot

memdisk is a part of Loadlin package. Note that this image is specific to my Vista installation. You must edit it with bcdedit before using it:


bcdedit /enum /store A:\Boot\BCD
bcdedit /store A:\Boot\BCD /set {bootmgr} device partition=C:
bcdedit /store A:\Boot\BCD /set {default} device partition=C:
bcdedit /store A:\Boot\BCD /set {default} osdevice partition=C:

Sunday, September 13, 2009

Booting Windows Vista/7 From a Logical Partition

It is possible for Windows Vista and Windows 7 to be installed on logical partitions. Windows Vista and Windows 7 use the new bootmgr bootloader to start themselves as opposed to ntldr used by old NT-based operating systems like Windows XP. Therefore, booting Windows Vista/7 from a logical partition takes a different approach from booting Windows XP from a logical partition.


Installing Windows Vista/7 onto a Logical Partition


Windows Vista/7 can be installed into a logical partition at the time of first installation. However, a new primary NTFS partition will be created. This partition is about 100 MB and only contains essential bootloader files, such as bootmgr and BCD. If you intend to remove this Vista/Win7 boot partition, be sure to copy its contents (especially bootmgr and BCD) to the logical partition containing Windows Vista/7 beforehand.

After that, reboot with Vista/Win7 installer CD, choose “Repair Your Computer” and proceed to invoke the Command Prompt. Type the following commands to enable Vista/Win7 to boot from a logical partition.


C:
bcdedit /enum /store C:\Boot\BCD
bcdedit /store C:\Boot\BCD /set {bootmgr} device partition=C:

Restart your computer. Put a CD into CD-ROM that has GRUB bootloader. Most Linux install CD's use GRUB these days. When you see the Grub boot menu, press C or Esc. You are now on the GRUB command line. To find which partition is your Windows partition, type root (hd0, and then press Tab. Windows partitions are mostly type 7. For example, if your Windows partition is (hd0,5), type the following commands to boot Windows.


root (hd0,5)
chainloader +1
boot

The reason why we want to remove the boot partition is most likely because we want to free a primary partition for use by another OS, such as OpenBSD or OpenSolaris. However, in order to boot Windows from a logical partiton, you need to set up a special bootloader, for example, GRUB.


Copying Windows Vista/7 from Primary to Logical Partition


If you installed Windows Vista/7 on a primary partition and want to move it to a logical parition, we need GParted to manipulate partitions. To get GParted, I recommend you to download one of the following ISO's:


Use GParted to copy Windows Vista/7 from a primary partition to a logical partition. Then, delete the original primary partition containing Windows Vista/7. Grab your Windows Vista/7 install DVD and reboot your PC with it. Click “Repair Your Compure” option and open a Command Prompt. Type the following commands to fix the C:\Boot\BCD file.


C:
bcdedit /enum /store C:\Boot\BCD
bcdedit /store C:\Boot\BCD /set {bootmgr} device partition=C:
bcdedit /store C:\Boot\BCD /set {default} device partition=C:
bcdedit /store C:\Boot\BCD /set {default} osdevice partition=C:

Reboot. Use the following GRUB commands to start Windows Vista/7. In this example, (hd0,5) is the logical partition that has Windows Vista/7.


root (hd0,5)
chainloader +1
boot


Validating the System Restore Drive


After booting Windows Vista/7, open the System Properties dialog and make sure that the Available Disks in System Protection tab are all valid.


System Protection Tab

Related Posts


Tuesday, September 8, 2009

Setting Up Windows Vista/7 on Toshiba Mini NB205

Toshiba NB205 comes pre-installed with Windows XP. I wiped out windows XP from the netbook and installed both Windows Vista Home Basic and Windows 7 Home Premium. I will use Windows Vista as my primary workspace and Windows 7 as my experimental workspace.


Installation of Windows Vista requires the SATA driver to be installed at the partition selection step (See the picture below). Download f6flpy3289 from Intel and unpack it onto a USB floppy or a USB thumb drive. Plug it into a USB port, click Load Driver and choose Intel(R) ICH7M/MDH SATA AHCI Controller. If you don't load the SATA driver, Vista will crash after reboot. This problem doesn't happen with Windows 7.


Load Driver for Widows Vista installation

This post serves as a journal I keep in order to keep track of the installed software and configuration. It'll ease the task of reinstalling Windows Vista or Windows 7.


  1. Drivers and Utilities


  2. Windows Update


    If you don't want to wait for Windows to update itself, download the following service packs and hotfixes.


  3. Applications


Related Posts


Saturday, April 25, 2009

Vista Installation Annoyances

This post will eventually have a collection of tips for resolving issues when installing Windows Vista. Some of them are based on my own experience with Windows Vista installation, but I'm going to add useful advices I found on the Internet.


Partition your hard drive before booting Vista DVD


I think it's good to partition your hard drive first before going ahead with Vista installation. There are many partitioning tools, for example, GParted, Acronis DiskDirector and the forsaken PartitionMagic. My favorite is GParted. Because Vista leaves a little space at the beginning of the hard disk after installation, this may create a problem when you later move or resize your Vista partition.


gparted-

Screen goes blank while Vista DVD is booting


This happened to me when I tried to install Windows Vista on my old computer with an LCD monitor. The screen went blank while there was no hard disk activity. However, when I punched the Caps Lock on the keyboard, the LED for Caps Lock switched on and off. So I knew the Vista DVD booted okay but Vista was'nt recognizing the monitor yet.


Windows Vista Advanced Boot Options

So I reset the PC. As soon as the Vista DVD began loading, I held down the F8 key until a black-and-white Advanced Boot Options menu appeared. I highlighted the line saying Enable low-resolution video (640x480) and pressed Enter. Then, Vista successfully booted into a nice Installation screen with large characters.


Vista doesn't recognize my hard disk


This happened to me when I tried to install Windows Vista on a hard drive that's connected to a PCI IDE controller — Promise Technology Ultra 100 TX2. Obviously, Vista couldn't recogize the IDE controller. So I had to download the driver and save it on a USB flash. Then, I plugged the flash drive in and told Vista to load the driver. After Vista successfully loaded the driver for my IDE controller, Vista could see my hard drive and install onto it.


Select a Partition

Related Posts


Monday, April 6, 2009

OEM SLIC tables for Windows Vista

I was researching the activation scheme behind Windows Vista OEM computers. Computers with pre-installed Windows Vista have a special license embedded in their ACPI BIOS, called SLIC table. This kind of a hardware-based activation scheme was designed to prevent software piracy. Nonetheless, there's a way to create a SLIC table in the BIOS with the help of software. This method is sometimes called SoftMod or just Vista Loader.


Using the SoftMod method, one can insert the SLIC signature of a certain hardware manufacturer into the BIOS and apply a copy of a license file (*.xrm-ms), then have Windows Vista activated. The first SLIC code that was leaked widely belongs to the (infamous) ASUS notebook manufacturer. After ASUS, more and more SLIC codes have been discovered and exploited.


Obviously, using a SLIC code that's spread and used widely makes it vulnerable to Windows updates that are designed to defeat circumventive measures against software activation. Therefore, uncommon SLIC signatures are better than the common ones. Vista Loader 3.0.0.1 includes OEM BIOS emulation codes of the following vendors:


  • AMD
  • AMD64
  • Acer
  • Asus
  • COMPAQ
  • Dell
  • Emachines
  • Fujitsu-Siemens
  • Gateway
  • Hewlett-Packard
  • Intel
  • Levono
  • Medion
  • NEC
  • Packard Bell
  • Samsung
  • Sony
  • Toshiba

Among these vendors, MEDION seems to be the most obscure one. Anyway, I found more vendor SLIC codes by downloading AMI_SLIC3_20080419.rar.

Sunday, April 5, 2009

Multiple Windows Installation

When the Vista Loader — also known as SoftMod or OEM BIOS emulation — is installed in a system with multiple Windows installations, Windows probably won't boot except the one in the first NTFS partition because the Grub4Dos code in the grldr file installed by the Vista Loader by default boots the first NTFS partition. In this case, you should uninstall Vista Loader from every Windows partition and then reinstall Vista Loader into a separate FAT logical partition. GRUB4DOS or pure GRUB will be used to load OEM BIOS emulation code into memory and then execute instructions in the menu.lst file to boot Windows in NTFS primary partitions.


To use multiple Windows installation, Grub4Dos and Vista Loader should be used together. This duo can be installed on a floppy or a bootable USB flash. The following is the contents of a menu.lst file used with Vista Loader.


timeout 0
default 0
fallback 1

title Vista Loader
map --mem (hd0,0)/vstaldr.img (fd0)
map --hook
chainloader (fd0)+1
rootverify (fd0)

title Windows Vista
find --set-root /bootmgr
chainloader /bootmgr


Related Posts


Saturday, April 4, 2009

Fixing a Vista Boot Problem

Error: Press Ctrl+Alt+Del to restart


I restored a partimage backup of Windows Vista. The backup was originally made from the partition /dev/sda2, but I deleted /dev/sda1 and created a new partition at /dev/sda1 with the same size as the backed-up partition. Then I restored the backup on /dev/sda1.


Upon reboot, Windows Vista couldn't start. Instead I received an error:


A disk error occurred.

Press Ctrl+Alt+Del to restart.

After many attempts, I finally fixed the problem. Here I show how I did it:


  1. Put your Vista installation DVD into your DVD drive and restart your computer. When you see the message "Press a key to boot from DVD", press any key.
  2. When the Install Windows screen appears, click Repair your computer.
  3. You may see Vista automatically trying to detect a boot problem and fix it. When a boot problem is detected, you'll get a dialog with a choice to fix the problem or ignore it. Just cancel and close the dialog.
  4. You'll be shown a window with many repair options. Open a command prompt.
  5. Type the following commands. It is assumed that Windows is installed in C: Replace C: with the correct letter if it's different:
    chkdsk C: /f
    C:
    bootrec /FixMBR
    bootrec /FixBoot
    bootrec /ScanOs
    attrib -r -s -h c:\boot\bcd
    del c:\boot\bcd
    bootrec /rebuildbcd

  6. Restart your computer and see if Vista can start.


Error: Winload.exe is missing or corrupt


Windows failed to start. A recent hardware or software change might be the cause. To fix the problem:
1. Install your WIndows installation disk and reboot.
2. Choose your language settings, click Next
3. Choose "Repair your computer"

File: \Windows\system32\winload.exe
Status: 0xc0000225
Info: The selected entry could not be loaded because the application is missing or corrupted

This problem occurs when the UUID of the NTFS partition is changed after resizing or moving the Windows partition with GParted or Acronis Disk Director. This problem can be easily fixed if you have a Windows install DVD. Put the Windows install DVD in your CD-ROM and Reboot your computer. Select “Repair your computer” and cancel Automatic Repair. Open a Command Prompt and type the following commands:


C:
bcdedit /enum /store C:\Boot\BCD
bcdedit /store C:\Boot\BCD /set {bootmgr} device partition=C:
bcdedit /store C:\Boot\BCD /set {default} device partition=C:
bcdedit /store C:\Boot\BCD /set {default} osdevice partition=C:

Thursday, April 2, 2009

Tweaking Windows Vista for Slow PC

Is Windows Vista only for fast and powerful computers? Not really. Technically, Vista can run on old computers with a CPU as slow as 800MHz. But Vista runs sluggish on old computers. For those old and slow computers, there are some ways to improve the speed of Vista, as explained below.


Stop unnecessary programs from running or starting.


Don't use the Windows Sidebar. This program is unnecessary and graphics-intensive program that slows your computer down. You can easily disable it from starting.


Disable UAC


Disabling UAC may dramatically speed up Windows Vista.


Disable Windows Theme


If you don't need fancy Windows themes, you can change your theme to a plain one or disable the Themes service altogether.

Monday, March 30, 2009

Test Driving Taiwanese Windows Vista (Chinese Traditional)

Taiwan is being overshadowed by the monstrously growing mainland China today. However, its cultural heritage is as rich as mainland China where it originated. The authenticity of the traditional Chinese scripts used in Taiwan and Singapore should not be overlooked in favor of the simplified Chinese used in the mainland China. If you are studying Chinese or do business with Taiwan or the mainland China, you may sometimes come across Chinese versions of Windows Vista.


I installed Taiwanese Windows Vista to see what it's like. Since I have almost no knowledge of Chinese, it was like guesswork most of the time. Often I had to rely on my experience with English Windows Vista. But as times went on, I learned the meaning of some Chinese characters naturally. It is such an enlightening expererience to use Taiwanese Windows Vista.


Windows Vista TW Traditional Chinese Welcome Center

Related Posts


Sunday, March 29, 2009

Installing Korean Windows Vista

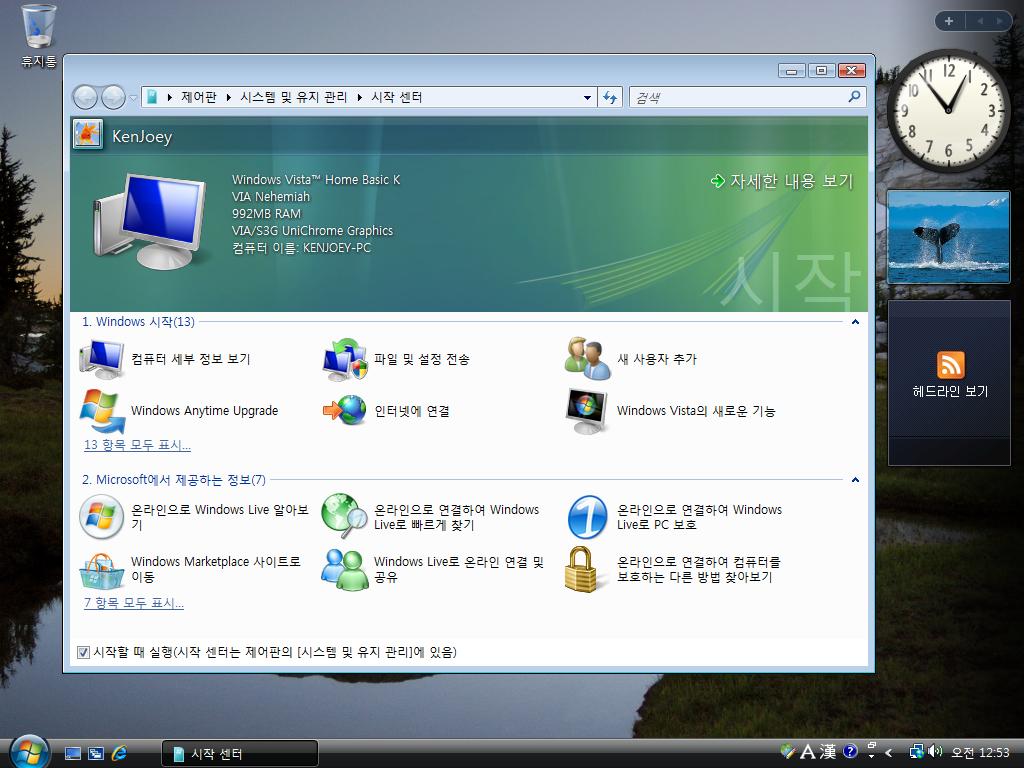
Due to the Korean cultural expansion and popular k-drama, there's an increasing number of people interested in learning the Korean language and Korean culture. If you are one of those people who study Korean, you may as well try Korean Windows Vista. ISO images of Korean Windows Vista DVD are available on the P2P networks with the filename X12-59647 vista.rtm.kor.iso. Once you download and install it, it's quite adventurous and fun using the Korean version of Windows Vista.


Windows Vista Home Basic K Korean Welcome Center

Related Posts


Saturday, March 28, 2009

Cleaning Up Windows Vista

This post will eventually be a collection of tips on cleaning up and trimming Windows Vista.


Emptying the Recycle Bin


Emptying the recycle bin is the easiest and most common way for people to clean up Windows. Even if you don't, Windows will automatically remove the oldest trash from the recycle bin when it fills up.


Deleting Temporary Files


As you use your computer, Windows and applications save temporary files in the folder dedicated for temporary storage. These temporary folders are given the variable name %TEMP% or %TMP% — in most cases, %TEMP% and %TMP% are identical. Ideally, applications are supposed to remove temporary files after they finish their jobs, but sometimes they forget to remove temporary files. Thus, once in a while, you have to remove temporary files yourself.


To remove temporary files, follow the following steps:


  1. Open the Explorer — the default file browser in Windows. You can do so by opening My Computer, My Document, My Pictures or My Music.
  2. Type in the address bar %TEMP% and press Enter.

    Go to %TEMP% folder.
  3. You'll be taken to the temporary folder, typically C:\Users\YourName\AppData\Local\Temp. Remove any temporary files and folders existing inside that folder.
  4. If %TEMP% and %TMP% are different, also do the same for %TMP% folder.


Cleaning Up VirtualStore


With strict User Access Control (UAC) in effect, Vista places user-generated files in the VirtualStore folder when a program wants to save something in the restricted area of filesystem. Type %APPDATA% in the address bar of the Windows explorer. Then, descend to Local/VirtualStore. Note that not everything there should be deleted as some of them are user settings.


Deleting Windows Updates


Windows updates are necessary to make Windows Vista secure and efficient. However, after updating Windows, some update files are left over and take extra space. The following steps delete these left-over update files.


  1. Open the Start menu, right-click Computer and select Manage.
  2. In the left pane, expand Service and Applications and select Services.
  3. In the right pane, select Windows update service and stop the serive.
  4. Open Computer in the explorer and go to C:\Windows\SoftwareDistribution
  5. Go to the DataStore folder and delete all files and folders there.
  6. Go back and change to the Download folders. Remove all files and folders there.
  7. Restart the Windows Update service.

Using GParted To Create Dual-Boot Vista Partitions

Have you ever wished to have multiple Windows installed on your computer? Having a multi-boot system has many applications, such as:


  • Set up one Windows system for your work or school, and set up another Windows system for your family and kids, all in one single computer
  • Use one Windows installation for your sensitive data, and use another installation for gaming and the Internet
  • Set up multiple Windows for different languages, for example one for English and another for Spanish
  • Try different Windows versions, one for Vista, one for XP and another for Windows ME.

In order to set up multiple installations of Windows in a single computer, you need to slice your hard drive into several partitions using a partitioning tool such as GParted. Get a GParted live CD and boot your computer with it.


Partitioning Advices


Here's what you need to know about multiple Windows installation:


  • One primary partition must be set up with Windows Vista or XP and set active. This partition will be used to boot itself and optionally other Windows partitions, primary or logical.
  • If multiple primary partitions have Windows installed, then only one of them should be active and the others should be hidden.


GParted in Action


Once you booted GParted live CD, launch GParted.


GParted first look

In most case, you'll see a Windows partion (type ntfs) as the first primary partition. If you need to resize it to make space available for the second Windows partition, you can use GParted, but I recommend you to use ntfsresize.


Now hide your existing Windows partition by right-clicking it and choosing Manage Flags.


GParted Manage Flags

Clear the boot flag and set the hidden flag. Then click Close.


GParted hide partition

Click the unallocated area and click New on the toolbar. Create new Partition dialog appears on screen. Set the size in the New Size box, create it as a Primary Partition and make it ntfs. Click Add.


GParted Create new Partition dialog

Look at the GParted window and make sure the new hard disk layout is okay. Click Apply on the toolbar.


GParted changed new layout

A confirmation dialog appears. Click Apply.
GParted Apply operations to device

If everything goes well, a dialog appears saying All operations successfully completed. Click Close.


GParted All operations successfully completed.

Right-click the newly created NTFS partition and select Manage Flags from the right-click menu. In the Manage flags window, only set the boot flag and click Close.


GParted Manage Flags

Quit GParted. Put your Windows installation DVD into your CD-ROM and reboot.

Tuesday, March 17, 2009

Downloading Windows Vista ISO

Microsoft often releases samples of its flagship programs to its MSDN members. Among the software samples released to MSDN members are a series of Windows Vista editions. Some of these copies are leaked to P2P networks like BitTorrent or eDonkey. Below is a list of Windows Vista ISO images including those released to MSDN members:


LanguageFilename32-bit Links64-bit Links
Chinese Traditional
繁體中文
tw windows vista x86 dvd X12-59649.iso
Windows Vista x86 32位元系統繁體中文正式授權製造商裝機版.ISO (2,577,250,304 bytes)
1
EnglishWindows Vista All-in-One RTM build

6000.16386.061101-2205_x86Fre_Client Lrmcfre_En_DVD.iso (2,678,614,016 bytes)
1, 2
Windows Vista English Service Pack 2

6002.18005.090410-1830_x86fre_Client_en-us-FRTMCFRE_EN_DVD.iso
1
Korean
한글
Windows Vista X86 DVD X12-59647 vista.rtm.kor.iso (2,591,459,328 bytes)1


Related Posts


Wednesday, January 7, 2009

NVIDIA RIVA TNT2 M64 Driver for Windows Vista

I decided to install NVIDIA RIVA TNT2 M64 for use with Windows Vista because the on-board graphics chip didn't work so well. Like many old video cards, Windows Vista doesn't include a driver for NVIDIA RIVA TNT2 M64 cards. So I've tried many different versions of NVIDIA unified drivers. Finally I found the one that works perfectly with Windows Vista.


You should install NVIDIA ForceWare version 72.14 to be able to use an NVIDIA RIVA TNT2 M64 video card with Windows Vista. Download it HERE.


This driver is not certified for Windows Vista. Therefore, you should manually install the video driver. First, download and install the NVIDIA ForceWare 72.14. You may be asked to restart the computer. Just do so.


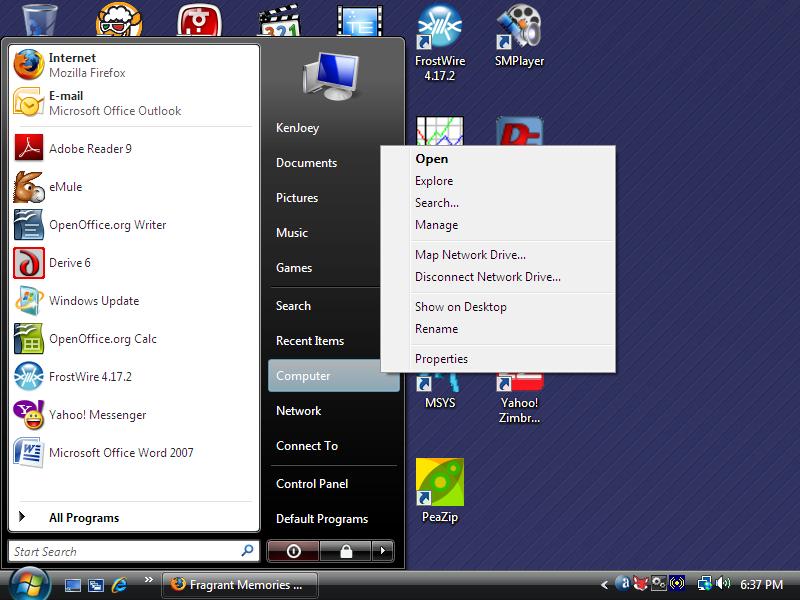
Once your PC restarts, open the Start menu, right-click Computer, and select Manage.


Right-click Computer and select Manage.

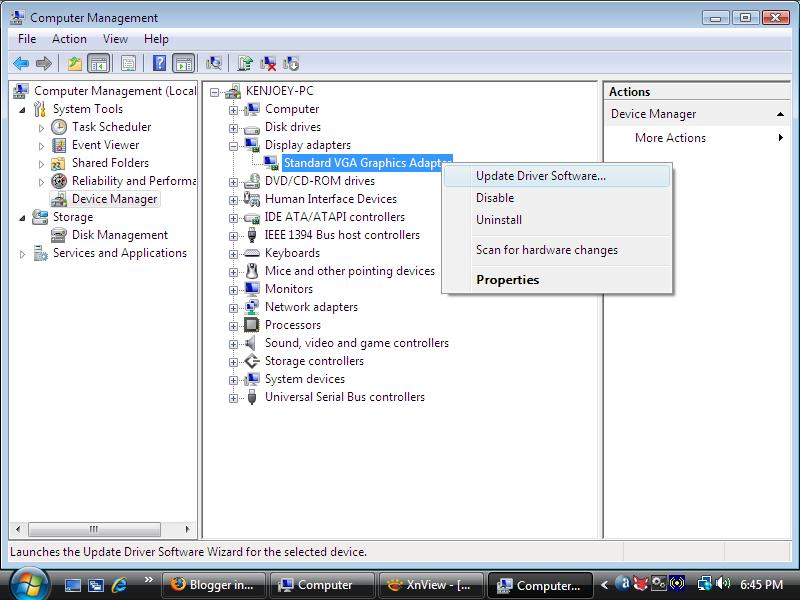
In the left pane, click Device Manager. In the right pane, expand the Display adapters section, right-click Standard VGA Graphics adapter and choose Update Driver Software.


Right-click Standard VGA Graphics adapter and choose Update Driver Software.

In the pop-up dialog, choose Browse My computer for driver software and indicate the folder where you unpacked the NVIDIA graphics driver. You'll get a warning that Windows can't verify the publisher of the driver. Just ignore the warning and go ahead with the installation. You may have to restart the PC again.


Go ahead with Vista driver installation

Voila, your NVIDIA RIVA TNT2 M64 video card may be a bit old but it still works OK with Windows Vista!

Tuesday, January 6, 2009

Disabling the Sleep Mode in Vista


With the default Vista power settings, pressing the Start menu power button will put the computer into a sleep mode. After newly installing Windows Vista, opening the Start menu will show the power button in amber yellow. This means clicking the power button will put the PC into the power-saving sleep mode instead of turning it off completely. The sleep mode saves the current state of the computer in memory, turns down the fans and keeps the PC quiet until you press a key or move a mouse.


But don't you find it annoying? I do. I want the PC turned off completely when I click the Power button. The following steps show you how to change Vista power settings so that clicking the Power button will turn off the PC:


  1. Click or press the Windows Logo button to open the Start menu.

  2. Click the Control Panel.

  3. Click System and Maintenance.

  4. Click Power Options.

  5. Click Change plan settings under the current preferred plan (by default, Balanced).

  6. Click Change advanced power settings.

  7. When the Power Options window appears, click the plus sign + next to Power buttons and lid to expand the section.

  8. Click the plus sign + next to Start menu power button.

  9. Change the Setting from Sleep to Shut down.

  10. Click OK to change the power options and close the window.

Saturday, January 3, 2009

Intel 845G Driver for Windows Vista

I salvaged an eMachine T1742 from an e-cycling dump. Someone had pried out the memory and hard drive from the unit. So I had to plug in new ones to set up a new PC. Then, I installed Windows Vista Home Premium Lite CD.

Windows Vista didn't recognize Intel 845G/845GL graphics chipset, so installed the driver for generic Standard VGA Graphics Adapter instead. After searching the Internet, I found the driver for Intel 845G/845GL graphics that can be used with Windows Vista. Just go to the Intel website and download the latest driver for Intel 82845G Graphics Controller. This chipset is outdated and in the archived drivers section. Get the Windows XP Professional driver for Intel 82845G Graphics controller.

Download the ZIP file (win2k_xp14103.zip) instead of the .EXE installer. Unpack it somewhere on your computer. Open the Start menu, right-click Computer, and select Manage.


Right-click Computer and select Manage.

In the left pane, click Device Manager. In the right pane, expand the Display adapters section, right-click Standard VGA Graphics adapter, and choose Update Driver Software.


Right-click Standard VGA Graphics adapter and choose Update Driver Software.

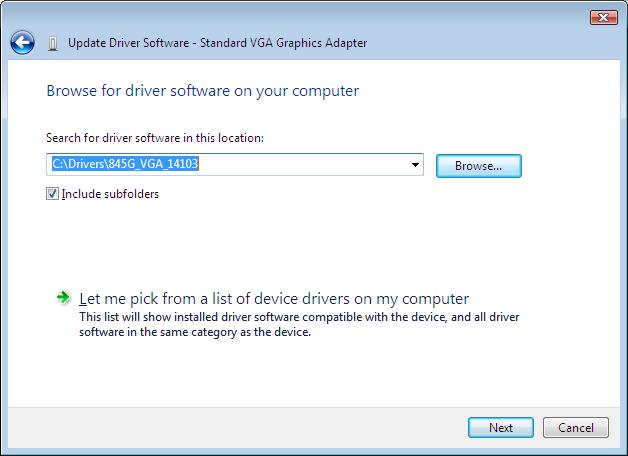
In the pop-up dialog, choose Browse My computer for driver software, and indicate the folder where you unpacked the Intel 82845G graphics driver.


Specify the folder where you put Intel 82845G driver.

If you get a warning that the driver is not digitally signed or authentic, just ignore the warning and go on with the installation. You may have to restart the PC.

One caveat with the driver is that the display may appear too bright at each boot time. Just adjust the Gamma, brightness and contrast settings in the Intel 845G control panel.

Thursday, December 11, 2008

Windows Vista Home Premium Lite CD

You want to try Windows Vista but you can't try it because your computer doesn't have a DVD drive. In this case, you can download a CD edition of Windows Vista with eMule or aMule. Burn the ISO file with InfraRecorder, CDBurnerXP or any other cd-burning tool. It takes less space to install and runs slightly quicker than a DVD version.

Compared to the full DVD edition, the CD edition lacks some major features. For example, it doesn't have many drivers so you'll hassle with driver installation from the start. It also lack international language support, Windows Mail, Windows Photo Gallery Viewer among other things. Yet, all this lack of functions makes Vista leaner and faster.

There's one critical flaw with this edition whereby you can't rename a folder. No fix or workaround has been found yet.

Once you've installed Vista, you can activate Windows Vista with Vista Loader

Related Posts


About This Blog

KBlog logo This blog is about current events and issues concerning general population. Thanks for visiting the blog and posting your comments.

© Contents by KBlog

© Blogger template by Emporium Digital 2008

Followers

Total Pageviews

icon
Powered By Blogger