Showing posts with label windows 7. Show all posts

Wednesday, March 23, 2011

Hacker's Guide To Installing Windows 7

Many people want to try the new Windows 7, but they're not too sure if Windows 7 is worth it. After all, it doesn't make sense to buy a new computer to try Windows 7 and then find out it's another lame bloatware. This guide will help an average joe to download, install and activate Windows 7 with freely available tools.


Hardware Requirements of Windows 7


First, you need to decide if your computer is capable of running Windows 7. According to Microsoft, Windows 7 has the following hardware requirements:


  • 1 GHz or faster 32-bit or 64-bit processor
  • 1 GB RAM (32-bit) or 2 GB RAM (64-bit)
  • 16 GB available hard disk space (32-bit) or 20 GB (64-bit)
  • DVD-ROM drive or DVD burner
  • DirectX 9 graphics card with WDDM 1.0 or better driver


That means Windows 7 can run on most computers available. You may have to buy additional memory or a new video card to be able to run Windows 7. See the Windows 7 Compatibility site.


Next, decide which edition of Windows 7 you want to install on your computer. There are many editions of Windows 7, for example, Home Premium, Professional, Enterprise and Ultimate. For most people, Windows 7 Home Premium is good enough.


Windows 7 Direct Downloads and Bittorrents


It is recommended that you use aria2, Halogenware Retriever or Free Download Manager to download Windows 7 so you can resume a download in the event of connection problems. On the Web, you can download DVD images of Windows 7 from the following locations:


  • Windows 7 Home Premium SP1 (x86 English) X17-24208.iso

    MD5: c5bb99b2f1a9e7a5b4fbc6e3eff70882

    SHA1: 22df3e5a80f8dbf014c2776a01b1cd9f24d83233

    CRC32: 9c5dc931
  • Windows 7 Home Premium SP1 (x64 English) X17-24209.iso

    MD5: 971843a457b6e0db0af61258cbe7256a

    SHA1: b4821f46a171708f5f8f8a0ef48fc16529437961

    CRC32: d236fd70
  • Windows 7 Professional SP1 (x86 English) X17-24280.iso

    MD5: befd4f1e00ec8da2effbd789f4e66fbf

    SHA1: 917a542b0541054bb9c2a06a11a46aed6943856b

    CRC32: 20078d8d
  • Windows 7 Professional SP1 (x64 English) X17-24281.iso

    MD5: 338f3245d68527db47b8a44e55317d0a

    SHA1: 5ed2584110e03f498db4458ba9fafd5a7ef602ed

    CRC32: 74f3cb73
  • Windows 7 Ultimate SP1 (x86 English) X17-24394.iso

    CRC32: C2966895

    MD5: 24F3A45D43D7C532AA3126CC094C61BD

    SHA1 : 92c1ada4ff09c76ec2f1974940624cab7f822f62

    SHA2: BBB5E0BAF3659F6DEC96B50381CBB05C09F066675EE639324B728215D5D47C43
  • Windows 7 Ultimate SP1 (x64 English) X17-24395.iso

    CRC32: 8589EE18

    MD5: 56A26636EC667799F5A7F42F142C772D

    SHA1: 1693b6cb50b90d96fc3c04e4329604feba88cd51

    SHA2: 9A2F3972FBBBB4974255CCCC26CDA9B1A75D9D0179867D6111162AC33F0CB693
  • Windows 7 Home Premium (x86 English) X15-65732.iso

    SHA1: CC9D8220B2179E784D85BF1EA98D2EE2190D534F

    ISO/CRC: 5DF6DBA0
  • Windows 7 Home Premium (x64 English) X15-65733.iso

    SHA1: 336779EA6B65F63E11A609B4D021439C47AB315B

    ISO/CRC: 56D954E4
  • Windows 7 Professional (x86 English) X15-65804.iso

    SHA1: 697FA06554502FB21D30275273B25747299C020D

    ISO/CRC: 578725D1
  • Windows 7 Professional (x64 English) X15-65805.iso

    SHA1: 50127304441A793EE51B3F501289F6599A559E9F

    ISO/CRC: 502C42C1
  • Windows-7-SP1-EN-MSDN-TechNet.torrent


I like using aria2 for download. Get my aria2 win32 build from here. To use aria2c to download Windows 7 Home Premium, open the Command Prompt and type the following command.


aria2c --file-allocation=prealloc http://msft-dnl.digitalrivercontent.net/msvista/pub/X15-65732/X15-65732.iso


To stop the download, press Ctrl+C twice. Later, you can resume download with the command:


aria2c -c http://msft-dnl.digitalrivercontent.net/msvista/pub/X15-65732/X15-65732.iso


After the download has finished, verify the checksums of the download with md5deep or HashCheck shell extension.

This is optional. If you want to create a single All-in-One DVD that can be used to install Home Basic, Home Premium, Professional and Ultimate edition, download and run eicfg_remover. This tool removes ei.cfg from the ISO file.

Then, burn the image to a blank DVD. You need to have a DVD burner and a blank DVD, of course. For free DVD-burning software, you can get ImgBurn, InfraRecorder or CDBurnerXP.


Wednesday, May 19, 2010

My Windows Vista/7 Power Settings

Here are my power settings on Windows Vista or Windows 7. I find the default setting annoying or inadequate, especially the Start menu power button triggering sleep.


  • Lid Close Action
    • On Battery: Sleep
    • Plugged in: Do nothing


  • Power Button Action
    • On Battery: Hibernate
    • Plugged in: Hibernate


  • Sleep Button
    • On Battery: Sleep
    • Plugged in: Hibernate


  • Start menu power button
    • On Battery: Shut down
    • Plugged in: Shut down

Sunday, April 25, 2010

Setting Up Codecs For Windows 7

Although Windows 7 provides wider support for multimedia files, including H.264, XviD, DIVX and AAC, Windows Media Player 12 has some bugs, such as jittery DVD sound. For satisfying multimedia experience in Windows 7, one needs to take some steps to set up additional codecs. Though ffdshow is a comprehensive codec package, I am going to use alternative codecs other than ffdshow.


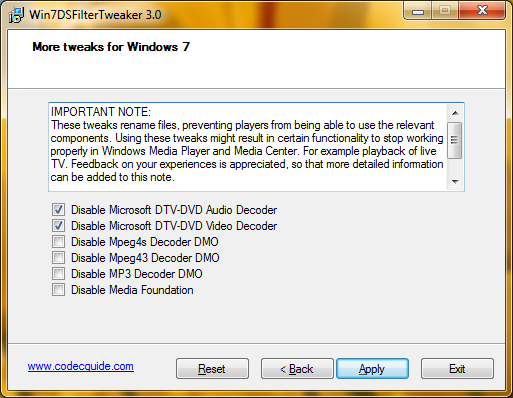
  1. Go to C:\Windows\System32 and rename msmpeg2adec.dll and msmpeg2vdec.dll. Alternatively, run Win7DSFilterTweaker and check both Disable Microsoft DTV-DVD Audio decoder and Disable Microsoft DTV-DVD Video decoder.

    Win7DSFilterTweaker 3.0


  2. Install DirectShow FilterPack (DSFP.zip) which only contains DirectShow source filters and splitters, but no codecs. Unpack the package (DSFP-3.32.exe) into C:\Program Files. Start the Command Prompt (cmd.exe) as administrator and run the batch file DSFP_inst.bat.

    cd "C:\Program Files\DirectShow FilterPack"
    DSFP_inst.bat


  3. Install XviD codec.

  4. Install AC3filter which allows Media Player to play AC3 and DTS sound.

  5. Install DirectShow filters for Ogg Vorbis, Speex, Theora and FLAC from xiph.org.

  6. Obtain CLVsd.ax from the Web and run the following command in an elevated Command Prompt.

    regsvr32 CLVsd.ax

    CLVsd.ax can be obtained this way:


    • Download PowerDVD from filehippo.
    • Right-click the installer (CyberLink.1705(Trial)_DVD100510-04.exe) and open it with 7-zip.
    • Right-click data1.cab and choose Open Inside.
    • Extract the file _64A6CC87C2FD46EDBDBCC13164131D6A (1,086,832 bytes) to C:\Windows\System32 folder.
    • Rename _64A6CC87C2FD46EDBDBCC13164131D6A as CLVsd.ax.
    • Run "regsvr32 CLVsd.ax" as administrator.


  7. Open the registry editor (regedit) and navigate to HKLM\SOFTWARE\Microsoft\Windows\CurrentVersion\Media Center\Decoder and find the entry PreferredMPEG2VideoDecoderCLSID. Double-click the entry and enter {516F1EFA-42F4-436E-801C-B752EB9343EB} (UUID for Cyberlink decoder). You can verify the CLSID with Radlight Filter Manager (DSFM.exe) that was installed by DirectShow FilterPack above.

  8. Download the DirectVobSub filter, also known as VSfilter. Copy VSFilter.dll to C:\Windows\System32 and run the following command:

    regsvr32 VSFilter.dll


Saturday, March 13, 2010

Windows 7 Installation

I installed the following programs on my Windows 7 machine.


  • Adobe Flash Player
  • Adobe Reader 10.0
  • Avast Antivirus 5
  • CDBurnerXP or ImgBurn
  • Google Apps or Thinkfree
  • Google Chrome
  • IBM Lotus Symphony
  • iTunes
  • Java
  • Microsoft Office 2010
  • NVIDIA Driver
  • QuickTime
  • RealPlayer
  • Skype
  • Windows Live Essentials
  • Zimbra
  • Zumodrive

Sunday, November 22, 2009

To Activate Windows 7 on Toshiba Mini NB205

Because Toshiba Mini NB205 has BIOS with embedded SLIC 2.1 signature, it is easy to activate the netbook if the owner obtains an .xrm-ms file and a valid Windows key. Thanks to the Internet and powerful search engines, this seemingly difficult task becomes rather easy for average people. Surprisingly, new computers and motherboards in most cases come with SLP 2.1 capable BIOS, thus making it easy to activate new computers.


For your information, SLP (system locked preinstallation) 2.1 is the newest anti-piracy scheme used by Microsoft to sell more Windows 7 on OEM computers. In this case, BIOS of OEM computers have SLIC 2.1 signature which is unique per each OEM manufacturer. An OEM version of Windows 7 is installed on an OEM computer and contain an OEM certificate (*.xrm-ms) that should match SLP/SLIC 2.1 thing in the BIOS. In this post, it is assumed that you installed an OEM version of Microsoft Windows 7 that can be downloaded using utorrent, eMule or Limewire.


If you use the SLIC Dump Toolkit on Toshiba Mini NB205, you can find that SLIC 2.1 begins with the string TOSCPLTOSCPL00.


SLIC Dump Toolkit V2.0

Now you can search for an OEM certificate matching your SLIC 2.1 data with the help of a search engine. You can use such search keywords like: TOSCPLTOSCPL00 2.1 XRM-MS.


ysearch_toscpl

Clicking on the fourth link in the picture above, you'll be taken to a page where you can download a file containing TOSCPLTOSCPL00.XRM-MS. You'll need to type a 3-digit number to download the archive 2.1.rar. Once you downloaded it, open it and extract TOSCPLTOSCPL00.XRM-MS.


7-zip opening 2.1.rar

Open a command prompt with administrator privilege.


Start Command Prompt as Administrator

Type the following command to install the OEM certificate.


slmgr -ilc TOSCPLTOSCPL00.XRM-MS

Now you need to activate Windows 7 with a valid Windows 7 key. Use a command in the following form to activate Windows 7.


slmgr -ipk XXXXX-XXXXX-XXXXX-XXXXX-XXXXX

Some valid Windows 7 keys are circulating on the Internet. With luck, you'll be able to find one. The following are some keywords to locate a Windows 7 key:


Sunday, October 18, 2009

Setting Up Windows 7 on Compaq Presario V5306US

I installed Windows 7 Home Premium on my old Compaq Presario V5306US notebook. Installation went without a problem, but 3 hardware components were not detected. They are:


  • ATI Mobility RADEON XPRESS X200M Series

  • In-Build Conexant ATI AC '97 Modem

  • HP Quick Launch Buttons


Since both of the built-in Ethernet and wireless network adapters are detected by Windows 7, I started Windows Update and installed the display driver through Windows Update. Drivers for the modem and quick launch buttons can be downloaded from HP/Compaq support site. For the quick launch buttons, extract the package with 7-zip and only install the driver.

The following pictures are taken from the device manager that list devices available in Compaq Presario V5306US.


Tuesday, September 29, 2009

GRUB: Booting and Activating Windows Vista/7

This post describes a way to activate Windows Vista/7 with Grub and SLIC loader. In order to successfully activate Windows Vista/7, you essentially need the following 3 things.


  • OEM SLIC code

    Every SLIC code is 374 bytes. It can be extracted from the BIOS by using the SLIC Dump ToolKit on a PC running legitimate Windows.
  • OEM Certificate (*.xrm-ms) that matches with the corresponding SLIC code
  • Valid 25-digit Windows key


Once these 3 things are obtained, you need a program to insert the SLIC code into memory to emulate OEM BIOS. I found an executable file called wow.exe whose job is to insert a SLIC code into BIOS. Also, GRUB.EXE is needed to find Windows partition and to boot Windows.


Because wow.exe and grub.exe are DOS executables, DOS should be booted first and run wow.exe and grub.exe in turn. grub.exe will chain-load Windows bootmgr, and then Windows will start. FreeDOS is preferred to MS-DOS because it works better with GRUB. Download a floppy image containing FreeDOS kernel and FreeCOM command processor below.


Inserting SLIC data into wow.exe with XVI32


wow.exe has a SLIC table embedded in itself beginning at $A58. Start XVI32 and open wow.exe. Start another XVI32 and open a SLIC table which should be 374 bytes.

With the XVI32 window showing a SLIC.table, open the Edit menu, click the beginning of file, select Block mark from the Edit menu, go to the end of file and select Block mark again. Open the Edit menu, open the Clipboard submenu and select Copy.

With the XVI32 window showing wow.exe, go to $A58, open the Edit window, select Block <n> chars..., enter 374 and click OK. Select Block delete from the Edit menu. Then, open the Edit menu, open the Clipboard submenu, and choose Paste. Go to $A38 and select Overwrite string... and enter the new 14-character OEM identifier which should match the string starting at $A62. Save the file wow.exe.


Open the FreeDOS floppy image with WinImage. Insert wow.exe into the floppy image. Create a batch file called AUTOEXEC.BAT with a text editor and put the following contents in it.


@ECHO OFF
WOW
GRUB

Save the file AUTOEXEC.BAT and insert in into FreeDOS floppy image.


Assuming that Windows 7 is installed, open a Command Prompt as administrator. Create an arbitrary file in C:\Boot, for example, with the filename win7. This file will be used to find the Windows partition (useful in mutiple-Windows environment).


copy nul C:\Boot\win7

Then, create a new text file MENU.LST with the following contents:


timeout 0
default 0
fallback 0
hiddenmenu

title Windows 7
find --set-root /boot/win7
chainloader /bootmgr

Save the file as MENU.LST and insert it into the floppy image with WinImage. Save the floppy image and quit WinImage.


With GRUB installed into MBR, type the following GRUB commands at boot time to boot Windows with BIOS-inserted SLIC code. Assume memdisk and freedos.flp is in the (hd0,3) partition.


kernel (hd0,3)/boot/grub/memdisk
initrd (hd0,3)/boot/grub/freedos.flp


Activating Windows


Once Windows has started, find the OEM certificate (*.xrm-ms) and 25-character Windows key that match the SLIC table just loaded into BIOS. Open a command prompt as administrator and type the following commands to activate Windows:


slmgr -ilc oemcert.xrm-ms
slmgr -ipk XXXXX-XXXXX-XXXXX-XXXXX-XXXXX

Hopefully, Windows will be activated.

Saturday, September 26, 2009

Setting Up Windows Recovery Environment with Bootmgr

After installing Windows 7, I found Winre.wim in C:\Recovery folder. I wanted to create a separate recovery partition and set it up so that it will boot to Windows Recovery Environment. So I created a new primary partition formatted in NTFS. I rebooted with Windows 7 DVD, chose “Repair Your Computer.” and opened a Command Prompt. I typed the following commands:


C:
bootrec /fixboot
copy D:\bootmgr C:\
robocopy D:\Boot C:\Boot /E
robocopy D:\Recovery C:\Recovery /E

D: is the Windows 7 partition. I used bcdedit in the following way to enable Windows Recovery Partition:


bcdedit /create /d "Windows Recovery Environment" /application osloader
bcdedit /set {13800a57...} device ramdisk=[C:]\Recovery\Winre.wim,{ramdiskoptions}
bcdedit /set {13800a57...} osdevice ramdisk=[C:]\Recovery\Winre.wim,{ramdiskoptions}
bcdedit /set {13800a57...} path \Windows\System32\winload.exe
bcdedit /set {13800a57...} systemroot \Windows
bcdedit /set {13800a57...} winpe yes
bcdedit /displayorder {13800a57...} /addlast

Here, the UUID's have been abbreviated. However, Windows Recovery Partition seemed to be loading for a few seconds, then crashed with blue screen.

Monday, September 21, 2009

To Create Windows Vista/7 Boot Floppy

Windows Vista and Windows 7 are overly complicated pieces of software, and thus bring a bunch of boot problems with them. In preparation for such problems, it is wise to create a boot floppy for Windows Vista or Windows 7. Floppy drives are hard to find in new computers, and are being phased out in favor of USB thumb drives. If your computer doesn't have a built-in floppy drive, you can get a USB floppy drive and use it to create a boot floppy. If you don't have a floppy drive, download a floppy image from the links below and use it with a bootloader, such as GRUB.


To create a Windows Vista/7 boot floppy, follow these steps:


  1. Insert a blank floppy diskette into your floppy drive. If your floppy drive is a USB type, connect it to your computer.
  2. Click Computer in the Start menu. This opens Computer in Windows Explorer.
  3. Right-click on Floppy Disk Drive (A:) and choose Format... from the menu.
  4. Click Start in the Format window.
  5. Copy C:\bootmgr to A:\. The file bootmgr is also located on Windows Vista/7 installer CD. You may have to unhide bootmgr before copying it if it is hidden.
  6. Create a new folder A:\BOOT.
  7. Open a Command Prompt and run the following commands to copy C:\BOOT\BCD.

    bcdedit /export A:\BOOT\BCD

  8. Reboot your computer with the boot floppy. You'll be able to get back to Windows Vista/7.


For those who can't create their own boot floppy for lack of a floppy drive, here's my boot floppy image:


You can use it with GRUB like this:


kernel (hd0,4)/boot/grub/memdisk bigraw
initrd (hd0,4)/boot/grub/vstaboot.bin
boot

memdisk is a part of Loadlin package. Note that this image is specific to my Vista installation. You must edit it with bcdedit before using it:


bcdedit /enum /store A:\Boot\BCD
bcdedit /store A:\Boot\BCD /set {bootmgr} device partition=C:
bcdedit /store A:\Boot\BCD /set {default} device partition=C:
bcdedit /store A:\Boot\BCD /set {default} osdevice partition=C:

Sunday, September 13, 2009

Booting Windows Vista/7 From a Logical Partition

It is possible for Windows Vista and Windows 7 to be installed on logical partitions. Windows Vista and Windows 7 use the new bootmgr bootloader to start themselves as opposed to ntldr used by old NT-based operating systems like Windows XP. Therefore, booting Windows Vista/7 from a logical partition takes a different approach from booting Windows XP from a logical partition.


Installing Windows Vista/7 onto a Logical Partition


Windows Vista/7 can be installed into a logical partition at the time of first installation. However, a new primary NTFS partition will be created. This partition is about 100 MB and only contains essential bootloader files, such as bootmgr and BCD. If you intend to remove this Vista/Win7 boot partition, be sure to copy its contents (especially bootmgr and BCD) to the logical partition containing Windows Vista/7 beforehand.

After that, reboot with Vista/Win7 installer CD, choose “Repair Your Computer” and proceed to invoke the Command Prompt. Type the following commands to enable Vista/Win7 to boot from a logical partition.


C:
bcdedit /enum /store C:\Boot\BCD
bcdedit /store C:\Boot\BCD /set {bootmgr} device partition=C:

Restart your computer. Put a CD into CD-ROM that has GRUB bootloader. Most Linux install CD's use GRUB these days. When you see the Grub boot menu, press C or Esc. You are now on the GRUB command line. To find which partition is your Windows partition, type root (hd0, and then press Tab. Windows partitions are mostly type 7. For example, if your Windows partition is (hd0,5), type the following commands to boot Windows.


root (hd0,5)
chainloader +1
boot

The reason why we want to remove the boot partition is most likely because we want to free a primary partition for use by another OS, such as OpenBSD or OpenSolaris. However, in order to boot Windows from a logical partiton, you need to set up a special bootloader, for example, GRUB.


Copying Windows Vista/7 from Primary to Logical Partition


If you installed Windows Vista/7 on a primary partition and want to move it to a logical parition, we need GParted to manipulate partitions. To get GParted, I recommend you to download one of the following ISO's:


Use GParted to copy Windows Vista/7 from a primary partition to a logical partition. Then, delete the original primary partition containing Windows Vista/7. Grab your Windows Vista/7 install DVD and reboot your PC with it. Click “Repair Your Compure” option and open a Command Prompt. Type the following commands to fix the C:\Boot\BCD file.


C:
bcdedit /enum /store C:\Boot\BCD
bcdedit /store C:\Boot\BCD /set {bootmgr} device partition=C:
bcdedit /store C:\Boot\BCD /set {default} device partition=C:
bcdedit /store C:\Boot\BCD /set {default} osdevice partition=C:

Reboot. Use the following GRUB commands to start Windows Vista/7. In this example, (hd0,5) is the logical partition that has Windows Vista/7.


root (hd0,5)
chainloader +1
boot


Validating the System Restore Drive


After booting Windows Vista/7, open the System Properties dialog and make sure that the Available Disks in System Protection tab are all valid.


System Protection Tab

Related Posts


About This Blog

KBlog logo This blog is about current events and issues concerning general population. Thanks for visiting the blog and posting your comments.

© Contents by KBlog

© Blogger template by Emporium Digital 2008

Followers

Total Pageviews

icon
Powered By Blogger