I am sharing my kernel builds for Linux 3.5.4 and 3.6.0. Hope it works for everyone.
Sunday, September 30, 2012
To Compile ndiswrapper 1.58rc1 for Linux 3.5.4
ndiswrapper allows Linux users to use Windows drivers for PCI/USB network adapters on Linux. If you own a network device for which Linux support is still absent or premature, then you need to compile ndiswrapper yourself and install Windows driver for your network device. Fortunately, today's Linux supports most network devices out-of-box, so most distributions don't bother to include ndiswrapper. However, I am compiling ndiswrapper believing that Windows NDIS drivers would outperform native Linux drivers.
To my surprise, building the latest version of ndiswrapper (1.58rc1) did not require any patch. After compiling Linux 3.5.4, I downloaded the ndiswrapper source from the sourceforge site. I chose the testing version because I thought it would work better with Linux 3.5.x. I unpacked the source.
tar xzvf ndiswrapper-1.58rc1.tar.gz
cd ndiswrapper-1.58rc1
I typed the following commands to compile and install ndiswrapper.
KVERS=3.5.4 make uninstall
KVERS=3.5.4 make
KVERS=3.5.4 make install
Then, I generated modules.* files again.
depmod -e -m -F /boot/System.map-3.5.4 3.5.4
The following files were installed by ndiswrapper.
/lib/modules/3.5.4/misc/ndiswrapper.ko
/sbin/loadndisdriver
/usr/sbin/ndiswrapper
/usr/sbin/ndiswrapper-buginfo
/usr/share/man/man8/loadndisdriver.8
/usr/share/man/man8/ndiswrapper.8
Also read:
Happiness the Movie 2007
Happiness is a Korean movie that makes you think seriously about the true meaning of happiness in life. It tells a story of two terminal patients who met at a remote nursing home and fell in love with each other. However, the guy leaves the girl for a careless, material life in the city. In the end, he comes back to the girl only to find her dying and regrets having left her. The movie tries to teach us that true happiness is about being close to someone you care about no matter how sick or poor he/she is.
Saturday, September 29, 2012
My All-Purpose Init Script for initrd / initramfs Boot Images
Here I post my init script. It is used in my initrd/initramfs boot images for the following purposes.
- Boot from a live CD / DVD
- Boot from a read-only filesystem image, compressed in SquashFS
- Copy the filesystem image to a RAM disk and run Linux entirely on memory
- Boot Linux from a USB flash drive
- Boot Linux from a local disk partition
- Run a rescue shell without booting Linux
I have yet to implement network booting. Right now it is good enough for my current needs. It takes the following boot parameters.
- root=
Specifies the root partition to boot Linux from. For example, /dev/sda2. - label=
Specifies the label of the device to boot from. For example, label=DEBIAN. - uuid=
Specifies the UUID of the device to boot from. For example, uuid=dcfd6a0a-2a0f-4b3d-8a1a-5e7d642ebfbd - boot=
Can be cdrom, loop, ram, usb or ata. - vmode=
Specifies the screen resolution of the framebuffer video. For example, vmode=640x480 - single
Boot into the single-user mode. - nox
Boot into the console mode in runlevel 2
#!/bin/dash

# Define a function to parse kernel command line options.
get_opt() {
  echo $@ | cut -d "=" -f 2
}

# Define a function to load drivers.
loadmod() {
  for i in $@ ; do
    for j in $(grep $i /tmp/pcimodules.txt); do
      modprobe $j
    done
  done
}

# Define a function to guess the partition type.
gpart() {
  for i in $(blkid | grep $1); do
    case $i in
      *\=*)
        eval $i
        ;;
      *)
        true
        ;;
    esac
  done
}

# Define a function for mounting the root partition.
mountr() {
  if [ $uuid ]; then
    if [ $# = 2 ]; then
      mount -r -U $uuid $2
    elif [ $# = 1 ]; then
      mount -r -U $uuid $1
    else mount -r -U $uuid /mnt
    fi
  elif [ $label ]; then
    if [ $# = 2 ]; then
      mount -r -L $label $2
    elif [ $# = 1 ]; then
      mount -r -L $label $1
    else mount -r -L $label /mnt
    fi
  else
    gpart $1
    case $TYPE in
      ext*)
        e2fsck -p $1
        [ $# = 2 ] && mount $1 $2 || mount $1 /mnt
        ;;
      jfs)
        jfs_fsck $1
        if [ $# = 2 ]; then
          mount -t jfs -o ro,iocharset=utf8 $1 $2
        else mount -t jfs -o ro,iocharset=utf8 $1 /mnt
        fi
        ;;
      vfat)
        if [ $# = 2 ]; then
          mount -t vfat -o ro,gid=100,dmask=2,fmask=113 $1 $2
        else mount -t vfat -o ro,gid=100,dmask=2,fmask=113 $1 /mnt
        fi
        ;;
      *)
        [ $# = 2 ] && mount -r $1 $2 || mount -r $1 /mnt
        ;;
    esac
  fi
}

# Create a union filesystem
union() {
  mount -t tmpfs none /opt/tmp
  modinfo unionfs > /dev/null 2>&1 &&
  mount -t unionfs -o dirs=/opt/tmp=rw:/opt=ro none /mnt ||
  ( mkdir /opt/tmp/.change
    modprobe fuse
    unionfs-fuse -o allow_other,use_ino,suid,dev,nonempty,kernel_cache \
     -o cow,chroot=/opt,max_files=32768 /tmp/.change=RW:/=RO /mnt )
}

# Mount proc and sysfs.
mount -t proc none /proc
mount -t sysfs none /sys

# Find the available PCI hardware
mount -t tmpfs none /tmp
pcimodules > /tmp/pcimodules.txt

# Populate /dev (Needs kernel >= 2.6.32)
mount -t devtmpfs none /dev
mkdir -m 755 /dev/pts
mount -t devpts -o gid=5,mode=620 none /dev/pts

# Set default values
boot=ata
root=/dev/sda6

# Find the root=, label=, uuid= and boot= values on kernel command line.
for i in $(cat /proc/cmdline); do
  case $i in
    root\=*)
        root=$(get_opt $i)
        case $root in
          /dev/cdr* | /dev/dvd* | /dev/sr* | /dev/scd*)
            boot=cdrom
            ;;
          0x200)
            root=/dev/fd0
            ;;
        esac
        ;;
    label\=* | uuid\=* | boot\=* | vmode\=* )
        eval $i
        ;;
    single)
        RUNLEVEL=single
        ;;
    nox)
        RUNLEVEL=2
        ;;
  esac
done

# Activate framebuffer display devices.
if [ $vmode ]; then
  if [ $boot = cdrom ]; then
    modprobe uvesafb scroll=ywrap mode_option=$vmode-16
  else for i in $(grep fb /tmp/pcimodules.txt); do
    case $i in
      atyfb)
        modprobe $i mode=$vmode-16
        ;;
      nvidiafb | rivafb)
        modprobe nvidiafb mode_option=$vmode bpp=16 hwcur=1
        ;;
      radeonfb | savagefb)
        modprobe $i mode_option=$vmode-16
        ;;
      sisfb)
        modprobe $i mode=$vmodex16 mem=12288 font=SUN12x22
        ;;
      viafb | vt8623fb)
        modprobe viafb viafb_mode=$vmode viafb_bpp=16
        ;;
      *)
        modprobe $i
        ;;
    esac
  done
    if grep -q i915 /tmp/pcimodules.txt; then true
    else [ -c /dev/fb0 ] || modprobe uvesafb scroll=ywrap mode_option=$vmode-16
    fi
  fi
fi

case $boot in
    cdrom)
        # Boot Linux from a live CD.
        loadmod ata_ ahci pdc_adma ^.hci-hcd
        modprobe usb-storage &&
        modprobe sr_mod &&
        sleep 7
        modprobe isofs
        mount -t iso9660 /dev/sr0 /media
        [ -d /media/isolinux -o -d /media/boot/isolinux ] ||
          mount -t iso9660 /dev/sr1 /media
        if [ -f /media/*.[Ss][Qq]* ]; then
          SQF=$(ls -t /media/*.[Ss][Qq]* | head -n 1)
          if [ $root = /dev/ram ]; then
               echo "Please wait until the RAM disk is ready."
               dd if=$SQF of=/dev/ram1 bs=2048 &&
               mount -t squashfs /dev/ram1 /opt
          else modprobe loop
               mount -t squashfs -o loop $SQF /opt
          fi
        else
          mount --move /media /opt
        fi
        union
        ;;
    loop)
        # Boot Linux from an image file.
        loadmod ata_ ahci pdc_adma ^.hci-hcd
        modprobe usb-storage &&
        modprobe sd_mod &&
        sleep 7
        mountr $root /media
        modprobe loop
        if [ -f /media/*.[Ss][Qq]* ]; then
          SQF=$(ls -t /media/*.[Ss][Qq]* | head -n 1)
          mount -t squashfs -o loop $SQF /opt
        elif [ -f /media/*.[Ii][Ss][Oo] ]; then
          ISO=$(ls -t /media/*.[Ii][Ss][Oo] | head -n 1)
          modprobe isofs
          mount -t iso9660 -o loop $ISO /opt
        fi
        union
        ;;
    ram)
        # Boot Linux from ramdisk.
        loadmod ata_ ahci pdc_adma ^.hci-hcd
        modprobe usb-storage &&
        modprobe sd_mod &&
        sleep 7
        mountr $root /media
        echo "Please wait until the RAM disk is ready."
        if [ -f /media/*.[Ss][Qq]* ]; then
          SQF=$(ls -t /media/*.[Ss][Qq]* | head -n 1)
          dd if=$SQF of=/dev/ram1 &&
          mount -t squashfs /dev/ram1 /opt
        elif [ -f /media/*.[Ii][Ss][Oo] ]; then
          ISO=$(ls -t /media/*.[Ii][Ss][Oo] | head -n 1)
          dd if=$ISO of=/dev/ram1 bs=2048 &&
          modprobe isofs
          mount -t iso9660 /dev/ram1 /opt
        fi
        union
        ;;
    usb*)
        # Boot Linux from a USB drive.
        loadmod ^.hci-hcd
        modprobe usb-storage &&
        modprobe sd_mod &&
        sleep 7
        mountr $root
        ;;
    ata*)
        loadmod ata_ ahci pdc_adma &&
        modprobe sd_mod &&
        mountr $root
        ;;
esac

# Make sure that init exists and is executable.
if [ -x /mnt/sbin/init ]; then
  mount --move /dev /mnt/dev
  mount --move /proc /mnt/proc
  mount --move /sys /mnt/sys
  umount /tmp

# Start init from the root filesystem.
  cd /mnt
  [ -f /media/updates.zip ] && unzip -o /media/updates.zip
  case $boot in
    cdrom)
      [ $root = /dev/ram ] && umount /media
      [ $RUNLEVEL ] || RUNLEVEL=3
      ;;
    loop | ram)
      umount /media
      [ $RUNLEVEL ] || RUNLEVEL=3
      ;;
    *)
      [ $RUNLEVEL ] || RUNLEVEL=5
      ;;
  esac
  [ -d initrd ] && pivot_root . initrd
  exec chroot . /sbin/init $RUNLEVEL
fi

# Start a shell as a last resort.
echo "Error booting from the root filesystem. Starting a shell."
exec /bin/dash
The following are examples of boot parameters that can be used with my init script.
- Boot Linux from the local hard drive partition /dev/sda8
boot=ata root=/dev/sda8
- Boot Linux from the latest squashfs file (*.sq*) on /dev/sda1
boot=loop root=/dev/sda1
- Boot Linux from the CD-ROM with 1024x768 video resolution
boot=cdrom vmode=1024x768
- Copy the squashfs image from CD-ROM into memory and run Linux on memory
boot=cdrom root=/dev/ram ramdisk_size=573440 vmode=800x600
- Boot Linux from the second partition of a USB drive
boot=usb root=/dev/sda2
Also read:
Labels:
bootstrap,
linux,
technology


Wednesday, September 26, 2012
Using UnionfsFuse on Debian/Ubuntu Linux
Unionfs-fuse is a user-space implementation of unionfs that makes it possible to run Linux over a read-only medium, such as CD-ROM. Unionfs-fuse is a convenient alternative to kernel implementations (unionfs, aufs and overlayfs), so users don't have to patch the kernel in order to try unionfs. There are many possible uses of unionfs:
- Create a live CD
- Run Linux from a read-only filesystem image, such as a squashfs file
- Freeze an existing Linux system and save all changes in the memory
Unionfs achieves all this by merging a read-only filesystem and a writeable filesystem into a single virtual filesystem and mount it at a certain mount point. Let's try and apply unionfs-fuse to the third situation above. Basically, we need to create an initramfs file containing unionfs-fuse and a custom init script. The basic procedure is like this:
- Load kernel drivers necessary to access the underlying storage device
- Mount the read-only filesystem image at /opt
- Mount tmpfs at /opt/tmp and create a directory /opt/tmp/.change
- Use unionfs-fuse to merge the two and mount it at /mnt
- Use chroot and start /sbin/init to boot the new unionfs filesystem
To carry about the above steps, an init script might look like this:
#!/bin/dash
# Use the small but functional dash to process this script

# Mount /proc, /sys, /dev and /dev/pts just in case
mount -t proc none /proc
mount -t sysfs none /sys
mount -t devtmpfs none /dev
mkdir -m 755 /dev/pts
mount -t devpts -o gid=5,mode=620 none /dev/pts

# Write commands here to load modules necessary to access a hard drive
modprobe pata_via
modprobe sd_mod

# Mount the Linux filesystem read-only at /opt
mount -r /dev/sda6 /opt

# Mount tmpfs at /opt/tmp
mount -t tmpfs none /opt/tmp
mkdir /opt/tmp/.change

# Create a unionfs mount at /mnt
modprobe fuse
unionfs-fuse -o allow_other,use_ino,suid,dev,nonempty,kernel_cache \
   -o cow,chroot=/opt,max_files=32768 /tmp/.change=RW:/=RO /mnt

# Make sure that init exists and is executable
if [ -x /mnt/sbin/init ]; then
  mount --move /dev /mnt/dev
  mount --move /proc /mnt/proc
  mount --move /sys /mnt/sys

# Start init from the root filesystem with runlevel 5.
  exec chroot /mnt /sbin/init 5
fi
The computer will boot into a virtual unionfs, consisting of writable tmpfs on top of read-only root filesystem. Make sure to modify /etc/rc.local so that it contains the following snippet of code.
for i in `ps ax | grep unionfs | grep -v grep | awk '{print $1}'`; do
  echo $i > /var/run/sendsigs.omit.d/unionfs.$i;
done
This prevents Linux from killing unionfs-fuse during shutdown so the system will properly shut down.
Related Posts
To Build Transmission-Daemon for Windows

Transmission is a free bittorrent application available on Linux. It is a pretty neat tool compared to other bittorrent software. It is possible to compile and use Transmission on Windows, thanks to Cygwin. First, install Cygwin using the Cygwin installer(setup.exe). I set the Root directory to C:\Cygwin and chose to install the following packages in addition to base packages.
- bison
- gettext-devel
- libtool
- make
- binutils
- gcc4-g++
- patch
- pkg-config
Compile zlib.
./configure --prefix=/usr --static
make
cp -iv zconf.h zlib.h /usr/include
cp -iv libz.a /usr/lib
Build OpenSSL.
./Configure -DHAVE_STRUCT_TIMESPEC -lz -lpthread threads zlib --prefix=/usr cygwin
make
make install
Build CURL.
./configure --prefix=/usr --disable-shared --with-ssl --with-ca-bundle=ca-bundle.crt
make
make install
Compile libevent.
./configure --prefix=/usr --disable-shared
make
make install
Lastly, build transmission.
./configure --prefix=/usr --disable-shared --enable-static --disable-nls --without-gtk CPPFLAGS=-DHAVE_STRUCT_TIMESPEC
make
make install
If you get snprintf error with libutp, insert the following line into utp.cpp:
extern int snprintf(char *, size_t, const char *, ...);
Labels:
bittorrent,
cygwin,
download,
open-source,
software
Saturday, September 22, 2012
To Compile UnionFS-fuse 0.26 on Debian Linux
I am trying to switch to unionfs-fuse for my live CD, but so far I haven't much success yet. Debian's unionfs-fuse package in Sid is outdated (version 0.24), so I compiled version 0.26. I had to install libfuse-dev in order to be able to build UnionFS-fuse. I probably needed cmake too, but I didn't choose to install cmake.
- cmake
- gcc
- libfuse-dev
- make
I edited Makefile to change PREFIX.
PREFIX=/usr
BINDIR=/bin
SBINDIR=/sbin
I just typed make to begin compilation.
make
make install
The following files are installed.
/usr/bin/unionfs
/usr/sbin/mount.unionfs
/usr/share/man/man8/unionfs-fuse.8
To make it compatible with Debian and derivatives, I renamed unionfs.
mv /usr/bin/unionfs /usr/bin/unionfs-fuse
Labels:
compile,
Debian,
linux,
open-source,
software
Friday, September 21, 2012
Thursday, September 20, 2012
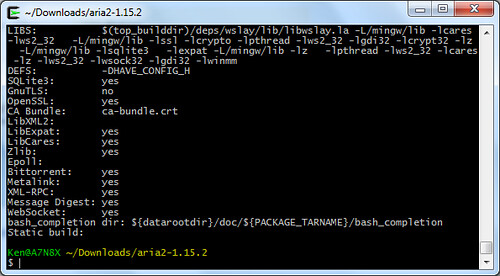
Download Aria2 1.15.2

Here you can download my Windows builds of aria2. This is the result of my previous post on how to build aria2 for Windows.
I didn't expect my Windows build to depend on libstdc++-6.dll. I think that's because I used Cygwin's mingw64 compiler. It still works, though.
Aria2c Usage
aria2c --file-allocation=prealloc ftp://192.168.1.64/pardus.iso
If aria2 aborts a download due to a connection error, you can resume the download any time using aria2c like this:
aria2c -c ftp://192.168.1.64/pardus.iso
To download files from URL's written in a file urls.txt to a folder Downloads, run aria2 as follows. The urls.txt should contain one download per line with URL's seperated by a tab:
aria2c -i urls.txt -d Downloads
Compile Aria2 1.15.2 with MinGW
Aria2 is a command-line download utility. It can be used to download files quickly from http(s), ftp, bittorrent, magnet and metalink locations. I prefer this handy tool over other programs, such as Free Download Manager and Frostwire because it's lean, fast and full of features. It took me a couple of days to compile Aria2 with all the features available. The following step-by-step guide will help you build your own aria2 program (aria2c.exe) the way I did.
- Install MinGW
Follow one of the following guides to install MingW:
- POSIX Threads
Download the source for Pthreads library (pthreads-w32-2-9-1-release.tar.gz) and compile it like this:
make clean GC-static
cp pthread.h semaphore.h sched.h /mingw/include/
cp libpthreadGC2.a /mingw/lib/libpthread.a - zlib
Zlib is needed by the OpenSSL library below. Download the zlib source and compile it like this:
make -f win32/Makefile.gcc
make -f win32/Makefile.gcc install BINARY_PATH=/mingw/bin INCLUDE_PATH=/mingw/include LIBRARY_PATH=/mingw/lib - OpenSSL
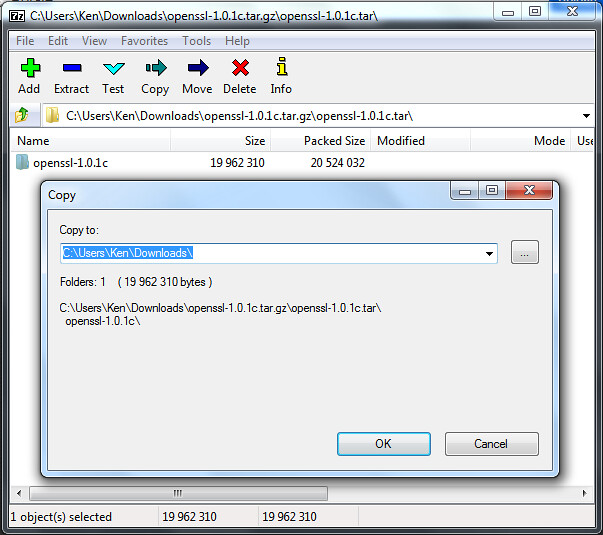
Aria2 requires either GnuTLS or OpenSSL for secure transfers. In this guide, OpenSSL is chosen over GnuTLS. Use 7-zip to unpack the tarball because it contains symbolic links.
./Configure -DHAVE_STRUCT_TIMESPEC -DPTW32_STATIC_LIB -L/mingw/lib -lz -lpthread -lws2_32 --prefix=/mingw threads zlib mingw
make
make install
Expat
Aria2 can use either LibXML2 or Expat for XML parsing. In this guide, Expat will be used. Download the expat source and compile expat like this:
./configure --build=i686-w64-mingw32 --prefix=/mingw --disable-shared --enable-static
make
make install
C-Ares
C-Ares is a C library that performs DNS requests and resolves DNS names asynchronously. Download the C-ares source from c-ares.haxx.se and unpack it. Then, compile C-Ares as follows:
./configure --build=i686-w64-mingw32 --prefix=/mingw --disable-shared CPPFLAGS='-I/mingw/include -DCARES_STATICLIB'
make
make install
SQLite 3
Download the SQLite source (sqlite-amalgamation-3071300.zip) and build SQLite 3:
gcc -O2 -DNDEBUG=1 -DTHREADSAFE=1 -c *.c
ar ru /mingw/lib/libsqlite3.a sqlite3.o
cp -iv *.h /mingw/include
Create sqlite3.pc and put it in /mingw/lib/pkgconfig.
prefix=/mingw
exec_prefix=${prefix}
libdir=${exec_prefix}/lib
includedir=${prefix}/include

Name: SQLite
Description: SQL database engine
Version: 3.5

Libs: -L${libdir} -lsqlite3
Cflags: -I${includedir}
aria2c
Finally, we are ready to compile Aria2. Download the Aria2 source from aria2.sf.net and unpack the source. Then, configure aria2 as follows:
./configure --build=i686-w64-mingw32 --prefix=/mingw --enable-threads=posix --with-ca-bundle=ca-bundle.crt --disable-nls LIBS='-lpthread -lws2_32 -lcares -lz' CPPFLAGS='-DPTW32_STATIC_LIB -DCARES_STATICLIB'
Then, issue the following commands to compile Aria2:
make
make install- Optionally, strip and compress the executable aria2c.exe.
strip aria2c.exe
upx --best --strip-relocs=0 aria2c.exe
To download my Windows builds of aria2, go here.
Aria2c Usage
aria2c --file-allocation=prealloc ftp://192.168.1.64/pardus.iso
If aria2 aborts a download due to a connection error, you can resume the download any time using aria2c like this:
aria2c -c ftp://192.168.1.64/pardus.iso
To download files from URL's written in a file urls.txt to a folder Downloads, run aria2 as follows. The urls.txt should contain one download per line with URL's seperated by a tab:
aria2c -i urls.txt -d Downloads
Wednesday, September 19, 2012
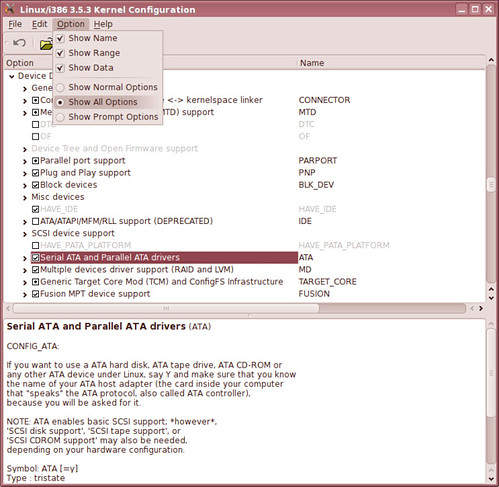
To Compile Linux Kernel 3.5.4
It's been a long time since I compiled a Linux kernel last time. The last one I built was version 3.1.4 on December 3, 2011. I need to build a new kernel so that my Linux system is kept up-to-date. In order to compile a kernel, I made sure that all the necessary packages were installed.
- binutils
- gcc & g++
- libglade2-dev, libqt3-mt-dev or libqt4-dev
- make
- module-init-tools
- patch
- pkg-config
I downloaded the kernel source from kernel.org and unpacked the kernel source package.
tar xjf linux-3.5.4.tar.bz2
cd linux-3.5.4
I copied the config-* file of my current kernel to the kernel source tree and renamed it to .config. This makes kernel configuration easier because I only need to set the values for new kernel settings.
cp /boot/config-3.1.4 .config
If you can't find your current kernel config at /boot, you'll find a copy at /proc.
zcat /proc/config.gz > .config
Type one of the following commands to start configuring the kernel.
- If libglade2-dev is installed:
make gconfig
- If libqt3-mt-dev or libqt4-dev is installed:
make xconfig
When you finish configuring the kernel, save the changes by selecting File, Save. To see what changes you made, try the following command:
diff -ub .config.old .config
Optionally, open Makefile with an editor and define EXTRAVERSION if necessary.
VERSION = 3
PATCHLEVEL = 5
SUBLEVEL = 4
EXTRAVERSION = -586mmx
It is useful to set EXTRAVERSION when you are building different kernels for several CPU types. Now let's compile the kernel.
make bzImage
make modules
make install
make modules_install
depmod -e -m -F /boot/System.map-3.5.4 3.5.4
Set the default root device and ramdisk size for the new kernel.
cd /boot
rdev vmlinuz-3.5.4 1,0
ramsize vmlinuz-3.5.4 4096
Here's my config for kernel 3.5.4 if you need it. Make sure to change the processor family to suit your computer before building the kernel.
Also read:
Setting up MinGW64 with Cygwin
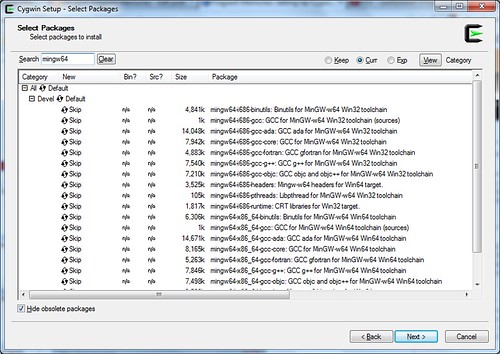
This is just another version of my previous post on Cygwin with focus on MinGW64. I hope this guide will more or less make it easy to install MinGW on Windows. After following this guide, you'll be ready to develop genuine Windows applications. Just download and run setup.exe from the Cygwin website and choose the following packages.
- bison
- gettext-devel
- libtool
- make
- mingw64-i686-gcc-g++
- mingw64-x86_64-gcc-g++
- patch
- pkg-config
To select a package for installation, type the name of the package in the Search box, expand the category by clicking the + sign, and click on the package until its version number shows up.
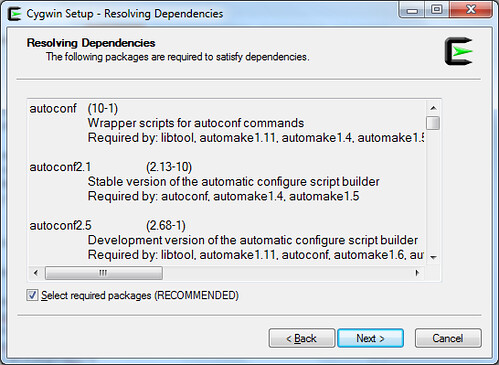
When you see the Resolving Dependencies window, just accept and click Next.
Mounting /mingw
If you're building 32-bit applications, add the following line to /etc/fstab so that /mingw is properly set up.
/usr/i686-w64-mingw32/sys-root/mingw /mingw none bind
If you're building 64-bit applications, add the following line to /etc/fstab instead.
/usr/x86_64-w64-mingw32/sys-root/mingw /mingw none bind
Creating Symbolic Links
Start the Cygwin terminal and create symbolic links to gcc and g++ in this manner.
ln -s /usr/bin/i686-w64-mingw32-gcc.exe /usr/i686-w64-mingw32/bin/gcc.exe
ln -s /usr/bin/i686-w64-mingw32-g++.exe /usr/i686-w64-mingw32/bin/g++.exe
ln -s /usr/bin/x86_64-w64-mingw32-gcc.exe /usr/x86_64-w64-mingw32/bin/gcc.exe
ln -s /usr/bin/x86_64-w64-mingw32-g++.exe /usr/x86_64-w64-mingw32/bin/g++.exe
Setting up environment variables
If you're building 32-bit applications, type the following commands or put them in ~/.profile:
export CC=/usr/bin/i686-w64-mingw32-gcc.exe
export CFLAGS="-mtune=pentium2 -mthreads -mms-bitfields -O2"
export CXXFLAGS="-mtune=pentium2 -mthreads -mms-bitfields -O2"
export CPPFLAGS="-I/mingw/include"
export LDFLAGS="-L/mingw/lib -Wl,--enable-auto-image-base -Wl,--enable-auto-import -Wl,--enable-runtime-pseudo-reloc"
export PATH=/mingw/bin:/usr/i686-w64-mingw32/bin:/usr/local/bin:/usr/bin
export PKG_CONFIG_PATH=/mingw/lib/pkgconfig
If you're building 64-bit applications, type the following or put in ~/.profile:
export CC=/usr/bin/x86_64-w64-mingw32-gcc.exe
export CFLAGS="-mtune=core2 -mthreads -mms-bitfields -O2"
export CXXFLAGS="-mtune=core2 -mthreads -mms-bitfields -O2"
export CPPFLAGS="-I/mingw/include"
export LDFLAGS="-L/mingw/lib -Wl,--enable-auto-image-base -Wl,--enable-auto-import -Wl,--enable-runtime-pseudo-reloc"
export PATH=/mingw/bin:/usr/x86_64-w64-mingw32/bin:/usr/local/bin:/usr/bin
export PKG_CONFIG_PATH=/mingw/lib/pkgconfig
For more information on possible -mtune values, look here.
Labels:
coding,
cygwin,
development,
mingw,
mingw64,
software,
technology,
windows
Monday, September 17, 2012
Quick 2011 with English/Spanish/Turkish/Arabic Subtitle
Quick is a Korean action movie that delivers thrilling action and speedy storyline.
With English subtitles
Quick.2011.part1 by wagamit1
Quick.2011.part2 by wagamit1
Quick.2011.part3 by wagamit1
Quick.2011.part4 by wagamit1
Quick.2011.part5 by wagamit1
Quick.2011.part6 by wagamit1
Quick.2011.part7 by wagamit1
With Arabic Subtitle
With Turkish Subtitle
Quick.2011.sa-rang-001.yeppudaa by onerepulic
Quick.2011.sa-rang-002.yeppudaa by onerepulic
With Spanish Subtitle
[Peliculas Coreanas] Quick 2011 (Divertidisima)
How to Compile libssh2 for Windows with MinGW
libssh2 is a client-side C library implementing the SSH2 protocol, according to the definition on libssh2.org. I am compiling libssh2 because it enables me to build applications for transferring files securely between Unix/Linux sites and Windows machines. Although there seems to be a way to build libssh2 with Visual Studio, this post focuses on using MinGW. If you haven't set up MinGW yet, just follow one of these posts on how to install MinGW.
First, I compiled zlib. I downloaded zlib source code from zlib.net, unpack the tarball, and typed the following commands:
make -f win32/Makefile.gcc
make install -f win32/Makefile.gcc BINARY_PATH=/mingw/bin INCLUDE_PATH=/mingw/include LIBRARY_PATH=/mingw/lib
Then, I compiled OpenSSL as shown in this post. For your information, libgcrypt can be used instead of OpenSSL (See this post). I typed the following commands to build OpenSSL.
./Configure -DHAVE_STRUCT_TIMESPEC -L/mingw/lib -lz -lws2_32 --prefix=/mingw zlib mingw
make
make install
I downloaded the latest libssh2 tarball from libssh2.org and unpacked it. I typed the configure as follows:
./configure --prefix=/mingw --with-libz --with-openssl --disable-examples-build
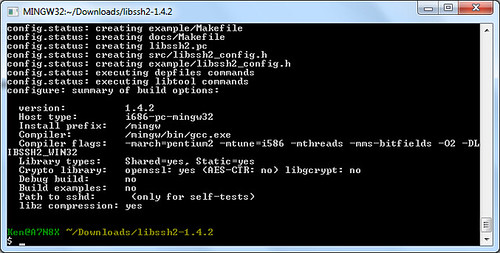
Then, I typed make.
make
make install
Somehow, only the static library was generated, but that's okay. I think that's because openssl was only compiled statically.
Labels:
cross-compiler,
mingw,
open-source,
porting,
software
Saturday, September 15, 2012
The Man from Nowhere - 아저씨 [Eng SUB]
The Man from Nowhere is a pretty well-made Korean action movie that has set the new standard for violence in Korean films but also manages to touch the emotional side of the viewers. The movie tells the story of a reclusive former special-ops agent who becomes attached to a neighbor girl and gets himself involved with cold-blooded Korean underground gangs in a bid to save the girl. The fighting scenes are brutal and realistic, and there are some nasty scenes with the criminals doing business, so viewer discretion is recommended. Other than that, the storyline is well structured and the flow is flawless. Overall, most viewers will like the movie.
Friday, September 14, 2012
Movie that enraged Muslims around the World
I was curious what on earth caused Muslims around the world to be mad and attack American embassies lately. It turns out that a movie has been made in the United States that makes fun of prophet Mohammed and the whole religion of Islam. The movie trailer is still on YouTube. Here's the movie snippet that's highly controversial and provocative even in the eyes of non-Muslims.
Halfway along the film, I wondered who in his right mind would think of making such a provocative movie. Indeed, there are several clues in the movie that hint on the movie's motive and its messages. The movie is boldly mocking Mohammed and depicts Islam as violent, immoral religion. Obviously, the movie is intended to ridicule and provoke Muslims and their religion. The movie questions the way Islam forced conversion of non-Muslims to the its religion.
I have to say the movie producer is outright bold and gutsy whoever he is. But I don't know who'll ever enjoy watching the movie other than hatemongers.
Thursday, September 13, 2012
Compile xz for Windows using MinGW
xz is the new popular compression format. To build xz tools and libraries, I issued the following commands.
./configure --prefix=/mingw --disable-shared --disable-nls --disable-lzma-links --disable-scripts
make
make install
I got the following files:
lzmadec.exe
lzmainfo.exe
unxz.exe
xz.exe
xzcat.exe
xzdec.exe
Note that xz can be used to create and decompress lzma files also.
Labels:
compression,
mingw,
open-source,
software
Wednesday, September 12, 2012
Compile libcddb for Windows
libcddb is used to query for information about audio Compact Discs that has been loaded in media players and CD rippers. Compiling libcddb is not so hard with MinGW.
First, I installed MinGW. I compiled zlib and libiconv.
Then, I compiled libcdio. I downloaded the latest development source from its git web server.
./autogen.sh
./configure --prefix=/mingw
make
make install
I compiled libcddb like this:
./configure --prefix=/mingw
make
make install
Labels:
cross-compiler,
mingw,
music,
open-source,
ripping,
software
FLAC for Windows

FLAC, short for Free Lossless Audio Codec, is an audio format similar to MP3, but lossless. Thus, audio compressed in FLAC has no loss in quality. With digital storage getting cheaper everyday, it makes sense to copy or preserve sound in the near-perfect quality. I'm compiling FLAC with MinGW because it's needed by some programs I want to build.
I installed MinGW, of course. I also instaled NASM because it was suggested during configure. I just downloaded yasm-1.2.0-win32.exe and renamed it as nasm.exe.
I think it's not necessary, but I compiled zlib and libiconv.
I built OGG.
./configure --prefix=/mingw
make
make install
Then, I built FLAC.
./configure --prefix=/mingw --enable-sse
The --enable-sse option is for SSE-capable CPU's which mean nearly all new desktop CPU's today. I began
make.make
I got errors about SIZE_T_MAX. To fix it, I just changed the line 38 in flac-1.2.1/include/share/alloc.h
# if defined _MSC_VER || defined __MINGW32__
I got another error compiling examples/cpp/encode/file/main.cpp. To fix it, I inserted the following line after <stdlib.h> on line 33.
#include <string.h>
I got no more error. I installed flac.
make install
Labels:
codec,
cross-compiler,
encoder,
mingw,
software
Tuesday, September 11, 2012
Kung Fu Hustle (2004) 功夫
Kung Fu Hustle is a funny but memorable movie from Hong Kong star Stephen Chow. If you haven't seen it yet, here's your chance to watch the movie.
And the one below is the original Chinese version with English subtitles.
Great Workout Videos
I found some great workout videos on the Web that will help you tone your body. I hope you enjoy these videos.
5 Killer Workout Routins!
Crazy 3 Min Home Abs Workout
Get 6-pack Abs in 12 minutes
How To Work On Your Six Pack At Home
How To Get Abs In One Week
Ab Exercises For Ripped Abs
Get 6 Pack Abs in 6 minutes on your couch
Here's one exercise that requires the use of a couch.
Note that I don't own any of the videos, and the copyrights belong to respectful owners.
Compile libRTMP with MinGW

The libRTMP library provides online multimedia streaming support for many open-source projects, such as ffmpeg and curl. I am building librtmp for use with ffmpeg and mplayer. I downloaded the latest release tarball from here.
First, I compiled zlib as shown in this post.
make -f win32/Makefile.gcc
cp -iv zlib1.dll /mingw/bin
cp -iv zconf.h zlib.h /mingw/include
cp -iv libz.a /mingw/lib
cp -iv libz.dll.a /mingw/lib
Then, I built OpenSSL as shown in this post.
./Configure -DHAVE_STRUCT_TIMESPEC -L/mingw/lib -lz -lpthreadGC2 -lws2_32 --prefix=/mingw threads zlib mingw
make
make install
Then, I built librtmp.
make SYS=mingw
cp -iv *.exe /mingw/bin
To build the shared library, I typed:
cd librtmp
gcc -shared -o librtmp.dll -Wl,--out-implib,librtmp.dll.a rtmp.o log.o amf.o hashswf.o parseurl.o -lssl -lcrypto -lz -lws2_32 -lwinmm -lgdi32
To install librtmp, I typed the following:
cp -iv librtmp.dll /mingw/bin
cp -iv amf.h http.h log.h rtmp.h /mingw/include/librtmp
cp -iv librtmp*.a /mingw/lib
cp -iv librtmp.pc /mingw/lib/pkgconfig
Sometimes, librtmp.pc fails to be generated. In that case, make it yourself and copy it to /mingw/lib/pkgconfig.
prefix=/mingw
exec_prefix=${prefix}
libdir=${exec_prefix}/lib
incdir=${prefix}/include/librtmp

Name: librtmp
Description: RTMP implementation
Version: 2.3
Requires: openssl libcrypto
URL: http://rtmpdump.mplayerhq.hu
Libs: -L${libdir} -lrtmp -lz
Libs.private: -lws2_32 -lwinmm -lgdi32 -lssl -lcrypto
Cflags: -I${incdir}
Labels:
cross-compiler,
mingw,
multimedia,
open-source,
software,
streaming
Monday, September 10, 2012
Build OpenSSL with MinGW

OpenSSL is an open-source library that provides cryptographic and network security functions. It is used by so many open-source software that require SSL/TLS support. To build OpenSSL for Windows, first install MinGW. There are two flavors of MinGW: mingw and mingw64. Just pick one of the following and set it up accordingly:
Then, download the latest source tarball from the OpenSSL website and unpack it with 7-zip. 7-zip should be used because MinGW/MSYS tar has trouble with tarballs containing symlinks. However, cygwin has no problem with tarballs containing symlinks.
OpenSSL optionally incorporates the following libraries when found.
Assuming that you compiled both zlib and pthread as shown in the above links, configure OpenSSL like this.
./Configure -DHAVE_STRUCT_TIMESPEC -DPTW32_STATIC_LIB -L/mingw/lib -lz -lpthreadGC2 -lws2_32 --prefix=/mingw threads zlib mingw
Then, run make.
make
If you run into errors compiling some test codes, just copy dummytest.c over. However, it doesn't happen under Cygwin.
cp -iv test/dummytest.c test/md2test.c
cp -iv test/dummytest.c test/rc5test.c
cp -iv test/dummytest.c test/jpaketest.c
Then, install OpenSSL.
make install
Labels:
cross-compiler,
mingw,
network,
open-source,
security,
software
To Build the Live555 library with MinGW
The Live555 streaming media library is an open-source implementation of RTP/RTCP/RTSP/SIP multimedia streaming protocols. I mainly use it with MPlayer. To compile it with MinGW, download the source for live555 library and extract the tarball under /mingw/lib:
cd /mingw/lib
tar xzvf live555-latest.tar.gz
cd live
compile it like this:
./genMakefiles mingw
make
Live555 and MPlayer
Normally, mplayer will detect the live555 library automatically. If not, append --enable-live to the ./configure command.
- Append the following text to CXXFLAGS= line.
-I/mingw/lib/live/liveMedia/include -I/mingw/lib/live/UsageEnvironment/include -I/mingw/lib/live/BasicUsageEnvironment/include -I/mingw/lib/live/groupsock/include
- Append the following text to EXTRALIBS= line.
/mingw/lib/live/liveMedia/libliveMedia.a /mingw/lib/live/UsageEnvironment/libUsageEnvironment.a /mingw/lib/live/BasicUsageEnvironment/libBasicUsageEnvironment.a /mingw/lib/live/groupsock/libgroupsock.a -lstdc++
Creating a Shared Library for live555
To create a shared library from the static live555 libraries, I ran the following command:
gcc -shared -o livemedia.dll -Wl,--out-implib,liblivemedia.dll.a -Wl,--whole-archive liveMedia/libliveMedia.a UsageEnvironment/libUsageEnvironment.a BasicUsageEnvironment/libBasicUsageEnvironment.a groupsock/libgroupsock.a -Wl,--no-whole-archive -lstdc++ -lws2_32
I got livemedia.dll and liblivemedia.dll.a. I copied these files under MinGW.
cp -iv livemedia.dll /mingw/bin
cp -iv liblivemedia.dll.a /mingw/lib
To use these files, I would define environment variables as follows:
CXXFLAGS='-I/mingw/lib/live/liveMedia/include -I/mingw/lib/live/UsageEnvironment/include -I/mingw/lib/live/BasicUsageEnvironment/include -I/mingw/lib/live/groupsock/include'
LIBS='-lstdc++ /mingw/lib/liblivemedia.dll.a'
Labels:
cross-compiler,
Internet,
live555,
mingw,
mplayer,
multimedia,
open-source,
software,
streaming
Sunday, September 9, 2012
Hilariously Awesome Martial Arts Classic: The Story of Ricky (电影: 力王)
Do you like classic horror movies or a Chinese kung-fu movie? Then, you may like the Hong Kong movie, “Ricki Oh: the Story of Ricky.” It's got both: blood and gore, and awesome kung fu. The fight scenes are gross and brutal like Kill Bill, but otherwise have outrageously cool kung-fu moves. However, I warn that some viewer discretion is advised.
Here's the same movie in Mandarin Chinese.
Saturday, September 8, 2012
Building MPlayer and Mencoder for Windows

MPlayer is one of my favorite media players. It is used with a frontend like smplayer, gnome-mplayer and MPlayerGUI to provide a good alternative to Windows Media Player. Although there are already several Win32 builds of MPlayer on the net, I like to build MPlayer on my own using MinGW compiler because I want to optimize my build for my CPU. So I installed MinGW and compiled MPlayer as follows.
Build ffmpeg statically or dynamically as shown in this post.
- (Optional) Compile the lzo library:
./configure --prefix=/mingw && make && make install
(Optional) Fribidi is a rendering library for right-to-left scripts, such as Arabic and Hebrew. If you are a speaker of such right-to-left languages, compile fribidi statically as shown below:
./configure --prefix=/mingw --disable-shared --disable-debug
make
make install
More information can be found here.
- Download JPEG source from ijg.org and complie JPEG:
./configure --prefix=/mingw --enable-static
make
make install - Compile libPNG:
./configure --prefix=/mingw --disable-shared
make
make install - Compile libiconv, Freetype, expat and fontconfig statically in that order:
./configure --prefix=/mingw --disable-shared
make install - Compile libdca:
./configure --prefix=/mingw
make
make install - (Optional) Download DirectX headers from any of the following locations and unpack them in /mingw/include:
- http://www.videolan.org/vlc/dx7headers.tgz
- http://www.mplayerhq.hu/MPlayer/contrib/win32/dx7headers.tgz
- http://www.videolan.org/vlc/dx7headers.tgz
- Download the latest mplayer source (mplayer-export-snapshot.tar.bz2) and unpack it. (patch 1 and patch 2)
tar xjvf mplayer-export-snapshot.tar.bz2
cd mplayer-export-2010-02-07/
Then, run
./configure:CPPFLAGS='-DFRIBIDI_ENTRY="" ' ./configure --prefix=/mingw --enable-runtime-cpudetection --enable-static --enable-theora --enable-fribidi --disable-ffmpeg_a --disable-gl --disable-vidix --yasm=/mingw/bin/yasm --extra-libs='-lfribidi'
The CPPFLAGS value allows fribidi to be linked statically.
- Build Mplayer:
make
After successful build, strip the executables:
strip m*.exe
Optionally, compress the executables with upx:
upx --best --strip-relocs=0 mplayer.exe
upx --best --strip-relocs=0 mencoder.exe
Download MPlayer codecs from here. The MPlayer codecs for Windows platform has a filename like windows-essential-20071007.zip. Extract the codecs package and you'll get a folder "windows-essential-20071007". Rename it as "codecs" and move the "codecs" folder inside where mplayer.exe file is located.
Make sure that HOME environment variable is set to your personal folder(for example, C:\Users\Jocelyn). Upon the first run of mplayer, a new folder named
mplayerwill be created in your HOME folder. Copy codecs.conf to themplayerfolder. The "config" file stores default options for playing movie files. Open the "config" file and make changes as follows:# Write your default config options here!
cdrom-device=D:
dvd-device=D:
ao=dsound
vo=direct3d
font=C:\WINDOWS\FONTS\MALGUN.TTF
framedrop=yes
subcp=cp949
My win32 build of mplayer can be downloaded from here. It is recommended that the zip archive should be extracted in C:\Program Files.
Running MPlayer
Now, let's try mplayer. First, get a movie file ready. In the Command Prompt, type a command in the following form:
mplayer mymoviefile.avi
Alternatively,
mplayer -vo direct3d -ao win32 -font C:\WINDOWS\FONTS\Tahoma.ttf -framedrop mymoviefile.avi
A new window will pop up with the movie playing inside it.
The next step is to get and set up SMPlayer.
Friday, September 7, 2012
Building cdrkit for Windows
 cdrkit is another CD/DVD burning tool that was spun off from the cdrtools project. Some say cdrkit is inferior to cdrtools, but I haven't found a problem with cdrkit yet. Although I prefer cdrtools to cdrkit, I'd like to give cdrkit a try. To build cdrkit with MinGW, I had to compile some libraries first.
- zlib
First, I compiled zlib:
tar xzvf zlib-1.2.7.tar.gz
cd zlib-1.2.7
make -f win32/Makefile.gcc
cp -iv zlib1.dll /mingw/bin
cp -iv zconf.h zlib.h /mingw/include
cp -iv libz.a /mingw/lib
cp -iv libz.dll.a /mingw/lib - POSIX threads for Win32
New genisoimage seems to use pthread for making checksums. I compiled pthread like this:
make clean GC
cp -iv pthreadGC2.dll /mingw/bin
cp -iv pthread.h semaphore.h sched.h /mingw/include/
cp -iv libpthreadGC2.a /mingw/lib
cp -iv libpthreadGC2.a /mingw/lib/libpthread.a - PCRE
Then, I compile PCRE:
./configure --prefix=/mingw --enable-pcre16 --enable-unicode-properties
make
make install
cp /mingw/include/pcreposix.h /mingw/include/regex.h
cp /mingw/lib/libpcreposix.a /mingw/lib/libregex.a
cp /mingw/lib/libpcreposix.dll.a /mingw/lib/libregex.dll.a - libmagic
I built the open-source file command. I configured it like this:
./configure --prefix=/mingw
Then, I added the following lines to
config.h:#define WIN32 1
#define MAGIC "magic"Compile libmagic:
make && make install
I got an error trying to build file.exe, so I modified src/Makefile:
file_LDADD = libmagic.la /mingw/lib/libpcreposix.dll.a
- libiconv
I built libiconv like this:
./configure --prefix=/mingw
make
make install - CMake
Then, I built CMake.
./bootstrap --prefix=/mingw
make
make install - cdrkit
I unpacked the cdrkit source and applied the patch that I found at the mailing list. Here are the modified patches of mine.
I used the command below to applied the patch.
patch -p1 -l < ../cdrkit-1.1.9-mingw.patch
Then, I compiled cdrkit:
cmake -G "MSYS Makefiles"
make
After successful build, I copied the executable files (*.exe) to my folder.
Issues and Fixes
I got an error linking genisoimage. I edited genisoimage/CMakeLists.txt to resolve the issue:
IF(USE_MAGIC)
 ADD_DEFINITIONS(-DUSE_MAGIC)
 LIST(APPEND EXTRA_LIBS "shlwapi")
 SET(MAGICLIBS magic)
ENDIF(USE_MAGIC)
I got errors compiling sha256.* and sha512.*. I made the following changes.
- I removed all lines that read #include <endian.h>.
- Assume the target machine is little endian.
- change all occurrences of
__THROWto__attribute__ ((__nothrow__)).
- I removed all lines that read #include <endian.h>.
The code in genisoimage/checksum.c gave me errors linking with pthread-w32. To fix it, I replaced
a->threadwith(a->thread).p.I found that genisoimage and readom still used
/dev/null. I changed it toNULin genisoimage.c and readom.c.
Download my cdrkit Build
 Here's my cdrkit build for Windows.
Related Links
Thursday, September 6, 2012
Building cdrtools under Cygwin

cdrtools is a powerful open-source CD/DVD/BD burning tool. It is used as backend software for free DVD-burning applications, such as Infrarecorder and cdrtfe. To build cdrtools for Windows, install Cygwin as shown in this post. Additionally, I installed the following Cygwin packages.
- bison
- gcc4-core
- gcc4-g++
- gettext-devel
- libiconv
- libtool
- make
- patch
- pkg-config
I set up some environment variables before I started.
export CC=/usr/bin/gcc.exe
export CC_OPT="-O2"
export CFLAGS="-march=pentium2 -mtune=i586 -mthreads -mms-bitfields"
export LDFLAGS="-L/usr/lib -Wl,--enable-auto-image-base -Wl,--enable-auto-import -Wl,--enable-runtime-pseudo-reloc"
Then, I built smake.
cd smake-1.2
make
make INS_BASE=/usr install
Then, I built cdrtools.
smake
smake INS_BASE=/usr install
Using cdrtools
I tested my cdrtools build. To create an ISO file from a folder, I ran mkisofs:
mkisofs -J -R -hide-rr-moved ~/Downloads > dl.iso
To burn an ISO:
cdrecord -scanbus
cdrecord dev=0,0,0 speed=8 driveropts=burnfree dl.iso
To make a copy of a data CD:
readcd dev=0,0,0 f=dl2.iso speed=8 retries=16 -nocorr -noerror
To scan a music CD, I ran cdda2wav:
cdda2wav -scanbus
cdda2wav dev=0,0,0 cddb=1 -cddbp-server=freedb.freedb.org -cddbp-port=8880 -J -N
To rip the second track of the music CD:
cdda2wav dev=0,0,0 cddb=1 track=2 ~/Music/track2.wav
Download my cdrtools build for Windows
Here you can get my cdrtools build.
Free cdrtools Graphical Interfaces for Windows
If you don't want to deal with the command line, there are, of course, user-friendly GUI frontends for cdrtools.
Related Links
Labels:
cross-compiler,
cygwin,
development,
dvd,
porting,
software,
windows
Wednesday, September 5, 2012
Compiling CMake with MinGW
CMake is a portable build system. CMake can be used to replace the traditional GNU build process, as in:
./configure
make
make install
Compiling CMake is fairly simple. After you install MinGW (as shown in this post), download and unpack the CMake source tarball. Run the following commands in order.
tar xzvf cmake-2.8.9.tar.gz
cd cmake-2.8.9
./bootstrap --prefix=/mingw
make
make install
Labels:
cmake,
development,
open-source,
software,
technology
To Compile ffmpeg with MinGW
ffmpeg is an important component of many open-source projects, such as MPlayer and VLC. I am compiling ffmpeg so that I can use it to transcode multimedia files. This guide shows how to use MinGW to compile ffmpeg either statically or dynamically. Installation of MinGW is explained in this post. The example commands below are meant to be entered into an MSYS window (not Command Prompt). I downloaded the FFmpeg source and unpacked it.
Preparing External Libraries for FFMpeg
FFMpeg can be linked with external libraries to add features to FFmpeg. I am adding most features to FFMpeg by compiling additional libraries. Most of these libraries are also covered in my posts on compiling MPlayer and Mencoder.
- Compression Libraries: Zlib and bzLib
Get the zlib source (zlib127.zip), unzip and compile it:unzip zlib127.zip
cd zlib-1.2.7/
make -f win32/Makefile.gcc
cp -iv zlib1.dll /mingw/bin
cp -iv zconf.h zlib.h /mingw/include
cp -iv libz.a /mingw/lib
cp -iv libz.dll.a /mingw/libOptionally, get bzip2 source from bzip.org and compile it like this:
tar xzvf bzip2-1.0.6.tar.gz
cd bzip2-1.0.6
make
cp bzlib.h /mingw/include/
cp libbz2.a /mingw/lib - libgsm
Download gsm-1.0.13.tar.bz2, unpack and compile it as follows:tar xzvf gsm-1.0.13.tar.bz2
cd gsm-1.0-pl13/
makeJust ignore the compile errors with fchmod and fchown when trying to build applications. Copy the header and static library to /mingw:
mkdir /mingw/include/gsm
cp inc/gsm.h /mingw/include/gsm
cp lib/libgsm.a /mingw/lib - LAME is an excellent MP3 encoder. LAME makes use of the nasm assembler if available. So download yasm and save it as /mingw/bin/nasm.exe. Then, download the LAME source from lame.sf.net and compile it like this.
./configure --prefix=/mingw --enable-expopt=full
make
make install - OGG, Vorbis, Speex and Theora
The source code for these libraries can be obtained from xiph.org. Compile them each like this:
./configure --prefix=/mingw
make
make install
As for speex, use the version 1.2rc1 or later.
- FAAC
FAAC is an MPEG-4 AAC audio encoder. Get the source (faac-1.28.tar.gz) and unpack the package. Then, edit Makefile.am:
SUBDIRS = include libfaac
Also, edit the line beginning with AC_OUTPUT in the file configure.in:
AC_OUTPUT(libfaac/Makefile include/Makefile Makefile)
Then, compile FAAC like this
sh bootstrap
./configure --prefix=/mingw
make
make install - XviD is a popular video encoder used to create movie files distributed in p2p networks. Xvid can use yasm assembler to build optimized binaries if found (
/mingw/bin/yasm.exe). Get the XviD source from xvid.org and compile as follows:tar xzvf xvidcore-1.3.2.tar.gz
cd xvidcore/build/generic
./configure --prefix=/mingw
make
make installIf you encounter "unrecognized command-line option
-mno-cygwin" errors, open the file platform.inc in a text editor and delete "-mno-cygwin". Then, runmakeandmake installagain.Copy the import library for xvidcore.dll:
cp -iv \=build/xvidcore.dll.a /mingw/lib/libxvidcore.a
- x264 is yet another good video encoder. x264 requires YASM to build an optimized executable. So get yasm and save it as /mingw/bin/yasm.exe. Then, compile x264 like this:
configure --prefix=/mingw --enable-win32thread --extra-cflags="-DX264_VERSION=20100422"
make
make install
cp -iv x264.h x264_config.h /mingw/include
cp -iv libx264.a /mingw/lib
cp -iv x264.pc /mingw/lib/pkgconfig - Compile librtmp as shown in this post.
Building FFMpeg Statically
You need pr.exe from MYS coreutils package (coreutils-5.97-3-msys-1.0.13-ext.tar.lzma). I configured ffmpeg with the following command:
CPPFLAGS='-DHAVE_INT32_T' ./configure --prefix=/mingw --enable-gpl --enable-nonfree --enable-postproc --enable-avfilter --enable-w32threads --enable-runtime-cpudetect --enable-memalign-hack --enable-bzlib --enable-libfaac --enable-libgsm --enable-libmp3lame --enable-libspeex --enable-libtheora --enable-libvorbis --enable-libx264 --enable-libxvid --enable-zlib --disable-debug
-DHAVE_INT32_T is used to allow static FAAC to be linked. Then, I began compilation and installation:
make
make install
Compiling FFmpeg Dynamically
Some Windows applications, such as Audacity, uses FFmpeg libraries when available. If you want to compile FFmpeg dynamically, append --enable-shared --disable-static to the ./configure command for FFmpeg.
./configure --prefix=/mingw --enable-gpl --enable-nonfree --enable-postproc --enable-avfilter --enable-w32threads --enable-runtime-cpudetect --enable-memalign-hack --enable-bzlib --enable-libfaac --enable-libgsm --enable-libmp3lame --enable-librtmp --enable-libspeex --enable-libtheora --enable-libvorbis --enable-libx264 --enable-libxvid --enable-zlib --enable-shared --disable-static --disable-debug
If you get "int32_t" error when compiling libfaac.o, open /mingw/include/faac.h and insert the following line:
#include <stdint.h>
When I built mplayer with --enable-static and --disable-ffmpeg_a options to force linking with shared ffmpeg libraries, I had to rename ffmpeg libraries so their names end in *.a.
cd /mingw/lib
cp -iv libavcodec.dll.a libavcodec.a
cp -iv libavformat.dll.a libavformat.a
cp -iv libavutil.dll.a libavutil.a
cp -iv libpostproc.dll.a libpostproc.a
cp -iv libswscale.dll.a libswscale.a
Tuesday, September 4, 2012
Dhoom 1 & 2 from Bollywood
I've been into Bollywood movies lately, experiencing slight culture shock from the other side of the world. One of the movies I watched is Dhoom, which is about young and restless criminals trying to outsmart cops during a robbery spree.
Here's Dhoom 1 in 8 parts.
Dhoom 1 Part 1 w/Eng Subs HQ DvDRip [2004] by CBoii789
Dhoom 1 Part 2 w/Eng Subs HQ DvDRip [2004] by CBoii789
Dhoom 1 Part 3 w/Eng Subs HQ DvDRip [2004] by CBoii789
Dhoom 1 Part 4 w/Eng Subs HQ DvDRip [2004] by CBoii789
Dhoom 1 Part 5 w/Eng Subs HQ DvDRip [2004] by CBoii789
Dhoom 1 Part 6 w/Eng Subs HQ DvDRip [2004] by CBoii789
Dhoom 1 Part 7 w/Eng Subs HQ DvDRip [2004] by CBoii789
Dhoom 1 Part 8 (Last) w/Eng Subs HQ DvDRip [2004] by CBoii789
Here's Dhoom 2 in 8 parts.
Dhoom 2 Part 1 w/Eng Subs HQ DvDRip [2006] by CBoii789
Dhoom 2 Part 2 w/Eng Subs HQ DvDRip [2006] by CBoii789
Dhoom 2 Part 3 w/Eng Subs HQ DvDRip [2006] by CBoii789
Dhoom 2 Part 4 w/Eng Subs HQ DvDRip [2006] by CBoii789
Dhoom 2 Part 5 w/Eng Subs HQ DvDRip [2006] by CBoii789
Dhoom 2 Part 6 w/Eng Subs HQ DvDRip [2006] by CBoii789
Dhoom 2 Part 7 w/Eng Subs HQ DvDRip [2006] by CBoii789
Dhoom 2 Part 8 (Last) w/Eng Subs HQ DvDRip [2006] by CBoii789
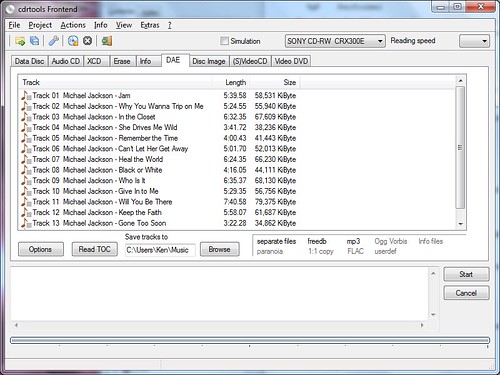
Using cdrtfe 1.5
cdrtfe is free CD/DVD/BD burning software for Windows. cdrtfe actually use the command-line program cdrtools as its burning engine. I have used cdrtools on Linux to create ISO images and burn or rip CD. I'd like to have cdrtools on Windows also. Fortunately, cdrtfe includes cdrtools Win32 binaries along with the nice-looking GUI application.
To install cdrtfe, I downloaded the cdrtfe zip archive (cdrtfe-1.5.zip) and unpacked the zip archive. Double-clicking on the cdrtfe file will start the cdrtfe program. (Warning: Running the Cygwin terminal and cdrtfe at the same time can cause a problem due to cygwin1.dll incompatibility, so close the Cygwin terminal before starting cdrtfe.)
So far, I have only tried ripping music CD's with cdrtfe. I will add more as I get to know more about cdrtfe.
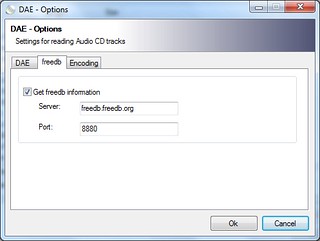
Ripping Audio CD's
To rip a music CD, click on the DAE tab and click the Options button. Check to make sure the options are okay.
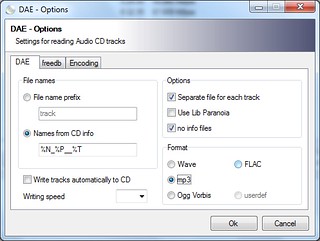
Back to the main window, click Read TOC to update the track list, check the Save tracks to folder, and click Start to begin ripping.
Sunday, September 2, 2012
Setting Up Cygwin For C/C++ Software Development on Windows
Cygwin provides a Unix-like environment for Windows users. Cygwin is useful for people who want to learn Unix or popular Linux without having to install Unix or Linux. Cygwin can also be used to port Linux applications to Windows or develop genuine Windows applications. To install Cygwin, download setup.exe from the Cygwin website and run it.
Cygwin Packages for Software Development
In addition to the default packages, select the following packages for common development environment:
- bison
- gettext-devel
- libtool
- make
- patch
- pkg-config
To select a package for installation, type the name of the package in the Search box, expand the categories by clicking a plus, and clicking on the package until its version number shows up.
If you want to develop software applications that depend on cygwin1.dll (which emulates Unix on Windows), install one of the following packages. This is when you want to port Linux applications to Windows with little modification.
- gcc-g++
outdated version 3.4.4 - gcc4-g++
GCC 4.x that links applications with cygwin1.dll
If you want to develop pure Windows applications, install one of the following packages.
- mingw-gcc-g++
The original MinGW compiler from mingw.org can't build 64-bit applications. - mingw64-i686-gcc-g++
New MinGW compiler from mingw-w64.sourceforge.net. - mingw64-x86_64-gcc-g++
Install these to develop 64-bit Windows applications.
When you see the Resolving Dependencies window, just accept and click Next.
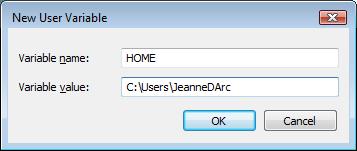
Setting HOME Variable
Setting the environment variable %HOME% is useful for various reasons. First of all, it allows regular users to compile freely in their user folder without requiring access to C:\Cygwin. Secondly, it allows users to save user-specific configuration in their user folder. For example, user configuration files such as .profile, .gtkrc-2.0, .fonts.conf and .pango-aliases can be saved in the folder specified by %HOME%.
Setting Up mingw* compiler for Cygwin
The file C:\Cygwin\etc\fstab is used to set up mount points in Cygwin. If you installed mingw64 packages, open the file C:\Cygwin\etc\fstab in a text editor and append the following line.
/usr/i686-w64-mingw32/sys-root/mingw /mingw none bind
Start the Cygwin terminal and type the following commands to set up Cygwin for Windows compilation.
ln -s /usr/bin/i686-w64-mingw32-g++.exe /usr/i686-w64-mingw32/bin/g++.exe
ln -s /usr/bin/i686-w64-mingw32-gcc.exe /usr/i686-w64-mingw32/bin/gcc.exe
Also, set up some environment variables.
export CFLAGS="-march=pentium2 -mtune=i586 -mthreads -mms-bitfields -O2"
export CXXFLAGS="-march=pentium2 -mtune=i586 -mthreads -mms-bitfields -O2"
export CPPFLAGS="-I/mingw/include"
export LDFLAGS="-L/mingw/lib -Wl,--enable-auto-image-base -Wl,--enable-auto-import -Wl,--enable-runtime-pseudo-reloc"
export PATH=/mingw/bin:/usr/i686-w64-mingw32/bin:/usr/local/bin:/usr/bin
export PKG_CONFIG_PATH=/mingw/lib/pkgconfig
Setting Up gcc* Compiler for Cygwin
If you installed the gcc4 compiler (as opposed to mingw*), set up some environment variables to customize your build environment. I usually type the following commands:
CC="/usr/bin/gcc.exe"
CFLAGS="-march=pentium2 -mtune=i586 -mthreads -mms-bitfields -O2"
CPPFLAGS="-I/usr/include"
CXXFLAGS="-march=pentium2 -mtune=i586 -mthreads -mms-bitfields -O2"
LDFLAGS="-L/usr/lib -Wl,--enable-auto-image-base -Wl,--enable-auto-import -Wl,--enable-runtime-pseudo-reloc"
export CC CFLAGS CPPFLAGS CXXFLAGS LDFLAGS
Labels:
cygwin,
development,
mingw,
porting,
software,
technology,
windows
Subscribe to:
Comments (Atom)


