Showing posts with label desktop. Show all posts

Sunday, April 3, 2011

Cloud Storages for Linux

Today the trend is to put your valuable data somewhere on the Internet and access it anywhere. This is a dramatic departure from the past as our trust grows towards Internet companies. More companies are offering cloud storage services, for example, Box.net and Zumodrive. Here I show how to set up Linux to access cloud storages.


Box.net offers 5GB of free online storage for personal use, but each upload must be smaller than 25MB. Zumodrive offers 2GB free space initially, but unlike box.net you can upload any size of files using the ZumoDrive desktop application.


Adding a Box.net folder in KDE Dolphin


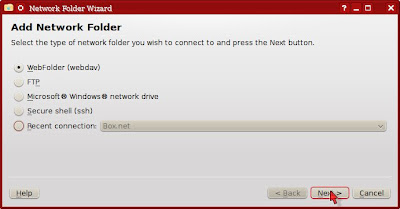
  1. Select Network from the Places panel. Then, double-click on Add Network Folder.


  2. Choose the WebFolder (webdav) and click Next.


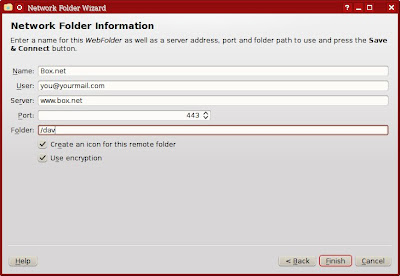
  3. Enter information for Box.net as follows.


Setting up Zumodrive on Mint KDE edition


  1. Download the Zumodrive package for Ubuntu 8 or later (zumodrive-ubuntu8-i386-0.989.deb).
  2. The Zumodrive package depends on openjdk-6-jre, but Sun's JRE is installed in Mint, so you don't have to install openjdk-6-jre.

    However, you need install libinotifytools0, libgnet2.0-0 and libnautilus-extention1. I used Synaptics to install the missing packages.
  3. Unpack the zumodrive package into the system.

    cd /
    dpkg --extract zumodrive-ubuntu8-i386-0.989.deb .

  4. Copy /usr/share/applications/zumodrive.desktop to your Desktop folder, so you can start Zumodrive by double-clicking the icon on desktop. Optionally, right-click on the icon, choose Properties and make it executable.


  5. Now double-click on the Zumodrive icon. Once you type in your email and password, you can access Zumodrive through the ~/Zumodrive folder.

Wednesday, September 30, 2009

VirtuaWin Settings

I found a useful virtual desktop manager called VirtuaWin on SoureForge. The following is my VirtuaWin settings.


VirtuaWin general settings

I use 4 desktops horizontally. Desktop wrapping is enabled so that going eastward from the fourth desktop will lead to the first desktop.


Virtuawin Hotkeys

Holding down Alt+Win and pressing F1, F2, F3, F4 will allow me to switch to the first, the second, the third and the fourth desktop respectively.


virtuawin_mouse

Holding Shift down and moving the mouse cursor against an edge of the screen will allow me to switch desktops.

Sunday, May 31, 2009

Manually Starting a VNC Server

Manually starting a VNC server is necessary for testing VNC. Once you got VNC to work correctly, you can copy the command line to a script or inetd.conf. First, I created an executable script ~/.vnc/xstartup with the following contents:


#!/bin/sh

exec /etc/X11/Xsession

This file has to be made executable, of course. Prior to starting vnc4server, make sure your X session can start normally by checking your ~/.xsession file. My .xsession file looks like this:


#!/bin/sh

exec openbox

Then, I started vnc4server:


vnc4server -geometry 800x600 -depth 16 -name VNC4

The first time you run vnc4server, it will ask you for the password. Create a password that only you can guess and memorize it. Next, I installed TightVNC U3 package on my Sandisk U3 flash. I went over to another PC running Windows and plugged in my USB flash. The U3 menu popped up and I clicked on the TightVNC icon. Then, I specified the address of my Linux box running vnc4server:


192.168.1.234:1 or

192.168.1.234::5901

After I was done with vnc session, I killed the vnc4server with the following command:


vnc4server -kill :1

When vnc sessions don't seem working, check the log file: ~/.vnc/*.log


Related Posts


Connecting to a VNC Server through a SSH Tunnel

For security and privacy, VNC connection should be done through a SSH tunnel. Here, I am using Putty to set up a SSH Tunnel. First, type in the host name:


Putty_Setup_1003

Next, type in the user name:


Putty_Setup_1010

Check the following options. Also, move Blowfish up for speed:


Putty_Setup_1018

Set up a SSH tunnel. The Source port will be the local port through which the VNC viewer will connect. The destination port is the remote port whereby the VNC server listens. Click Add button:


Putty_Setup_1027

Save the Putty session.


Putty_Setup_1034

Now that you set up a SSH tunnel, you can use a VNC viewer like TightVNC to connect through the SSH tunnel to the remote VNC server. For example, specify localhost::5900 as the server host to TightVNC.


Related Posts


Friday, March 27, 2009

Setting the Background with xsetbg

This is just my 2 cents on setting the wallpaper on your X Windows desktop. There are many tools for setting the background — technically called the root window. If you use KDE or GNOME, setting up the background is automatic as it is done by the friendly GUI. However, if you are one of those people — including me — who prefer light and minimalist X-Windows environment, you'll put a command in your .xsession file to set your background.


My Lotus desktop screenshot

Here, I introduce you to a nice nifty tool called xsetbg. It belongs to a package called xloadimage. I find it attractive just because it doesn't have many dependencies. This is how I use xsetbg in my .xsession file to place my lotus wallpaper on the desktop:


/usr/bin/xsetbg -center -xzoom 115 -yzoom 128 /usr/share/pixmaps/5469_G.jpg

The nice thing about it is that it lets you zoom the width and height separately and center the image at the same time. Pratically, this feature allows you to hide unwanted edges from the screen. For example, the picture below has unnecessary edges around it.


The forgotten sanctuary in the fantasy land

The following command sets this image as the desktop wallpaper without the unwanted edges (assuming your screen is in 800x600 resolution). Change the zoom percentages as necessary for your screen resolution.


xsetbg -center -xzoom 67 -yzoom 85 Sanctuary.jpg

My Fantastic Sanctuary desktop screenshot

About This Blog

KBlog logo This blog is about current events and issues concerning general population. Thanks for visiting the blog and posting your comments.

© Contents by KBlog

© Blogger template by Emporium Digital 2008

Followers

Total Pageviews

icon
Powered By Blogger