Saturday, February 28, 2009

Linux Tip: Retrieving Files From Unbootable Windows partitions

You are a Windows person. You've been using Windows for your daily work, school, or something else. One day, you turn on your PC, and, for whatever reason, you can't boot your Windows. You try every trick you know without success. Your last resort is to recover your precious data from your unbootable Windows partition — if your hard drive is still in good condition and accessible. You could use a Windows Vista installation CD which lets you use the unfriendly Windows repair console.


You can also use Linux to retrieve files from your troublesome Windows partition. If you don't have Linux installed in your computer, you can use a Linux Live CD that's available free from the Internet. A live CD lets you try something without installing it into your computer. Most Linux installation CD's released today are also live CD's. For example, you can try an Ubuntu CD to test-drive Linux and also access data from your broken Windows partition.


Assuming that you booted into Linux, start xterm, konsole or Gnome terminal. Mount your Windows partition with the following command so that you can access and copy files from Windows — specify your Windows partition in place of /dev/sda1:


mount -t ntfs-3g /dev/sda1 /mnt

The command above mounts your Windows partion /dev/sda1 on the directory /mnt. Now, you can change the current directory to /mnt and list its contents like this:


cd /mnt

ls

Plug in your USB flash so you can save your data on it. Then, mount your USB flash onto /media &mdash assuming your flash drive is /dev/sdb1 and the directory /media exists:


mount -t vfat /dev/sdb1 /media

Now you're ready to copy files from your broken Windows partitions to your flash drive using Linux. The following example illustrates copying files in Linux:


cd Users/Kenneth/Documents

cp project7k.doc /media

mv finance9b.xls /media

tar cf - folderX | (cd /media; tar xf -)

The first command in the example above lets you change the current folder to Users/Kenneth/Documents — that's the typical path to user data in Windows Vista. The next commands copy the file project7k.doc and move finance9b.xls and folderX to your flash drive mounted on /media.


Once you retrieve your data files from the broken Windows partition and save them on your USB flash, you can go ahead and wipe your Windows. Then, you may choose to reinstall Windows, or better yet, try and install Linux. My recommendation is Debian Linux.

Thursday, February 19, 2009

Calculus Formulas: Finding Anti-Derivatives

Properties of Definite Integrals


Properties of Definite Integrals

Basic Properties of Integrals


Basic Properties of Integrals

Derivatives of Definitive Integrals


Derivatives of Definitive Integrals

Table of Integrals


Table of Integrals

Calculus Formulas: Finding Derivatives

Basic Formulas of Derivatives


For any two differentiable functions f(x) and g(x):


  1. f(x)=c (c is a constant), then f'(x)=0
  2. g(x)=cf(x) (c is a constant), then g'(x)=c·f'(x)
  3. f(x)=xn (n is a rational number), then f'(x)=nxn-1
  4. y=f(x)±g(x), then y'=f'(x)±g'(x)
  5. y=f(x)·g(x) then, y'=f'(x)·g(x)+f(x)·g'(x)
  6. y=f(x)/g(x) (g(x)≠0) then, y'=(f'(x)g(x)-f(x)g'(x))/g2(x)


Derivatives of Various Functions


  1. y=ex then, y'=ex
  2. y=ax then, y'=ax·ln(a)
  3. y=ln(x) then, y'=1/x
  4. y=logax then, y'=1/(x·ln(a))
  5. y=sin(x) then, y'=cos(x)
  6. y=cos(x) then, y'=-sin(x)
  7. y=tan(x) then, y'=1/cos2(x)
  8. y=arctan(x) then, y'=1/(x2+1)
  9. y=arcsin(x) then, y'=(1-x2)-0.5


Derivative of Composite Functions


  1. y=f(u), u=g(x) then, dy/dx=dy/du · du/dx
  2. y=f(ax+b) then, y'=af'(ax+b)
  3. y=fn(x) then, y'=n·fn-1(x)·f'(x)

Saturday, February 14, 2009

Kamehameha the Great and His Epic Conquest

When Captain Cook discovered the Hawaiian Islands, young and ambitious Kamehameha first encountered white men, including Captain Cook, and witnessed the wonderful novelties of white men's civilization, such as their guns and metallic weaponry. It was since this encounter that Kamehameha awakened to the new ways of the world and began nourishing his great dream of uniting the Hawaiian Islands. Kamehameha was one of the noblemen on the Big Island of Hawaii, and a nephew of the aging ruler of Hawaii, Kalaniopuu. Upon his death, Kalaniopuu bequeathed the icon of Hawaiian war god Kukailimoku to Kamehameha, but named his son Kiwalao as his ruling heir, and also handed down a big portion of the Big Island to Kiwalao.

In the years that followed (1780's), the Big Island of Hawaii found itself in frequent feuds between Kamehameha and his allies, and Kiwalao's alliance. In 1782, Kiwalao was killed in a battle at Mokuohai by Kamehameha's ally Keeaumoku. Kiwalao's younger brother Keoua and Kiwalao's uncle Keawemauhili escaped the skirmish and remained strong amid occasional conflicts with Kamehameha.

On the leeward side of the Hawaiian archipelago, other lords ruled the other Islands. Most powerful of them was Kahekili of Maui. By 1786, Kahekili had Oahu, Maui, Molokai and Lanai under his rule. Kahekili also had a peace pact with his half-brother Kaeokulani, lord of Kauai.

Since Cook's discovery of the Hawaiian Islands, many ships from the United States, Britain and other nations came to the archipelago as a resting stop on a long journey through the immense Pacific Ocean to replenish their supplies, such as water, salt, fruit and pork. The Hawaiian natives were eager to barter with the white men to get Western goods, including various novelties and metal. Of particular interest to Hawaiian chiefs were firearms of haoles that could give advantages to the warring lords of the Islands. Soon, Hawaiians enthusiastically bought or stole guns and metals from foreign ships that stopped at Hawaiian Islands. Kamehameha, with his keen foresight, was not exception to the first Hawaiian arms race. He captured two Englishmen Isaac Davis and John Young, and had them working for him as gunners. He also acquired a small cannon from a vandalized ship Fair American and called it Lopaka.

With western firearms and English aides, Kamehameha was ready to set out his conquest. In 1790, he invaded Maui and came short of capturing Kahekili's son Kalanikupule. Failing so, he had to return to the Big Island upon hearing about war there. Keoua had killed his uncle Keawemauhili and ravaged Kamehameha's territory. Kamehameha engaged Keoua in indecisive battles before both sides withdrew. One day, Kamehameha built a ritual tower and invited Keoua for discussion. Keoua accepted Kamehameha's ominous invitation and arrived at Kamehameha's ritual site in Kawaihae. Upon setting foot on the beach from his canoe, Keoua was fatally wounded with a spear thrown by Kamehameha's lieutenant Keeaumoku. Thus, Kamehameha got rid of his last opponent on the Big Island of Hawaii, and became the Lord of Hawaii.

In 1791, Kahekili, together with his half-brother Kaeokulani, his foreign gunner Mare Amara and many warriors, sailed for Hawaii to challenge Kamehameha. This battle was the first in Hawaii that saw both sides have foreign gunners, Mare Amara with Kahekili, and Isaac Davis and John Young with Kamehameha. The battle was so fierce that it was called Kepuwahaulaula, the battle off the red-mouthed gun, but no side came out winner. Kahekili withdrew to Oahu. In the quiet years that followed, Honolulu began to transform into a port city when the Englishman William Brown discovered the usefulness of Pearl Harbor. Yet, in mid-1794, Kahekili died leaving Oahu to his son Kalanikupule and other leeward islands to his half-brother Kaeokulani.

Soon after Kahekili's death, Kalanikupule and Kaeokulani turned against each other. They fought each other on Oahu. Kaeokulani was outnumbered and outmaneuvered by Kalanikupule and by Englishman William Brown's men and muskets. In the end, Kaeokulani was killed. In January, 1795, Kalanikupule killed Brown and forced the surviving shipmates to sail the ships for Hawaii to wage a war against Kamehameha. However, Kalanikupule was soon overturned and forced overboard and ashore to Oahu. The shipmates sent a note to John Young and Isaac Davis on Hawaii, telling the plot and its outcome, and left for Canton, China.

Now that Kalanikupule was without military advantages, Kamehameha invaded and took Maui and Molokai in the early months of 1795. Next, Kamehameha took his fleet to Oahu and drove to Nuuanu valley Kalanikupule and Kaiana, once Kamehameha's ally but now his traitor. Eventually, Kalanikupule and Kaiana were cornered and put to death.

At this point, all of the Hawaiian Islands were within the grasp of Kamehameha except Kauai, which was under the rule of Kaumualii. Kamehameha made two attempts to invade Kauai, both resulting in failures. The first attempt to attack Kauai in 1796 was overturned when strong winds and waves turned back Kamehameha's fleet heading to Kauai. The second trial also failed because of the outbreak of an epidemic, possibly cholera or typhoid fever in 1804. Discouraged by two failed attempts, Kamehameha was practical enough to make a compromise with the lord of Kauai, Kaumualii. In 1810, with the help of mediation by an American trader, Nathan Winship, Kaumualii accepted Kamehameha as the supreme ruler of the whole Hawaiian archipelago. In return, Kaumualii would continue to govern Kauai as a tributary king under Kamehameha. Thus, Kamehameha finally united the Hawaiian Islands and built the first kingdom in Hawaii after almost three decades of war.

Upon uniting the islands, Kamehameha laid foundation for the Hawaiian kingdom. He appointed and sent governors to each island. The governors were chosen among his close and loyal chiefs. Kamehameha kept his rule absolute and powerful by directly relaying his commands to his governors and immediately crushing any opposition when such happened. He also established Hawaii as the lively commercial center of the Pacific. Kamehameha controlled Honolulu harbor and oversaw mercantile activities occurring in the harbor. Frequently, he intervened in deal-makings with foreign merchants who sailed to Hawaiian Islands as a stop to replenish food and water. He strictly controlled who could trade with other islands besides Oahu by sending his messengers with foreign merchants to relay his orders to his governors in other islands. However, the foundation of Hawaiian economy was still agriculture and Kamehameha understood it well. King Kamehameha set his people the good example of hard labor by planting taro himself in taro patches and by going on a fishing expedition.

In retrospect, by looking at the feats and deeds of King Kamehameha, his motives to unite the islands may have been to found a strong Hawaiian nation that could bring stability across the Hawaiian isles and strength against foreign forces. At the first encounter with Captain Cook, young Kamehameha may have realized that the world outside Hawaii was so advanced and dynamic compared to the Hawaiian isles. He must have realized that Hawaii had to change. Growing up, he had seen wars between Hawaiian lords. There had to be an end to feuds between Hawaiian people. To this end, he must have felt the need to unite the Islands. Once the Hawaiian islands were united as one kingdom, he could lay a strong foundation for the Hawaiian nation and lead the Hawaiian people for better change so that they could adapt to dynamic foreign influences and resist any foreign forces.

To unite the Hawaiian isles, Kamehameha used both old and new methods. Open-minded about new ways, not only did Kamehameha employ guns, cannons, and warships from foreign merchants, but also advices and aids of foreigners, for example, Isaac Davis, John Young, and Nathan Winship. On the other hand, Kamehameha was still a faithful supporter of old ways at heart, worshiping war god Kukailimoku, building ritual towers heiaus, and consulting soothsayers.

Kamehameha's government was an absolute monarchy in which Kamehameha presided over foreign commerce and foreign affairs of the Islands. However, each island and each district had its own governor and chiefs who governed the area on its own to an extent. He controlled trade on each island through his governors. He also kept strict Hawaiian kapu system to ensure his absolute rule.

Thursday, February 5, 2009

Speed Reading

We are living in the age of information overload. Most of us have to constantly read or process a lot of information just to keep up with the fast pace of our business or school. We need to read fast, and a lot faster. But reading fast requires a skill. There are many different techniques for speed reading. What follows is introduction to one of speed reading techniques.


Why we can't read fast


There are 3 major reasons that hinder speed reading:


  • Habitual regression

    A casual reader occasionally stops reading when he or she encounters an unknown or ambiguous word. This dramatically slows reading while reducing the efficiency of the short-term memory used for reading. Remember, the context is more important than the precise meaning. An efficient reader should quickly read through the material and look up words only before or after the reading.

  • Polysyllabic fixation

    English, like most Indo-European languages, is a polysyllabic language. That means most English words are made up of two or more syllables, for example, hospital, hippopotamus, etc. Most adult readers can recognize thousands of polysyllabic words instantly when they see the words because they recognize their shape, length, syllables and prior learning. However, poor readers tend to read words by each syllable, thus resulting in slow reading. On the other hand, speed readers pass over the words very quickly, taking in all the rest of the stuff with brain-eye coordination and memory.

  • Subvocalization

    Subvocalization often occurs simultaneously with polysyllabic fixation. Most readers speak while reading, either in their mouth, in their throat, or in their mind. This is a bad habit for people who need to read a lot of material.


Organization Patterns: Parts-to-Whole vs Whole-to-Parts


Efficient readers can apply different reading skills to different materials, be it fiction, non-fiction, magazine or newspaper. Most reading materials can be put into two categories: fiction and non-fiction. They have two different organizational patterns, for example, parts-to-whole or whole-to-parts.

Fictional works have the parts-to-whole pattern. When you read something fictional, you don't know until the very end of the story what it is all about. When you read a fiction, you need to understand the parts and put the parts together so as to understand the whole.


Nonfictional materials like textbooks have the whole-to-parts pattern. A typical textbook begins with an introduction of what you're going to read or learn, then the actual contents divided into sections, and finishes with a summary or conclusion. Thus, the organization of informational books leads you from the whole to the parts. You get the big picture and then its components.


Preview before Reading


A good reader should preview a reading material and select an appropriate reading strategy according to the organizational pattern of the material. It is always important to preview the reading material before you actually read it. Some quick preview methods are as follows:


  • skim the first and last few pages
  • skim the first 5 pages, several places in the middle and the
    last 5 pages
  • skim the entire work
  • skim the beginning of each chapter or each subsection


Speed Reading Procedure


The following steps are recommended for improved comprehension, speed and retention:


  1. Survey

    Reader looks at covers and title, reads the preface and introductions, checks out if there is a glossary, definitions, pictures, etc.
  2. Preview

    Reader pays special attention to chapter titles and section titles, reads the introductions and conclusions of chapters, time permitting the first sentence of every paragraph.
  3. Comprehensive Reading

    Select the appropriate reading strategy — what can be skipped, read more carefully, etc. Mark in the margins those places to return to for an additional reading once the first reading is done. There should be NO highlighting or underlining in the first read-through. A simple check/dot in the margins is all that should be done at this point. And the reader SHOULD NOT STOP and employ that BAD HABIT: habitual regression!
  4. Review

    This is to check what was marked in the margin, skim and review the material, recall something, find answers, etc. Some quick review methods follow:

    • skim the entire work, slowing on the marked parts
    • skim from marked part to marked part
    • reread difficult parts only
    • scan only for answers to questions
    • review as many times as you need


Some skills that help Speed Reading


Good vocabulary and grammar skills are essential to reading, of course. Also, prior knowledge helps reading comprehension. Prior knowledge may refer to one's experiences or basic knowledge required for the current readings.


Good Reading Strategies


  • The reader takes chances — risks errors with language
  • The reader reads to get meaning NOT to identify letters or words
  • The reader guesses from context at unfamiliar words or SKIPS them and
    deals with them later at an appropriate time given the reading
  • The reader reads as though he/she expects the text to make
    sense — Expecting meaning, predicting meaning, making guesses, taking
    chances. Pushing ahead confidently are strategies that are critical for
    identifying meaning early on — the brain must relate incoming information
    to already stored information.
  • The reader samples the text as economically as
    possible (especially if a good preview took place) and uses the skills of
    peripheral vision to assist.


Books about Speed Reading


I found some books that teach how to read quickly from P2P networks. The following books can be downloaded using lphant.


  1. A Course in Light Speed Reading, Joseph Bennette

  2. The Evelyn Wood Seven-Day Speed Reading and Learning Program
  3. The Photo Reading Whole Mind System, Paul R. Scheele
  4. THE ALPHA-NETICS RAPID READING PROGRAM, Owen D. Skousen
  5. THE SPEED READING WORKBOOK
  6. The Speed Reading Course, Shepherd & Unsworth-Mitchell
  7. THE SPEED READING WORKBOOK

  8. Teach Yourself Speed Reading

Monday, January 26, 2009

Installing MinGW on Windows

MinGW is a free software development system for Windows. Not only is MinGW useful for porting Linux software to Windows, but you can also use MinGW to write native Windows programs. The following is an excerpt from the MinGW web site:


MinGW: A collection of freely available and freely distributable Windows specific header files and import libraries, augmenting the GNU Compiler Collection (GCC) and its associated tools (GNU binutils). MinGW provides a complete Open Source programming tool set which is suitable for the development of native Windows programs that do not depend on any 3rd-party C runtime DLLs.

Now, let's install MinGW. Note that MinGW doesn't run smoothly on Windows Vista because of weird filesystem restrictions. The workaround is:


  • to install MinGW in your home folder (C:\Users\username) or a public folder (somewhere in C:\Users\Public, for example, C:\Users\Public\Desktop)
  • to run MSYS (rxvt) as administrator (Right-click and select Run as administrator)
  • to install MinGW on FAT filesystem,
  • to work in the safe mode, or
  • to use MinGW Portable which is said to be working well.


To Set up the Latest MinGW


To have a functional MinGW installation, just download and run the latest MinGW installer.


To Set up GCC toolchain 3.4.5


To install the outdated GCC toolchain 3.4.5, download the following installers and run them in the order:


After Installation


After successfully installing MSYS, check the file /etc/fstab inside the MSYS folder. Mine looks like:


C:/MinGW /mingw
C:/MinGW /usr/local


You can try MSYS by double-clicking the MSYS icon on the desktop. This will bring up a console window where you can type in some UNIX commands. For example, the following command will display the version of installed GCC compiler:


$ gcc --version
gcc.exe (GCC) 3.4.5 (mingw-vista special r3)
Copyright (C) 2004 Free Software Foundation, Inc.
This is free software; see the source for copying conditions. There is NO
warranty; not even for MERCHANTABILITY or FITNESS FOR A PARTICULAR PURPOSE.


The environment variable HOME can be used to set the user's working directory. If your username has a space or foreign character, it may confuse MinGW and hinder the compile process. In Windows Vista and Windows 7, access restriction is imposed outside C:\Users. In such cases, set $HOME to some other location. For example, set the HOME variable like this:


Don't forget to create ~/.profile. This file can be used to set environment variables, such as CC, CFLAGS, CXXFLAGS, CPPFLAGS and LDFLAGS. These environment variables are used to customize the compiler settings. The following is my .profile contents:


CC=/mingw/bin/gcc.exe
CFLAGS='-march=pentium2 -mtune=i586 -mthreads -mms-bitfields -O2'
CXXFLAGS='-march=pentium2 -mtune=i586 -mthreads -mms-bitfields -O2'
LDFLAGS='-Wl,--enable-auto-image-base,--enable-auto-import,--enable-runtime-pseudo-reloc'
PKG_CONFIG_PATH=/mingw/lib/pkgconfig
TERM=cygwin
export CC CFLAGS CXXFLAGS LDFLAGS PKG_CONFIG_PATH TERM


Testing GCC with simple codes


Let's compile a very simple C program. Using a text editor, such as Notepad, create a text file called test.c:


#include <stdio.h>

int main(void)
{
printf("Greetings, ladies and gentlemen.\n");
return 0;
}


The following command will produce an executable code.


gcc -o test.exe test.c


Now, let's try a very simple C++ code:


#include <iostream>
using namespace std;

int main()
{
cout << "Hello, boys and girls.\n";
return 0;
}


To build it, type:


g++ -o test.exe test.cpp


Additonal Tools to Install


You can optionally install other tools from the MinGW download site, such as mingw-utils and bison. mingw-utils provides some useful tools, including dos2unix, a2dll, pexports and reimp. I find dos2unix particularly useful as it converts DOS-style line endings (CR+LF) to UNIX-style (LF) in text files. mingw-utils should be extracted into the MinGW folder and bison should be extracted into the MSYS folder.


Some tools are commonly used in the Linux development environment, such as pkg-config and msgfmt. I've compiled static versions of these programs in order to ease compiling processes. Download them from the links below and place them in /mingw/bin.


Integrated Development Environments for MinGW


If you prefer to use a convenient IDE to the command line, you have several choices:


Related Posts


Sunday, January 11, 2009

Installing Free Korean Fonts in Windows

Are you looking for free, good Korean fonts? You've come to the right place. Here I show you how to install Un fonts designed by a free Korean fonts project.


First, download the fonts from one of the links here. You may optionally choose to download additional fonts here.


Extract the fonts from the Debian package(s) with PeaZip or TugZip or any other tool.


Take the necessary steps to install the Un Korean truetype fonts in Windows.

부모 자녀 관계와 아동 행동에 대한 애착의 중요성

Kazakh mother and baby

자녀와 보호자 사이의 따뜻한 상호 반응적 관계를 발전시키는 일은 그 자체가 목적으로서 자녀의 심리 계발에 중요하다고 여긴다. 자녀와 보호자 관계 연구의 중요한 측면은 자녀의 애착 안전성이다. 애착설에 관한 여러 의문점을 다루고자 많은 모자 표본 집단을 대상으로 다양한 실험이 행해졌다. 몇몇 실험은 조화적 감정 대화(Oppenheim, Koren-Karie, & Sagi-Schwartz, 2007)와 아동 사회 행동(Burgess, Marshall, Rubin, & Fox, 2003)에 대한 조기 아동 애착의 관계를 밝히는 장기적 실험 해법을 택하였다. 다른 실험들은 이혼 가정과 완전 가정처럼 서로 다른 집단에 속한 어린이들의 애착 안정성과 성격을 연구하는 동시적 실험 해법을 택하였다(Nair and Murray, 2005). Berlin과 Cassidy (2001) 같은 몇 연구자들은 성인 애착설을 연구하고 가족 관계 문제를 다루는 심리치료의 응용에 그 용도를 제시한다. 이들 연구에 대한 간결한 재검토와 분석이 아래 따른다.

12개월 유아의 애착성과 4.5세 및 7.5세 때 모친과 다양한 감정적 주제로 얘기하는 대화 능력 사이의 관계를 조사하는 장기적 실험이 행해졌다(Oppenheim, Koren-Karie, & Sagi-Schwartz, 2007). 이 실험에서 안전 애착성 아동, 불안전 모호 애착성 아동, 불안전 혼란 애착성 아동 등을 포함한 다양한 표본 집단에 속한 각 쌍의 어머니와 아이를 대상으로 두 가지 검사가 행해졌다. 두 검사 중 하나는 자서전적 감정 사건 대화(Autobiographical Emotional Event Dialog)로서 각 쌍의 어머니와 아이는 다음 네 가지 감정을 유발하는 과거 사건에 대해 얘기했다: 행복, 슬픔, 분노 및 두려움. 표본 집단에 행한 또 다른 검사는 이별 재회 공동 서술(Separation-Reunion Narrative Co-Construction)로서 각 쌍의 모자가 아이의 과거에 경험한 부모와의 이별과 재회에 대하여 얘기했다.

이 실험을 확률적으로 분석한 결과 유아 애착성이 조화적 감정 대화의 중요한 예보 지수임을 알아냈다(Oppenheim, Koren-Karie, & Sagi-Schwartz, 2007). 유아기에 안전하게 애착된 어린이들은 소년기 내내 안정된 감정 대화를 조리 있게 구성하고 또한 부정적 감정을 수반하는 대화를 긍정적으로 마무리하는 능력을 보여주기 마련이다. 또한 이 실험은 안전 애착성의 어린이들이 불안전 애착성의 아이들보다 더 높은 단어 시험 점수를 받고 또 유창하고 균형 잡힌 대화를 전달함을 밝혀냈다.

이 연구(Oppenheim, et al, 2007)는 유아기에 보호자로부터 그들의 요구에 대한 신속 적절한 반응을 지속적으로 받은 안전 애착성의 어린이들이 보호자를 안전한 기지로서 믿고 인식하며 자유로이 감정의 세계를 탐험한다는 것을 제시한다. 대조적으로, 불안전 애착성의 어린이들은 감정 표현과 부정적 감정 해소에 흔한 어려움을 갖는다.

또 다른 장기적 연구는 14개월시 아동 유착과 24개월시 행동 억제 및 4살 때 낯선 동무와의 사회 행동 등 사이의 관계를 밝히기 위해 행해졌다(Burgess, Marshall, Rubin, & Fox, 2003). 행동 억제의 측정은 어린이를 낯선 놀이방에 데려간 다음 차례대로 새로운 노리개와 낯선 사람, 그리고 부푼 터널(그 속으로 아이가 기어가도록 격려함), 그리고 광대를 마주치게 하고 관찰하여 얻었다.

불안전 기피 애착성의 어린이들은 비억제 행동을 갖는 경향이 있다(Burgess, et al, 2003). 행동이 비억제적인 어린이들은 새로운 것에 두려움을 잘 나타내지 않고 낯선 동무에 거리낌 없이 접근한다. 그들의 성질이 안정적일 때 그들은 외향적이고 잘 나가고 사교적인 사람으로 성장하는 경우가 많다. 그러나, 그들의 성질이 비통제적으로 방치될 경우, 유아시 기피 유착성의 비억제적 어린이들은 제어할 수 없는 상황에 대해 좌절감, 분노, 또는 급기야 공격성을 표출하는 경향이 있다.

연구 표본의 부모들이 작성한 콜로라도 아동 성질 시험과 아동 행동 점검표를 확률 분석(ANOVA)하니 기피 유착성 아이들이 더 높은 공격성 점수를 받았고 억제성이 낮은 아이들이 높은 활동 점수와 낮은 탈퇴성 점수를 받았다(Burgess, Marshall, Rubin, & Fox, 2003).

대조적으로, 안전 또는 모호 유착성 어린이들은 낯선 것을 마주쳤을 때 억제된 행동을 보이는 경향이 있다(Burgess, et al, 2003). 낯선 상황에서 억제된 행동의 어린이들은 낯선 동무 사이에서 삼가는 행동을 보인다.

한편, Nair와 Murray(2005)는 유치원 아동의 애착 안전성에 권위적 양육 방식이 중요한 영향을 미친다는 것을 밝혀냈다. 권위적 양육 방식은 어린이들의 애착 안전성을 키우는 온화하고 감응 협조적인 양육 방식과 유사하다고 볼 수 있다.

Nair와 Murray(2005)는 완전 가정과 이혼 가정 사이에 아동 애착 안전성 차이를 조사하기 위해 유치원에서 58쌍의 어린이와 어머니들을 모집하였다. 이혼 가정의 아이들은 완전 가정의 아이들보다 낮은 애착 안전성 점수를 받았지만, 이혼이 아동 애착 불안전의 원인이라고 밝혀진 것은 아니다. 다만, 오히려 이혼 이후 스트레스, 우울증, 부부 갈등 및 사회 지원 부족 등이 아이에게 최적하지 못한 양육 방식을 초래한다고 보이므로, 따라서 어린이의 애착 불안전을 유발하는 것이다.

이 연구(Nair & Murray, 2005)는 또한 이혼 가정의 아이들이 완전 가정의 아이들에 비해 까다로운 성질이 있음을 밝혀냈다. 까다로운 성질의 아이들은 불규칙적 식사 취면 습관이 있고 새로운 경험을 기피하고 변화에 느리게 적응하며 부정적 성향의 격심한 반응을 보이는 경향이 있다.

부모의 애착 내부 작동 모델을 이해하는 것도 조기 부모자식간 관계를 발전시키는 데 중요한 역할을 한다고 여긴다(Berlin & Cassidy, 2001). 내부 작동 모델이란 것은, 타인이 얼마나 믿을만한지, 자신의 요구에 얼마나 협조적인지, 자신이 얼마나 상냥한 대우를 받을 가치가 있는지, 그리고 자신이 필요시 얼마나 보살핌을 받을 수 있을지 따위에 대한 개인의 예상을 가리킨다. Bowlby의 애착론에 따르면, 부모의 애착 내부 작동 모델은 자식의 사회감정적 발달에 중대한 역할을 한다.

애착 내부 작동 모델의 주된 측정은 성인 애착 인터뷰(Adult Attachment Interview)를 통해 인터뷰 대상자가 어린 소년 시절의 경험과 현재 인간관계에 미치는 그 영향에 대해 얘기함으로써 이루어진다. 성인 애착은 자녀의 애착 안전에 직접적 관련이 있음이 알려져 왔다. 성인 애착이 양육 태도에 영향을 미치고, 결과적으로 부모에 대한 자녀의 애착과 자녀 행동의 틀을 잡는다고 가정되어 왔다(Berlin & Cassidy, 2001).

자녀가 자라 새로운 사람들을 만나고 새로운 환경을 탐험하면서, 그들은 마음이 괴롭거나 어찌할 줄 모를 때 부모에게 의지할 정서적 요구가 있다. 안전과 편안에 대한 자녀의 요구가 충족될 때, 부모는 자녀에게 안전한 피난처(마음이 괴로울 때 편안을 찾고자 되돌아오는 곳)와 안전한 기지(새로운 세계를 탐험하고자 나아가는 곳)가 모두 된다. 이러한 부모자식간의 호혜적 관계에서 성인 애착은 자녀의 애착 안전과 행동에 영향을 미치며 그 틀을 잡는다(Berlin & Cassidy, 2001).

성인 애착은 이론적으로 4 가지의 애착 유형으로 분류한다: 안전 성인 애착, 불안전/최소 성인 애착증, 불안전/최대 성인 애착증 및 불안전/미해결 성인 애착증. 이러한 성인 애착론은 심리치료사들에게 부모자식간 관계 문제를 분석하고 해결하는 새로운 방법을 마련하게 되었다(Berlin & Cassidy, 2001).

안전 애착성 부모는 자녀와의 절친한 관계를 중시한다. 그들은 자녀의 요구를 인정하고 편안과 가까움을 구하는 자녀의 요구를 일관적으로 충족시킨다. 그들은 자녀에게 새로운 환경을 탐구하라고 격려한다.

불안전/최소 애착증 부모는 자녀의 애착을 회피하거나 최소화하고 공감, 편안 및 친근을 구하는 자녀의 요구를 흔히 거부한다. 그들은 자녀의 탐험, 유능 및 독립을 지나치게 격려한다. 그들은 또한 엄격히 규칙을 강요하기도 한다. 이러한 부모의 자녀는 강함과 독립을 요구하는 부모에게 당황하곤 한다. 그들은 기피성 행동을 보이기도 한다. 그들은 정서적 불안전을 느끼고 동료에게 공격성을 보이기도 한다.

대조적으로, 불안전/최대 애착증 부모는 과거 인간관계가 남긴 공허를 채우기 위해 자녀의 애착을 최대화하기를 원한다. 이러한 부모는 자녀를 미숙하고 요구적이며 의존적이라고 취급한다. 그들은 가끔 자녀와 쉴 틈 없고 긴장된 격정적 상호작용을 유지한다. 이러한 상호작용은 자녀의 의존을 조장하고 자녀의 자율과 독립적 탐험을 저지한다.

한편, 불안전/미해결 애착증 부모는 자녀에 대해 무력함을 보이고 약한 부모 역할을 취한다. 그들은 일반적으로 과거에 상실이나 정신적 상처를 경험하였다. 그들은 종종 두려워하거나 무서운 행동을 보여 자녀에게 공포를 주입한다. 이러한 부모는 자녀와 역할을 바꾸어 자녀로 하여금 부모를 보살피도록 하기도 한다. 이런 부모의 자녀는 요구적이고 통제적이기도 한다.

요약하건대, 자녀와 부모 사이의 애착 관계 연구는 부모자식간 관계가 서로의 심리적 행복을 높이는 호혜적 관계라는 것을 밝혀냈다. 보호자의 신속 민감한 보살핌은 자녀의 안전감을 높이고 자녀로 하여금 정서적 세계와 사회적 환경 모두 더 적극적으로 또 건전하게 탐험할 수 있도록 한다. 성인 애착이 양육 태도에 영향을 미치기 때문에 부모 자식 관계를 발전시킬 때 부모의 성인 애착을 이해하는 것은 역시 중요하다. 덧붙여서, 이혼은 자녀의 애착 불안전에 간접적 영향을 미친다는 것이 밝혀졌다. 그러나, 진심 어린 부모의 애정과 권위적 양육 방식이 자녀의 애착 안전을 강화하고 자녀의 정서적 발달을 촉진한다는 것이 밝혀졌다.

나는 어린이들을 좋아하고 언젠가 가정을 형성하여 나 자신의 자녀를 가지고 싶다. 아동 애착 연구는 아동 심리에 대한 나의 이해를 넓혔고 어린이를 정서적으로 키우는 바람직한 방법을 나에게 가르쳤다. 나는 부모에 대한 나의 애착과 또한 나의 성인 애착을 더욱 잘 이해하게 되었다. 나 자신의 애착을 분류하긴 어렵지만, 양육 방식과 호혜 작용이 애착에 영향을 미친다는 것을 알기에, 현재와 미래의 인간관계를 개선하기 위해 빈번한 정서적 대화와 상호 작용에 적극적으로 참여하려고 노력할 작정이다.


참고:


Thursday, January 8, 2009

Knowledge Is Power.

Knowledge is power. Accumulation of significant knowledge expands our understanding of solutions to our problems and enables us to better achieve our goals. Therefore, it deserves premium priority to gather significant knowledge and establish streamlined information system in order to strengthen our intellectual resources and better design our tactics.


Today, vast expanse of knowledge is easily accessible on the Internet. Not only does such knowledge include information of academic importance, but also includes facts of tactical significance. It would be highly rewarding if we could collect such vast information of great significance available on the open Internet and store such in a logical, organized and systematic manner.


Indeed, it takes a great skill to find and collect valuable information on the Internet. It is equally important to learn the art of Internet search. We can use various Internet search engines or browse many social bookmark sites to find what we want to learn. We can also use several Internet encyclopedia such as Wikipedia.


However, knowledge should be distinguished from wisdom. Knowledge mostly refers to factual information. It takes critical thinking and wise decision to make good use of such knowledge. Wisdom refers to such skills in making good use of available knowledge. Therefore, it is highly valuable to attain wisdom along with knowledge.

Wednesday, January 7, 2009

NVIDIA RIVA TNT2 M64 Driver for Windows Vista

I decided to install NVIDIA RIVA TNT2 M64 for use with Windows Vista because the on-board graphics chip didn't work so well. Like many old video cards, Windows Vista doesn't include a driver for NVIDIA RIVA TNT2 M64 cards. So I've tried many different versions of NVIDIA unified drivers. Finally I found the one that works perfectly with Windows Vista.


You should install NVIDIA ForceWare version 72.14 to be able to use an NVIDIA RIVA TNT2 M64 video card with Windows Vista. Download it HERE.


This driver is not certified for Windows Vista. Therefore, you should manually install the video driver. First, download and install the NVIDIA ForceWare 72.14. You may be asked to restart the computer. Just do so.


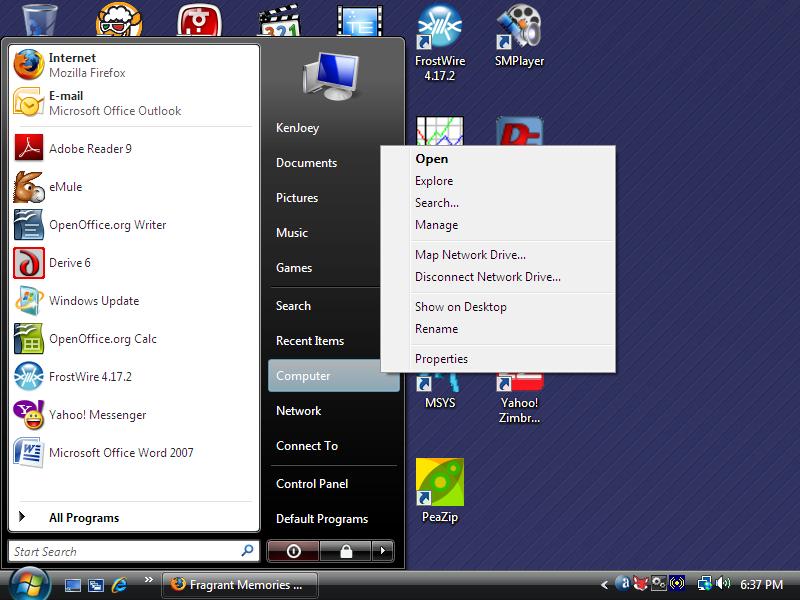
Once your PC restarts, open the Start menu, right-click Computer, and select Manage.


Right-click Computer and select Manage.

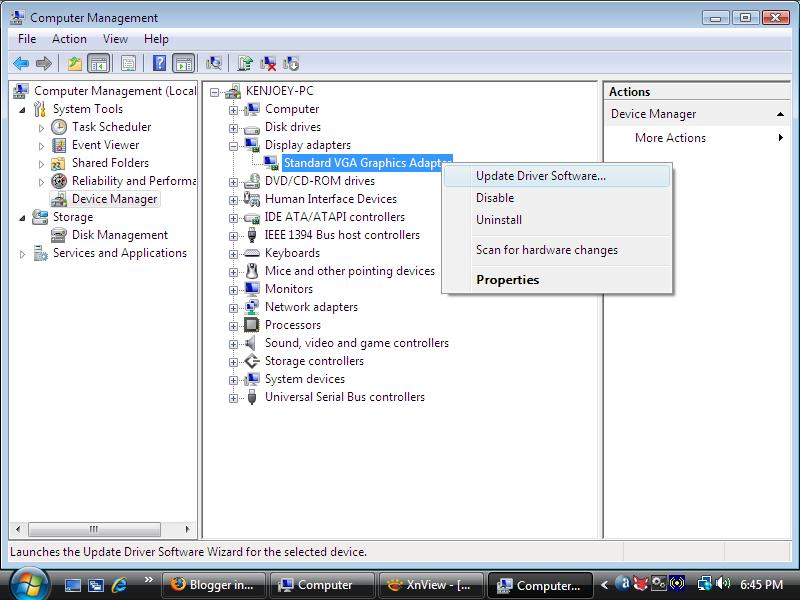
In the left pane, click Device Manager. In the right pane, expand the Display adapters section, right-click Standard VGA Graphics adapter and choose Update Driver Software.


Right-click Standard VGA Graphics adapter and choose Update Driver Software.

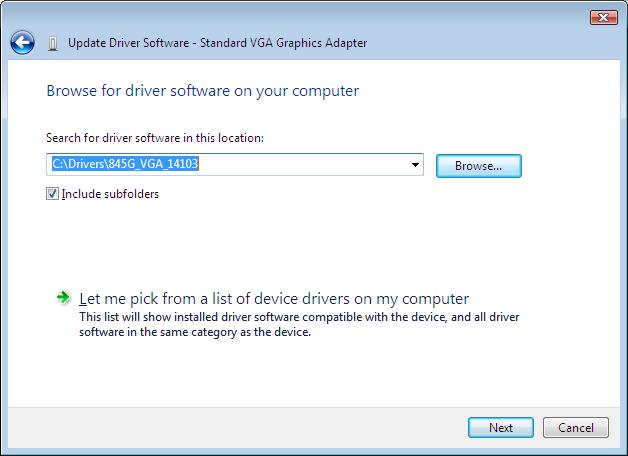
In the pop-up dialog, choose Browse My computer for driver software and indicate the folder where you unpacked the NVIDIA graphics driver. You'll get a warning that Windows can't verify the publisher of the driver. Just ignore the warning and go ahead with the installation. You may have to restart the PC again.


Go ahead with Vista driver installation

Voila, your NVIDIA RIVA TNT2 M64 video card may be a bit old but it still works OK with Windows Vista!

Tuesday, January 6, 2009

Disabling the Sleep Mode in Vista


With the default Vista power settings, pressing the Start menu power button will put the computer into a sleep mode. After newly installing Windows Vista, opening the Start menu will show the power button in amber yellow. This means clicking the power button will put the PC into the power-saving sleep mode instead of turning it off completely. The sleep mode saves the current state of the computer in memory, turns down the fans and keeps the PC quiet until you press a key or move a mouse.


But don't you find it annoying? I do. I want the PC turned off completely when I click the Power button. The following steps show you how to change Vista power settings so that clicking the Power button will turn off the PC:


  1. Click or press the Windows Logo button to open the Start menu.

  2. Click the Control Panel.

  3. Click System and Maintenance.

  4. Click Power Options.

  5. Click Change plan settings under the current preferred plan (by default, Balanced).

  6. Click Change advanced power settings.

  7. When the Power Options window appears, click the plus sign + next to Power buttons and lid to expand the section.

  8. Click the plus sign + next to Start menu power button.

  9. Change the Setting from Sleep to Shut down.

  10. Click OK to change the power options and close the window.

Monday, January 5, 2009

My List of Linux Distros to Try

Here I list Linux distros that I'd like to try and master.


RPM distrosDEB distrosOther distros
FedoraDebianFuduntu
OpenSUSEMintFrugalware
MageiaMEPIS 
   

Sunday, January 4, 2009

Hacking WEP with Backtrack 3

Today, we commonly find wireless networks around us. Most wireless networks are encrypted using WEP or WPA encryption methods. I covered the dictionary attack on WPA networks in a previous post. Compared to WPA, WEP has weak mechanism and is easy to crack.


Theory


At the time of conception, WEP, short for wired equivalent privacy, was believed to be secure. However, a security flaw was found in the IV headers of data packets that makes it possible to crack WEP if enough IV headers are collected. This tutorial takes advantage of this weakness in the initialization vectors of wireless packets to crack WEP. However, a problem may arise when there are multiple keys in use instead of just one.


What's Needed To Test Your Wireless Network


To crack WEP, you need a Backtrack CD and basic knowledge of Linux. Backtrack is a set of tools for testing network security. Download Backtrack and burn it onto a black CD with InfraRecorder or any other tool.


Then, boot your computer with the Backtrack CD. Hopefully, you'll be automatically presented with a nice and dark GUI screen of KDE.


Surveying Wireless Networks with Kismet


Launch Konsole which is located right next to the KDE Start menu. Open /usr/local/etc/kismet.conf in a text editor and edit the source= line to include your wireless device. For example, for Broadcom 43xx based card, put source=bcm43xx,eth1,bcm43xx. Save kismet.conf and start kismet.

Once kismet starts detecting wireless networks around, press s and P to sort the network list by packet counts in descending order. Press Up or Down key to move to the target network and press i for network information or c for client list. Write down such information as:


  • ESSID (wireless network name)
  • BSSID (MAC address of access point)
  • channel of wireless network
  • MAC address of clients

In Kismet, the flags for encryption are Y (WEP), N (No encryption), or O (WPA/WPA2). Press x to close popup windows and Q to exit Kismet.


Dumping Wireless Traffic with Airodump


To hack WEP, you need to use airodump-ng to sniff wireless traffic of the target network and collect good IV's (initialization vectors, a part of WEP encryption data). Type the following commands in a terminal window:


airmon-ng stop wlan0

airmon-ng start wlan0

airodump-ng -w logfile -c 9 --ivs wlan0

The commands above put the network device wlan0 in monitor mode and then use airodump-ng to log the wireless traffic. The -c option specifies the channel to listen to. The screen will show wireless networks and associated clients, if any, with a set of numbers increasing. Don't stop airodump-ng or close the terminal yet. Just leave the terminal open.


Using Aireplay-NG To Generate Traffic


Aireplay-ng is a handy tool that can be used to generate more wireless traffic in order to collect enough good IV's. It does so by injecting or replaying captured packets to fool the access point into giving us what we need.


To Force Association of Clients with Access Point


Open another terminal and enter the following command to associate the target wireless client with the access point:


aireplay-ng -1 30 -e belkin -a 00:11:22:33:44:55 -h 00:fe:21:83:f4:e5 wlan0

The -e option specifies the network name, the -a option specifies the MAC address of the AP, and the -h option specifies the MAC address of the wireless client.


You can use macchanger to view and change your MAC address, for example, macchanger -s wlan0. Then, you can associate your wireless adapter when there are no clients connected to the wireless network in the first place.


ARP Injection with Aireplay


ARP injection is slow but always works. While airodump-ng is listening, run the following command:


aireplay-ng -3 -b 00:11:22:33:44:55 -h 00:fe:21:83:f4:e5 wlan0

Whereas the -b option specifies the MAC address of the AP and -h specifies MAC address of the associated client. Let it run and airodump-ng will pick up traffic. If no client is connected, we can create one by fake authentication described above.


Interactive Packet Replay


This attack generates traffic by asking the access point to resend data packets.


aireplay-ng -2 -b <AP> -h <Client MAC> -n 160 -p 0841 -c FF:FF:FF:FF:FF:FF wlan0

Hacking WEP with Aircrack

Aircrack in Action


After collecting enough IV packets, aircrack-ng can be used to crack the WEP key. The syntax of the aircrack-ng command to use is like:


aircrack-ng -a 1 -b A0:B1:C2:D3:E4:F5 -n 128 logfile-01.ivs

Replace the filename with your log file that was previously generated with airodump-ng. Also, specify the access point's MAC address with -b option. The -n option specifies whether the WEP strength is 64-bit or 128-bit. The -a 1 option specifies that we're cracking WEP.


Can't Crack?


If you still can't crack WEP with tons of IV's, increase the fudge factor with -f N option (N>=2). It'll take much longer to crack but you'll have a better chance at success.


Related Posts


Saturday, January 3, 2009

Intel 845G Driver for Windows Vista

I salvaged an eMachine T1742 from an e-cycling dump. Someone had pried out the memory and hard drive from the unit. So I had to plug in new ones to set up a new PC. Then, I installed Windows Vista Home Premium Lite CD.

Windows Vista didn't recognize Intel 845G/845GL graphics chipset, so installed the driver for generic Standard VGA Graphics Adapter instead. After searching the Internet, I found the driver for Intel 845G/845GL graphics that can be used with Windows Vista. Just go to the Intel website and download the latest driver for Intel 82845G Graphics Controller. This chipset is outdated and in the archived drivers section. Get the Windows XP Professional driver for Intel 82845G Graphics controller.

Download the ZIP file (win2k_xp14103.zip) instead of the .EXE installer. Unpack it somewhere on your computer. Open the Start menu, right-click Computer, and select Manage.


Right-click Computer and select Manage.

In the left pane, click Device Manager. In the right pane, expand the Display adapters section, right-click Standard VGA Graphics adapter, and choose Update Driver Software.


Right-click Standard VGA Graphics adapter and choose Update Driver Software.

In the pop-up dialog, choose Browse My computer for driver software, and indicate the folder where you unpacked the Intel 82845G graphics driver.


Specify the folder where you put Intel 82845G driver.

If you get a warning that the driver is not digitally signed or authentic, just ignore the warning and go on with the installation. You may have to restart the PC.

One caveat with the driver is that the display may appear too bright at each boot time. Just adjust the Gamma, brightness and contrast settings in the Intel 845G control panel.

Friday, January 2, 2009

Project Directive: Building an Industrial PC

Project Directive


This directive outlines the purpose and requirements of the computer to be built in the near future.


Purpose of the Product


The machine will serve various purposes as stated below.


  1. Internet Gateway: The machine will be running almost always with constant wired or wireless connection to the Internet. The machine will have a gateway capability to connect other machines to the Internet via an Ethernet switch or wireless connection.
  2. Network Server: The machine will store and serve files (ex. pictures, music, movies, etc.) to clients both on private network and the Internet. However, the served files shall be stored and retrieved from an external storage device connected via USB, Firewire or eSATA.
  3. Internet Entertainment: The machine may be casually used to browse the Internet, hang out in social networks, read news, check Web mail and engage in text/voice/video conversation with others on the Internet.
  4. Multimedia Player: The machine will be able to play music, Internet radio and movies on stereo system, TV or monitor. It may be optionally controlled by a remote controller, wireless keyboard or mouse.
  5. Time-consuming Computations: The machine will optionally perform various computational tasks such as compilation of executable codes, encryption, decryption, statistical analysis and conversion of data.


Hardware Requirements


The machine shall occupy minimal space, and operate quietly and energy-efficiently.


  1. Its circuit board will be in Pico-ITX (100x72mm), Nano-ITX (120x120mm), Mini-ITX (170x170mm), or similarly compact form.
  2. The CPU will be Mobile AMD Sempron, VIA Nano or Intel Atom. In order to maintain quiet operation, it is recommended that the CPU have no fan attached.
  3. At least 256MB of volatile memory is required. SODIMM-type memory is recommended.
  4. Non-volatile memory will take the form of compact flash, Solid-State Drive or 2.5 inch hard drive. At least 256MB of non-volatile memory is required. Additional storage will be attached externally through USB, Firewire or eSATA ports.
  5. The machine will have a minimum number of external connectors such as one PS/2, VGA, S-Video, audio in/out, LAN and at least 2 USB ports. No serial or parallel port is required.
  6. The machine will contain no floppy or CD-ROM drive.


Software Requirements


The primary operating system will be Linux. Optionally, Windows XP or Windows Vista will be installed as a dual-boot option.


  1. The non-volatile memory storage in the system will store a functional boot loader that can boot the system from internal storage, external storage attached via USB/Firewire/eSATA, or network storage via BOOTP/TFTP.
  2. It is optional but recommended for the internal storage to contain a functional Linux operating system that meets the project purposes stated above. No private user-specific information shall be stored. For stability and data integrity, it is also recommended to write-protect the operating system and disable modification for a long period of time. Periodically (monthly, quarterly, every 4 months, or semianually), the whole operating system will be unlocked, updated with newer versions, and optimized with new settings.
  3. If Windows operating system is to be used, it will be installed on a USB hard drive and started by the boot loader.
  4. All variable/extraneous settings and data will be stored externally on a USB flash or USB hard drive.
  5. The machine should allow remote logins by local computers via SSH, HTTP, VNC or Remote Desktop sessions.


Candidate Parts


Monday, December 29, 2008

Backing up Hard Disk Partitions in Linux

To guard against disasterous hard disk failure or data loss, regular backup is very important. For Windows users, there's Norton Ghost which helps back up valuable data and settings in your hard disk. But for thrifty and savvy users, there's a nifty Linux tool called partimage. It's a simple console program but does its job great.

This tutorial guides you in backing up hard disk partitions in Linux. Let's assume you want to back up your Windows partition to a USB drive using partimage. If you are a Linux user, install partimage.

Otherwise, you can download and burn a System Rescue CD and boot with it. Connect your USB hard drive to your computer and mount it. If your USB drive has a FAT32 partition on /dev/sdb1, then the following command will mount it on /mnt:


mount -t vfat -o gid=100,dmask=2,fmask=113,shortname=winnt /dev/sdb1 /mnt

Make a folder called Backup and change to it:


cd /mnt

mkdir Backup

cd Backup

Save the partition table of your hard drive to a text file, assuming your hard drive is /dev/sda:


fdisk -l -u /dev/sda > hdptbl01.txt


Backing up with partclone


partclone is a new Linux tool for backing up and restoring hard disk partitions. The following command illustrates a situation where I back up the second partition, compress it on the fly and save the backup in 695M chunks.


partclone.ntfs -c -s /dev/sda2 | bzip2 -c | (cd /mnt/sdb1/Backup; split -d -b 695M - Backup-$(date +%F).partclone.bz2.)

Alternatively, you can use lzma to compress the backup.


partclone.ntfs -c -s /dev/sda2 | lzma -9c > Backup-$(date +%F).partclone.lzma

For quick backup, use lzop:


partclone.ntfs -c -s /dev/sda2 | lzop -c > backup-$(date +%F).partclone.lzo


Restoring Backups with Partclone


Here's a sample command:


cat Backup-2012-05-27.partclone.bz2.* | bzip2 -dc - | partclone.ntfs -r -o /dev/sda2


Backing up with Partimage


Assuming the partition to back up is /dev/sda1, the following command will back up /dev/sda1 in chunks of 695 MB so you can burn each piece on CD conveniently.


partimage -V 695 save /dev/sda1 backup01.pim

You'll be shown a number of options as seen below so you can tweak some settings. For example, if you want your computer to automatically power off after partimage finishes backup, check the Halt option. Press F5 to continue.


partimage save partition to image file options

Next, you will be given an option to enter description of the backup.


Partition Description

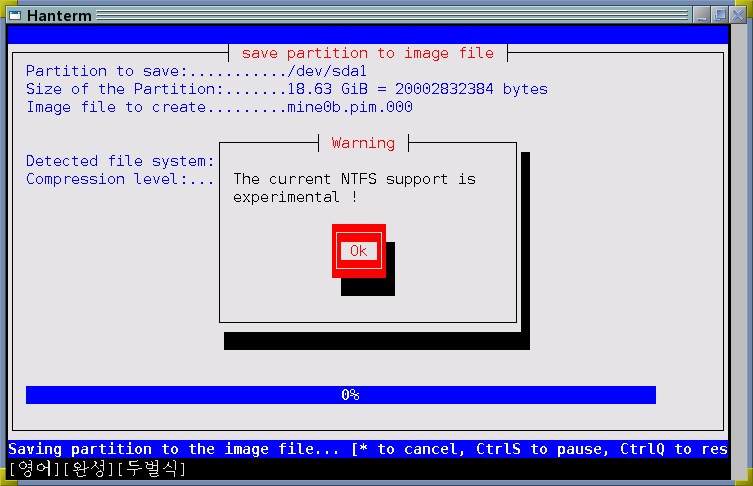
If the partition you're backing up is an NTFS partition (as most Windows partitions are), you'll be given the warning "The current NTFS support is experimental !". You can safely ignore it for now.


NTFS support is experimental

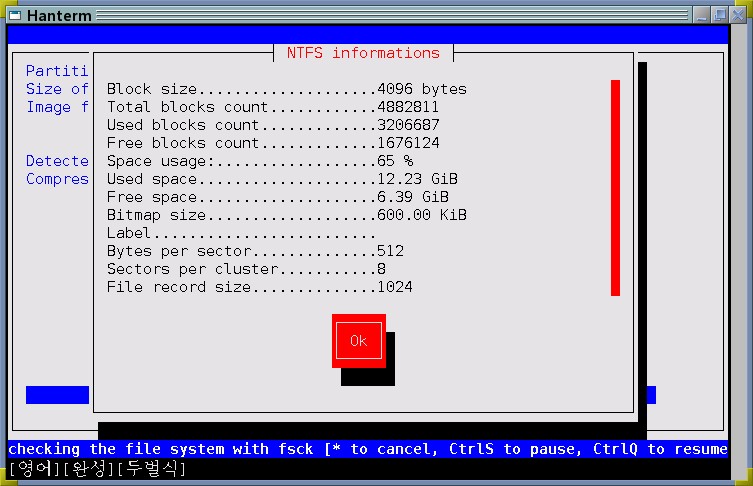
Next, you'll be shown NTFS information about the backup partition.


partimage NTFS information

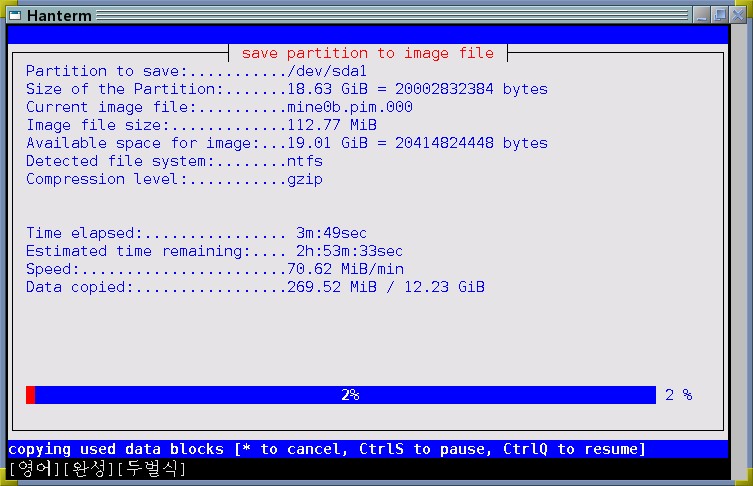
After that, partimage will start backing up as per instruction. A handful progress window will appear with the time remaining and progress in percentage.


partimage save partition to image file backup progress

Restoring Partitions with Partimage


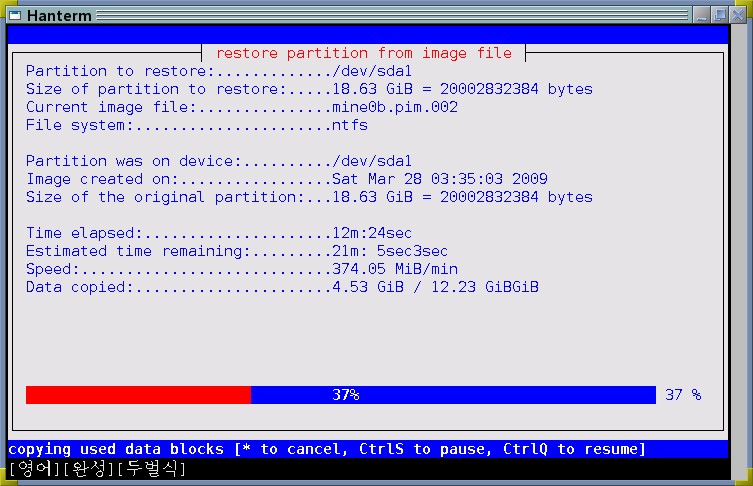
When something goes wrong with your computer, you can restore your hard disk partitions with the backup you've made with Partimage. First, make sure that you have a partition whose size is exactly the same as the partition the backup is made from. You can compare the current partition table with the contents of hdptbl01.txt file we've made earlier.

To restore the partition /dev/sda1 from a series of backup files starting with backup01.pim.000, open a console and type the following command:


partimage restore /dev/sda1 backup01.pim.000

Partimage restore partition from image file

Checking the Integrity of Partimage Backups


If you want to check partimage backups for integrity, specify the simulate option either on the command line or in the dialog, for example:


partimage --simulate restore /dev/sda1 backup01.pim.000


Related Posts


Saturday, December 27, 2008

Hacking WPA/WPA2 with Backtrack 3

WPA is an encryption scheme designed to secure the wireless network of your home or office from intruders and eavesdroppers. It is reportedly safer than WEP. There have been numerous attempts to break WEP and WPA encryption with mixed results. This tutorial discusses currently available techniques for testing the wireless network security. Be aware that breaking into your neighbor's network without permission is wrong.


What You Need


To test security of wireless networks, you can use the live CD Linux distribution called Backtrack. You can download its latest ISO image from Remote-Exploit.org and burn it with any CD burner program like InfraRecorder or CDBurnerXP. Alternatively, you can try the SliTaz Aircrack-NG distribution which is lighter and simpler than Backtrack.


Here's a list of what you need to crack WPA/WPA2:


Reboot your computer with a Backtrack CD and you'll be presented with the KDE environment.


Surveying Wireless Networks with Kismet


Launch Konsole which is located right next to the KDE Start menu. Open /usr/local/etc/kismet.conf in a text editor and edit the source= line to include your wireless device. For example, for Broadcom 43xx based card, put source=bcm43xx,eth1,bcm43xx. Refer to Kismet documentation section 12. Save kismet.conf and start kismet.


Once kismet starts detecting wireless networks around, press s and P to sort the network list by packet counts in descending order. Press Up or Down key to move to the target network and press i for network information or c for client list. Write down such information as:


  • ESSID (wireless network name)
  • BSSID (MAC address of access point)
  • channel of wireless network
  • MAC address of clients

Press x to close popup windows and Q to exit Kismet.

Brute-Force Dictionary Attack


This is the classic brute-force attack.


airmon-ng stop wlan0

airmon-ng start wlan0

The commands above put your wireless device in monitor mode. The monitor mode is the mode whereby your wireless card can listen to wireless traffic passively. Replace wlan0 with your wireless device name, such as eth1. Type iwconfig to make sure your card is in monitor mode.


airodump-ng -w test wlan0

Skip the step above if you used Kismet as in the previous section. Here airodump-ng is used to survey the wi-fi networks. Press Ctrl+C to stop airodump-ng. Copy BSSID (MAC address) of the target network.


airodump-ng -w logfile -c 3 --bssid A0:B1:C2:D3:E4:F5 wlan0

Sniff and log the target network (specified with --bssid option) on the specified channel (-c option) to the specified log file (-w option). Wait until WPA Handshake message appears on the screen. Then, stop airodump-ng by pressing Ctrl+C.


Optionally, if you see a client connected to the target network but no authentication handshake, then you can deauthenticate the client by running the following example command in a separate terminal:


aireplay-ng -0 5 -a 00:14:6C:7E:40:80 -c 00:0F:B5:FD:FB:C2 wlan0


where -a option specifies the access point and -c option specifies the client to deauthenticate. Hopefully, the command above will trick the client to renegotiate a 4-way authentication handshake with the access point. Otherwise, you'll have to wait until a handshake message shows up on airodump-ng outpout.

zcat /pentest/password/pico/cowpatty/final-wordlist.txt.gz > /tmp/wordlist.txt

aircrack-ng -a 2 -w /tmp/wordlist.txt logfile*.cap


Begin a brute-force dictionary attack using the saved log file(s) and the specified dictionary (-w option). Aircrack-ng will try every word in the dictionary until the correct passphrase is found. It may take hours or several days depending on the size of dictionary and the speed of your CPU to try every word in the dictionary. However, if the passphrase is not found in the dictionary or made up of random alphanumeric characters, then you are out of luck and just wasting your time. In this case, the dictionary attack won't be any good.


Finding a Good Dictionary


You need a good dictionary to crack WPA. Backtract 3 CD has wordlist files at the following locations:


/usr/local/john-1.7.2/password.lst

/pentest/fuzzers/spike/src/password.lst

/pentest/fuzzers/spike/src/wordlist

/pentest/password/pico/cowpatty/final-wordlist.txt.gz

/pentest/wireless/aircrack-ng/test/password.lst

/pentest/wireless/eapmd5pass/sample-wordlist.txt

/opt/windows-binaries/wordlist.txt.gz

Also, aircrack FAQ page has an extensive list of places where you can download good wordlists from. In addition, I found a good wordlist called 9-final-wordlist.zip here.


Further Readings


Friday, December 26, 2008

SMPlayer, the Ultimate Movie Player


There are a good number of programs that allow you to play DVD's and movie files. For me, SMPlayer is a powerful movie player. SMPlayer is in fact just a GUI frontend for MPlayer. I prefer compiling MPlayer by myself and use it with SMPlayer. However, compiling MPlayer may be a daunting task for most people, so I recommend a SMPlayer installer containing precompiled MPlayer binary. I'll write about how to compile MPlayer some day.


*UPDATE* I finally wrote tutorials on compiling MPlayer for Windows. If you're not afraid of compiling programs from sources, read the following posts:


  1. Installing MinGW and Code::Blocks on Windows
  2. Preparing for MPlayer Compilation
  3. To Compile MPlayer for Windows


Setting up SMPlayer


Assuming that you've compiled MPlayer by youself, download the SMPlayer package without MPlayer. The filename is something like smplayer-0.6.6_without_mplayer.7z. Unpack it using 7zip, Tugzip or Peazip, for example, at "C:\Program Files\smplayer-0.6.6". Create a shortcut to smplayer.exe on your desktop and double-click it. When SMPlayer shows up, select Preferences from the Options menu. In the Paths area of the General section, specify the location of your MPlayer executable. Quit and restart SMPlayer. Open Preferences again and choose the Video tab. Select directx (fast) as the video driver. Click the Audio tab and select dsound as the output driver. Click OK. Test SMPlayer by playing a movie.

Box Office Results of Movies 2008

The numbers are final for the 2008 Yearly Box Office Results. Here are the final rankings:


  1. The Dark Knight
  2. Iron Man
  3. Indiana Jones and the Kingdom of the Crystal Skull
  4. Hancock
  5. WALL-E
  6. Kung Fu Panda
  7. Twilight
  8. Madagascar: Escape 2 Africa
  9. Quantum of Solace
  10. Dr. Seuss' Horton Hears a Who!
  11. Sex and the City
  12. Mamma Mia!
  13. The Chronicles of Narnia: Prince Caspian
  14. The Incredible Hulk
  15. Wanted
  16. Get Smart
  17. Four Chrismases
  18. Marley and Me
  19. Tropic Thunder
  20. Bolt
  21. The Mummy: Tomb of the Dragon Emperor
  22. Journey to the Center of the Earth
  23. Eagle Eye
  24. Step Brothers
  25. You Don't Mess with the Zohan
  26. 10,000 B.C.
  27. Beverly Hills Chihuahua
  28. High School Musical 3: Senior Year
  29. Bedtime Stories
  30. Pineapple Express
  31. The Curious Case of Benjamin Button
  32. Yes Man
  33. 21
  34. What Happens in Vegas
  35. Jumper
  36. Cloverfield
  37. 27 Dresses
  38. Hellboy II: The Golden Army
  39. The Day the Earth Stood Still (2008)
  40. Vantage Point
  41. The Spiderwick Chronicles
  42. Fool's Gold
  43. Role Models
  44. Hannah Montana/Miley Cyrus: Best of Both Worlds Concert Tour
  45. Valkyrie
  46. The Happening
  47. Forgetting Sarah Marshall
  48. Seven Pounds
  49. Baby Mama
  50. Burn After Reading
  51. Step Up 2 the Streets
  52. Saw V
  53. The Strangers
  54. The Forbidden Kingdom
  55. The House Bunny
  56. Nim's Island
  57. Australia
  58. Made of Honor
  59. College Road Trip
  60. The Tale of Despereaux
  61. The Sisterhood of the Traveling Pants 2
  62. Speed Racer
  63. Prom Night (2008)
  64. Rambo
  65. Welcome Home Roscoe Jenkins
  66. Tyler Perry's Meet the Browns
  67. Nights in Rodanthe
  68. Max Payne
  69. Righteous Kill
  70. Body of Lies
  71. Lakeview Terrace
  72. Meet the Spartans
  73. Harold and Kumar Escape from Guantanamo Bay
  74. First Sunday
  75. The Secret Life of Bees
  76. Tyler Perry's The Family That Preys
  77. Death Race
  78. Changeling
  79. Star Wars: The Clone Wars
  80. Semi-Pro
  81. Fireproof
  82. Drillbit Taylor
  83. Definitely, Maybe
  84. The Love Guru
  85. Transporter 3
  86. Quarantine
  87. Nick and Norah's Infinite Playlist
  88. The Eye
  89. Leatherheads
  90. Zack and Miri Make a Porno
  91. Mirrors
  92. Slumdog Millionaire
  93. Space Chimps
  94. The Bank Job
  95. Untraceable
  96. The Women (2008)
  97. One Missed Call
  98. The Other Boleyn Girl
  99. Street Kings
  100. Shutter

Tuesday, December 23, 2008

Time for New Year's Resolution

The year 2008 is winding up. It's time to reflect on the last year and make a new year's resolution. The year 2008 has been a very tumultuous one both in the societal aspect and the personal aspect. However, it is said that a crisis can become an opportunity. Indeed, it is when we feel the most urgency that we embark on the most critical mission of our life.

I have about a week to think about the next year's plan. I have just a few thoughts:


  1. Get fit. A man's true strength lies in the brawn.
  2. Make money. Money is a measure of power in the modern.
  3. Master a foreign language, preferably Russian. Among my favorite languages, I believe Russian will be the next tongue of influences.

Monday, December 22, 2008

Fix Fonts in Vista Lite

Arial, Tahoma and Times New Roman are not displayed correctly when a CD edition of Windows Vista Home Premium is installed on your computer. To fix this problem, follow the following steps:


  1. Click the Start button to open the Start menu.
  2. Type regedit and press Enter. Registry Editor will appear on your screen.
  3. In the left pane, expand the registry tree to navigate to HKEY_LOCAL_MACHINE\SOFTWARE\Microsoft\Windows NT\CurrentVersion\FontSubstitutes.
  4. In the right pane, remove Arial, Microsoft Sans Serif, MS Sans Serif 8,10,12,14,18,24, MS Serif 8,10,12,14,18,24, Small Fonts, Tahoma and Times New Roman by selecting each one and pressing the Delete key. A dialog will pop up and ask you "Deleting certain registry values could cause system instability. Are you sure you want to permanently delete this value?" Answer Yes.
  5. Double-click Helv and replace its value with Arial.
  6. Double-click MS Sans Serif and replace its value with Microsoft Sans Serif.
  7. Replace the value of MS Serif, Times and Tms Rmn with Times New Roman.


Related Posts


Sunday, December 21, 2008

Applying an Fade-Out Effect to MP3 Using Audacity

When you download MP3's from the Internet, you occasionally get music files that have abrupt ending. These files occur because of incomplete downloads or CD's that have a track fading into another. In this case, you can use Audacity to fix the problematic music file. The following steps show how to apply an fade-out effect to such MP3 files that have abrupt ending.

Open the File menu and select Open... to open the audio file you want to work on. Audacity will display a popup window showing the progress of converting an MP3 to a wave file.

Once the conversion is done, click Zoom In multiple times until the units are in seconds. Select about 3 seconds at the end of the file.

Open the Effect menu and select Fade Out. Test the modified sound by clicking the Play button.

Save it back to an MP3 file. Open the File menu and select Export as MP3.

Saturday, December 20, 2008

Audacity Installation

Audacity is a multi-platform audio editor. You can use Audacity to edit MP3's and add sound effects such as fade-out to your music files. To install Audacity on Windows, download Audacity installer. You also need lame_enc.dll to edit and save MP3 files. If you have installed Winamp, lame_enc.dll is located in Winamp Plugins (C:\Program Files\Winamp\Plugins) folder.

Friday, December 19, 2008

iAUDIO U5: My Next MP3 Player to Buy

MP3 players are getting ubiquitous these days. One of the best MP3 player brands is COWON. Its products simply reflect the best in design and craftsmanship. The sound quality and sound effects featured in its products are far superior to other competitor's. I already own iAUDIO U3 2GB and know how good it is by experience.

I am in search of the next MP3 player to buy. Certainly, it's not going to be an iPod. iPod can't play MP3's, AFAIK. I chose to buy a product by COWON because COWON's products are full of functions not found in others. Of COWON's portable media player, I found iAUDIO U5 to be most attractive.


Monday, December 15, 2008

How to install ndiswrapper on Linux

Question


Can someone break it down step by step and tell me how to install ndiswrapper on Linux?

I just can't focus enough to understand what they're telling me to do. Can someone tell me how to do it step by step?


My Answer


1. The Linux kernel must have ndiswrapper support.
You can type "/sbin/modinfo ndiswrapper" to check whether kernel has
ndiswrapper module. If not, install a new kernel with ndiswrapper
support. Most decent Linux distros come with ndiswrapper support.
Otherwise, you have to compile a kernel yourself.

If you're going to compile ndiswrapper yourself, download the latest 2.6 kernel from http://www.kernel.org and ndiswrapper from ndiswrapper sourceforge site. Instruction for compiling and installing kernel and ndiswrapper is included in the tarballs.

2. If you have the ndiswrapper module, chances are you also have the
ndiswrapper tools. If running "ndiswrapper -l" displays "command not
found", install ndiswrapper-utils package in Debian or something
similar in other distros. If you compiled ndiswrapper yourself,
ndiswrapper support binaries are built at the same time.

3. Check if your wireless card or USB dongle is supported by ndiswrapper at http://ndiswrapper.sourceforge.net/jooml...
It's helpful to know your wireless device ID. If it's PCI, type "lspci
-nn" and look for numbers like 14E4:4312. If it's USB, lsusb will show
your device ID. Look for your device matching your device ID in the
Wiki. The wiki may also have helpful hints and links to download driver
files. Searching for "14E4:4312 ndiswrapper" at Yahoo! Search for example may give you helpful results.

4. Download and extract Windows driver for your Wireless gadget. If
you're lucky, ndiswrapper Wiki above has links to download Windows
driver. If not, get your driver CD that came with your gadget. If not,
mount your Windows partition and copy the files from
/Windows/System32/Drivers, /Windows/Inf, or
/Windows/System32/DriverStore/FileReposi... You typically need one .INF
file, one or more .SYS files for your device. You can use unzip,
cabextract or unshield to extract drivers from .EXE or .CAB files.

5. Once you extracted and have .INF, .SYS files ready, run "ndiswrapper
-i *.inf" against the INF file. This will copy the driver under
/etc/ndiswrapper folder.

6. Type "ndiswrapper -l" to make sure the driver is correctly installed.

zd1211u : driver installed

device (0ACE:1211) present (alternate driver: zd1211rw)


7. Now it's almost done. Run "modprobe ndiswrapper". iwconfig will
hopefully show your device as wlan0 or similar. Use iwconfig and
ifconfig to manually set up your device for wireless connection. There
may be GUI tools to automatically set up wireless networking for you.
For example:


iwconfig wlan0 key c9f8747de2f73d16816b3f828b restricted

iwconfig wlan0 essid linksys

ifconfig wlan0 192.168.1.253 up

route add default gw 192.168.1.1


8. This is optional. In Debian, you can add ndiswrapper into
/etc/modules file to have ndiswrapper automatically loaded at boot time.


Source(s):


http://ndiswrapper.sourceforge.net/jooml...

Sunday, December 14, 2008

Installing Hangul 2007

Hangul 2007 is a fine word processor developed by the Korean software company, Haansoft. It still claims a large user base in the Korean market.


If your Windows is in English locale, don't install the Hangul 2007 companion templates CD because the additional Korean fonts and Chinese/Japanese dictionaries won't be working correctly on English versions of Windows.

This key is known to work with Hangul 2007 installation.


Hangul 2007 installs the following fonts:


  • ahn_b.ttf
  • ahn_l.ttf
  • ahn_m.ttf
  • FZSong_Super.TTF
  • HBATANG.TTF
  • HDOTUM.TTF
  • HYBDAL.TTF
  • HYBDAM.TTF
  • HYBSRB.TTF
  • HYCYSM.TTF
  • HYDNKB.TTF
  • HYDNKM.TTF
  • HYGPRM.TTF
  • HYGSRB.TTF
  • HYGTRE.TTF
  • HYHWPEQ.TTF
  • HYKANB.TTF
  • HYKANM.TTF
  • HYMJRE.TTF
  • HYMPRL.TTF
  • HYNAMB.TTF
  • HYNAML.TTF
  • HYNAMM.TTF
  • HYPORM.TTF
  • HYSANB.TTF
  • HYSNRL.TTF
  • HYSUPB.TTF
  • HYSUPM.TTF
  • HYTBRB.TTF
  • HYWULB.TTF
  • HYWULM.TTF
  • UNI_HSR.TTF


Hangul companion CD installs the following fonts:


  • Along.ttf
  • Art.ttf
  • Easop.ttf
  • Gaesung.ttf
  • Sol.ttf


Related Posts


Saturday, December 13, 2008

Additional Fonts For Windows

After installing a CD edition of Windows Vista, some fonts necessary for displaying international scripts are missing from the default installation. In order to correctly display foreign characters, the following fonts need to be installed.


  • Aegean.otf

    Covers Basic Latin, Greek and Coptic, Greek Extended, some Punctuation and other Symbols, Linear B Syllabary, Linear B Ideograms, Aegean Numbers, Ancient Greek Numbers, Ancient Symbols, Phaistos Disc, Lycian, Carian, Old Italic, Ugaritic, Old Persian, Cypriot Syllabary, Phoenician, Lydian, Archaic Greek Musical Notation.
  • TagDoc93.ttf for the Tagalog script which had been used in the ancient Philippines
  • cerg_chi.ttf

    Contains both traditional and simplified Chinese ideographs
  • damase_v.2.ttf

    Covers Armenian, Cherokee, Coptic (Bohairic subset), Cypriot Syllabary, Cyrillic (Russian and other Slavic languages), Deseret, Georgian (Asomtavruli and Nuskhuri but no Mkhedruli), Glagolitic, Gothic, Greek (including Coptic characters), Hebrew, Latin, Limbu, Linear B (partial coverage of ideograms and syllabary), Old Italic, Old Persian cuneiform, Osmanya, Phoenician, Shavian, Syloti Nagri (no conjuncts), Tai Le (no combining tone marks), Thaana, Tifinagh, Ugaritic, and Vietnamese.
  • dilyan.ttf for Glagolitic and Cyrillic (Old Church Slavonic) alphabets.
  • hapaxber.ttf for the Tifinagh script which is used to write Berber languages in North Africa.
  • ipagp.ttf to display the Japanese language.
  • malgun.ttf and malgunbd.ttf to display the Korean language.
  • mm3.ttf for the Burmese/Myanmar script.
  • newathu.ttf

    Covers English and Western European languages, polytonic Greek, Coptic, Old Italic, and Demotic Egyptian transliteration, as well as metrical symbols and other characters used by classical scholars.
  • tagbanwa.ttf for the Tagbanwa script which had been used in the ancient Philippines.
  • taileval.ttf for the Tai Le script.


OpenOffice.org 3.0 installs the DejaVu and Open Symbols fonts.

To see a list of fonts installed by Microsoft Office 2007, go here.

Related Posts


My Next Project: Assembling a USB Hard Drive

I need a huge storage device to store all my software and digital media. I shopped around for a USB hard drive. At CostCo, I found Maxtor OneTouch 750GB external hard drive for $99.99 which I think is a great deal. However, I found a bunch of bad reviews for this product. It seems that a lot of buyers found this product broken after using it for some time. Sorry, but it happens.

So I decided it's a better idea to assemble a USB Hard Drive for myself. The first thing I need to buy is an hard drive enclosure. I found a few:


The next thing to buy is a SATA hard drive, hopefully 1 or 1.5 TB one. The question is the price. Hopefully, I'll find a deal when there's a holiday sale.

About This Blog

KBlog logo This blog is about current events and issues concerning general population. Thanks for visiting the blog and posting your comments.

© Contents by KBlog

© Blogger template by Emporium Digital 2008

Followers

Total Pageviews

icon
Powered By Blogger