Wednesday, June 2, 2010

Compiling GTK+ Theme Engines

The GTK+ widget library supports diverse customization of look and feel for GTK+ applications. This is achieved by installing a shared library (*.so or *.dll) that provides a particular GTK+ theme style. The default GTK+ theme engine (Raleigh) is too generic and old-fashioned to suit my style. The pixmap engine is too much of a resource hog, and the Wimp engine doesn't seem to work for GTK+ 2.18 and later releases.


My favorite GTK+ theme engines are thus:


  • Aurora engine
  • Candido engine
  • CleanIce engine
  • Clearlooks engine
  • Lighthouseblue engine
  • MagicChicken engine
  • Murrine engine
  • Nodoka engine
  • Rezlooks engine
  • Smooth engine
  • Wonderland engine


Compiling GTK+ Theme Engines 2.20.1


After building GTK+ 2 library, I can compile GTK+ theme engines, including Clearlooks and Lighthouseblue. I couldn't find the upstream release of gtk2-engines, so I downloaded the source from Debian Sid's page.


gtk2-engines requires intltool, so I compiled intltool first.


tar xzvf intltool-0.41.1.tar.gz
cd intltool-0.41.1
./configure --prefix=/mingw
make
make install

configure script will complain if xgettext, msgmerge and msgfmt are not found. I got these programs from my static gettext package I compiled previously.


Then, I compiled gtk-engines as follows:


tar xzvf gtk2-engines_2.20.1.orig.tar.gz
cd gtk-engines-2.20.1/
./configure --prefix=/mingw --disable-deprecated --enable-animation
make

I only wanted clearlooks, so I copied libclearlooks.dll.


find -iname \*dll
cp ./engines/clearlooks/.libs/libclearlooks.dll /mingw/lib/gtk-2.0/2.10.0/engines


Compiling Aurora Theme Engine


I downloaded the Aurora source from here and unpack it. I compiled Aurora like this:


./configure --prefix=/mingw --enable-animation
make
make install


Cygwin: Compiling Smooth Theme Engine


The source code of smooth theme engine can be downloaded from here. Compiling is easy:


./configure --prefix=/usr
make
make install

Monday, May 31, 2010

Compiling GTK+ for Windows with MinGW

GTK+ is a set of open-source widget libraries that are mature, functional and portable. GTK+ library is mainly used by many Linux programs. I am building a complete stack of GTK+ 2.x library before beginning my programming projects. This tutorial makes use of the free MinGW compiler to build GTK+.


If you haven't installed MinGW yet, read this tutorial on installing MinGW in Windows. Alternatively, you can also install MinGW Portable on your USB flash drive so you can enjoy compiling anywhere. GTK+ depends on many basic libraries that provide image, localization, font and other functions. These prerequisite libraries have be compiled first. Once you've installed MinGW and MSYS, launch MSYS. The following steps require you to type commands into MSYS console.


  1. Zlib 1.2.7


    Zlib is an essential compression library required by png, tiff and cairo. Get the zlib source and unpack it:

    tar xzvf zlib-1.2.7.tar.gz
    cd zlib-1.2.7/

    Compile zlib like this:


    make -f win32/Makefile.gcc

    Then, manually copy the files as follows:


    cp -iv zlib1.dll /mingw/bin
    cp -iv zconf.h zlib.h /mingw/include
    cp -iv libz.a /mingw/lib
    cp -iv libz.dll.a /mingw/lib


  2. libiconv 1.14


    libiconv is a character-set conversion library, and is needed by gettext. Download the libiconv source and compile libiconv:


    ./configure --prefix=/mingw
    make
    make install


  3. gettext 0.18.1.1


    GNU gettext is a tool for localizing and translating programs. Build gettext like this:


    ./configure --prefix=/mingw --enable-threads=win32 --enable-relocatable
    cd gettext-runtime/
    make
    make install


  4. glib 2.32.4


    glib's configure script requires pkg-config.exe and msgfmt.exe in the PATH. Download the executables and save them in /mingw/bin. Remember to set the system-wide environment variable PKG_CONFIG_PATH:


    export PKG_CONFIG_PATH=/mingw/lib/pkgconfig

    glib 2.30 and later depends on libffi. Compile libffi like this:


    ./configure --prefix=/mingw && make && make install

    Then, get the glib source from ftp.gnome.org and compile glib as follows:


    ./configure --prefix=/mingw --with-threads=win32 --with-pcre=internal --disable-debug
    make
    make install


  5. ATK 2.4.0


    Download ATK from here. Compile it like this:


    ./configure --prefix=/mingw
    make
    make install


  6. libpng 1.5.12


    PNG can be compiled like this:


    ./configure --prefix=/mingw
    make
    make install


  7. Optional libraries


    The following libraries are optional, but many GTK+ packages include them. It's up to you to decide whether to compile them or not.


    As usual, compile any of them like this:


    ./configure --prefix=/mingw && make && make install


  8. Pixman 0.26.2 and Cairo 1.12.2


    Get Pixman and Cairo from cairographics.org. Compile Pixman as follows:


    ./configure --prefix=/mingw

    make

    make install

    Then, compile cairo:


    ./configure --prefix=/mingw --enable-pthread
    make
    make install


  9. Pango Library 1.30.1


    Compile Pango like this:


    ./configure --prefix=/mingw --with-included-modules=yes

    make

    make install


  10. gdk-pixbuf 2.26.2


    Download and compile gdk-pixbuf:


    ./configure --prefix=/mingw --without-libjasper --with-included-loaders=yes --disable-modules --disable-debug
    make
    make install


  11. GTK+ 2.24.11 and GTK+ 3.4.2


    At last, we are ready to compile GTK+ for Windows. I compiled GTK+ like this:


    ./configure --prefix=/mingw --with-included-immodules=ime --disable-modules --disable-debug

    make

    make install


    To test your newly compiled GTK+ library, run gtk-demo.exe or testgtk.exe.


Wednesday, May 19, 2010

My Windows Vista/7 Power Settings

Here are my power settings on Windows Vista or Windows 7. I find the default setting annoying or inadequate, especially the Start menu power button triggering sleep.


  • Lid Close Action
    • On Battery: Sleep
    • Plugged in: Do nothing


  • Power Button Action
    • On Battery: Hibernate
    • Plugged in: Hibernate


  • Sleep Button
    • On Battery: Sleep
    • Plugged in: Hibernate


  • Start menu power button
    • On Battery: Shut down
    • Plugged in: Shut down

Sunday, May 16, 2010

Using Mencoder To Merge AVI Files

Merging 2 AVI files can be easily accomplished with mencoder. But the two AVI files must be encoded with the same video and audio codec. Assuming that you have part1.avi and part2.avi, seamlessly consecutive, the mencoder command to concatenate them is:


mencoder -ovc copy -oac copy -o whole.avi part1.avi part2.avi

Wednesday, May 5, 2010

Using VLC to Dump a DVD title

VLC is a free, powerful media player for Windows, Mac and Linux. I've used VLC mainly for playing Movies. Sometimes, I use VLC to listen to Internet radio. I seldom use VLC to rip DVD's but VLC can come in handy when dealing with tricky DVD titles. For DVD titles with mixed VOB ID's, VLC can be used to dump such DVD titles. Follow the steps below:


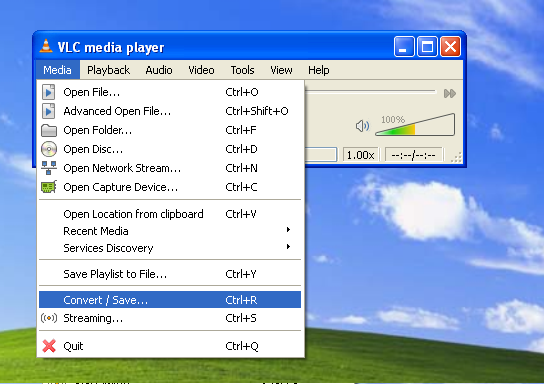
  1. From the Media menu of VLC, select Convert/Save...

    VLC Media Convert
  2. Choose the Disc tab. In the Disc Selection area, choose DVD and check No DVD menus. Type in the drive letter (for example, F:\) for your DVD drive. The main title number is typically 1, but may vary. Audio track is usually 0 for the primary language (English) and 1 for secondary lanuage (French or Spanish). Click Convert/Save button.


  3. In the next Convert window, click the Create a new profile button.


  4. Name the new profile as Copy Without Conversion. In the Video codec tab, check both options Video and Keep original video track.


    In the Audio codec tab, check both options Audio and Keep original audio track.


    Leave anything else as is. Click Save.


  5. Back to the Convert window, type in the name for Destination file (E:\output.ts). For the profile, select the newly created profile (Copy Without Conversion) from the dropdown list. Click Start.


  6. VLC starts saving the DVD title to a disk file.


Although VLC has many built-in functions for ripping DVD's and converting movies, I don't have much experience with them. I think VLC's transcoding function is premature.


After VLC finishes conversion, you'll get an output file (output.ts) whose size may be up to several gigabytes. Now, use mencoder to transcode it.


Related Links


Friday, April 30, 2010

Compile wxDownload Fast for Windows

I once used wxDownload Fast as a tool for getting something off the Web quickly. But it crashes every once in a while. So I stopped using it long ago. Now I am compiling wxDownload Fast only to test my static wxMSW library.


I am using MinGW GCC compiler to build wxDownload Fast. I downloaded the source for wxDownload Fast. I unpacked the source and configured it:


tar xzvf wxdfast_0.6.0.tar.gz
cd wxdfast-0.6.0/
./configure --prefix=/mingw --enable-win32build


I got some errors during the final linking stage. I had to modify src/Makefile to fix the errors. The end of Makefile was modified.


wxDFast.res: wxDFast.rc
windres -i $< -J rc -O coff -o $@ --include-dir=/mingw/include/wx-2.8


The other fix involves linking with expat because my wxMSW library depends on expat.


wxdfast$(EXEEXT): $(wxdfast_OBJECTS) $(wxdfast_DEPENDENCIES) 
@rm -f wxdfast$(EXEEXT)
$(CXXLINK) $(wxdfast_LDFLAGS) $(wxdfast_OBJECTS) $(wxdfast_LDADD) $(LIBS) -lexpat


Then, I started make.


make
make install


I double-clicked wxdfast and it started alright. The following files are installed onto the system (under the MinGW folder).


./bin/wxdfast.exe
./share/applications/wxdfast.desktop
./share/locale/cs/LC_MESSAGES/wxDFast.mo
./share/locale/de/LC_MESSAGES/wxDFast.mo
./share/locale/es/LC_MESSAGES/wxDFast.mo
./share/locale/fr/LC_MESSAGES/wxDFast.mo
./share/locale/hu/LC_MESSAGES/wxDFast.mo
./share/locale/id/LC_MESSAGES/wxDFast.mo
./share/locale/nl/LC_MESSAGES/wxDFast.mo
./share/locale/pl/LC_MESSAGES/wxDFast.mo
./share/locale/pt_BR/LC_MESSAGES/wxDFast.mo
./share/locale/ru/LC_MESSAGES/wxDFast.mo
./share/locale/tr/LC_MESSAGES/wxDFast.mo
./share/man/man1/wxdfast.1
./share/man/pt_BR/man1/wxdfast.1
./share/pixmaps/wxdfast.png
./share/wxdfast/RipStop/icon/dfast48x48.png
./share/wxdfast/RipStop/icon/wxdfast.ico
./share/wxdfast/RipStop/icon/wxdfast.png
./share/wxdfast/RipStop/license.txt
./share/wxdfast/RipStop/logo/about.png
./share/wxdfast/RipStop/menubar/about.png
./share/wxdfast/RipStop/menubar/completed.png
./share/wxdfast/RipStop/menubar/copydata.png
./share/wxdfast/RipStop/menubar/copyurl.png
./share/wxdfast/RipStop/menubar/details.png
./share/wxdfast/RipStop/menubar/downloading.png
./share/wxdfast/RipStop/menubar/error.png
./share/wxdfast/RipStop/menubar/find.png
./share/wxdfast/RipStop/menubar/graph.png
./share/wxdfast/RipStop/menubar/help.png
./share/wxdfast/RipStop/menubar/new.png
./share/wxdfast/RipStop/menubar/options.png
./share/wxdfast/RipStop/menubar/pasteurl.png
./share/wxdfast/RipStop/menubar/pause.png
./share/wxdfast/RipStop/menubar/progressbar.png
./share/wxdfast/RipStop/menubar/properties.png
./share/wxdfast/RipStop/menubar/quit.png
./share/wxdfast/RipStop/menubar/remove.png
./share/wxdfast/RipStop/menubar/schedule.png
./share/wxdfast/RipStop/menubar/scheduled.png
./share/wxdfast/RipStop/menubar/start.png
./share/wxdfast/RipStop/menubar/startall.png
./share/wxdfast/RipStop/menubar/stop.png
./share/wxdfast/RipStop/menubar/stopall.png
./share/wxdfast/RipStop/preview/ripstop.png
./share/wxdfast/RipStop/preview/wxdownloads_small.png
./share/wxdfast/RipStop/readme.txt
./share/wxdfast/RipStop/svg/ripstop.svg
./share/wxdfast/RipStop/svg/wxdownloads_small.svg
./share/wxdfast/RipStop/toolbar/download_info.png
./share/wxdfast/RipStop/toolbar/download_move_down.png
./share/wxdfast/RipStop/toolbar/download_move_up.png
./share/wxdfast/RipStop/toolbar/download_new.png
./share/wxdfast/RipStop/toolbar/download_remove.png
./share/wxdfast/RipStop/toolbar/download_schedule.png
./share/wxdfast/RipStop/toolbar/download_start.png
./share/wxdfast/RipStop/toolbar/download_start_all.png
./share/wxdfast/RipStop/toolbar/download_stop.png
./share/wxdfast/RipStop/toolbar/download_stop_all.png
./share/wxdfast/boxabout.xrc
./share/wxdfast/boxnew.xrc
./share/wxdfast/boxoptions.xrc
./share/wxdfast/images.xrc
./share/wxdfast/mainwindow.xrc
./share/wxdfast/menubar.xrc
./share/wxdfast/toolbar.xrc
./share/wxdfast/xpm/big/close.xpm
./share/wxdfast/xpm/big/down.xpm
./share/wxdfast/xpm/big/new.xpm
./share/wxdfast/xpm/big/properties.xpm
./share/wxdfast/xpm/big/remove.xpm
./share/wxdfast/xpm/big/schedule.xpm
./share/wxdfast/xpm/big/start.xpm
./share/wxdfast/xpm/big/startall.xpm
./share/wxdfast/xpm/big/stop.xpm
./share/wxdfast/xpm/big/stopall.xpm
./share/wxdfast/xpm/big/up.xpm
./share/wxdfast/xpm/small/error.xpm
./share/wxdfast/xpm/small/exit.xpm
./share/wxdfast/xpm/small/graph.xpm
./share/wxdfast/xpm/small/new.xpm
./share/wxdfast/xpm/small/noresume.xpm
./share/wxdfast/xpm/small/ok.xpm
./share/wxdfast/xpm/small/options.xpm
./share/wxdfast/xpm/small/paste.xpm
./share/wxdfast/xpm/small/progress.xpm
./share/wxdfast/xpm/small/properties.xpm
./share/wxdfast/xpm/small/queue.xpm
./share/wxdfast/xpm/small/remove.xpm
./share/wxdfast/xpm/small/resume.xpm
./share/wxdfast/xpm/small/schedule.xpm
./share/wxdfast/xpm/small/start.xpm
./share/wxdfast/xpm/small/startall.xpm
./share/wxdfast/xpm/small/stop.xpm
./share/wxdfast/xpm/small/stopall.xpm
./share/wxdfast/xpm/small/wxdfast.xpm
./share/wxdfast/xpm/wxdfast.ico
./share/wxdfast/xpm/wxdfast.xpm

Sunday, April 25, 2010

Setting Up Codecs For Windows 7

Although Windows 7 provides wider support for multimedia files, including H.264, XviD, DIVX and AAC, Windows Media Player 12 has some bugs, such as jittery DVD sound. For satisfying multimedia experience in Windows 7, one needs to take some steps to set up additional codecs. Though ffdshow is a comprehensive codec package, I am going to use alternative codecs other than ffdshow.


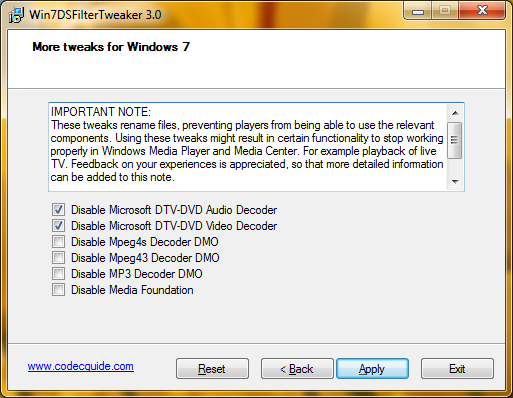
  1. Go to C:\Windows\System32 and rename msmpeg2adec.dll and msmpeg2vdec.dll. Alternatively, run Win7DSFilterTweaker and check both Disable Microsoft DTV-DVD Audio decoder and Disable Microsoft DTV-DVD Video decoder.

    Win7DSFilterTweaker 3.0


  2. Install DirectShow FilterPack (DSFP.zip) which only contains DirectShow source filters and splitters, but no codecs. Unpack the package (DSFP-3.32.exe) into C:\Program Files. Start the Command Prompt (cmd.exe) as administrator and run the batch file DSFP_inst.bat.

    cd "C:\Program Files\DirectShow FilterPack"
    DSFP_inst.bat


  3. Install XviD codec.

  4. Install AC3filter which allows Media Player to play AC3 and DTS sound.

  5. Install DirectShow filters for Ogg Vorbis, Speex, Theora and FLAC from xiph.org.

  6. Obtain CLVsd.ax from the Web and run the following command in an elevated Command Prompt.

    regsvr32 CLVsd.ax

    CLVsd.ax can be obtained this way:


    • Download PowerDVD from filehippo.
    • Right-click the installer (CyberLink.1705(Trial)_DVD100510-04.exe) and open it with 7-zip.
    • Right-click data1.cab and choose Open Inside.
    • Extract the file _64A6CC87C2FD46EDBDBCC13164131D6A (1,086,832 bytes) to C:\Windows\System32 folder.
    • Rename _64A6CC87C2FD46EDBDBCC13164131D6A as CLVsd.ax.
    • Run "regsvr32 CLVsd.ax" as administrator.


  7. Open the registry editor (regedit) and navigate to HKLM\SOFTWARE\Microsoft\Windows\CurrentVersion\Media Center\Decoder and find the entry PreferredMPEG2VideoDecoderCLSID. Double-click the entry and enter {516F1EFA-42F4-436E-801C-B752EB9343EB} (UUID for Cyberlink decoder). You can verify the CLSID with Radlight Filter Manager (DSFM.exe) that was installed by DirectShow FilterPack above.

  8. Download the DirectVobSub filter, also known as VSfilter. Copy VSFilter.dll to C:\Windows\System32 and run the following command:

    regsvr32 VSFilter.dll


Saturday, April 24, 2010

MinGW: To Compile Vorbis Tools

Vorbis tools include oggenc and vorbiscomment that can be used to produce Ogg-Vorbis music files. Ogg Vorbis provides people with free, open-source audio format and encoding algorithm. Because the MP3 algorithm is patented and creating MP3 exposes people to legal risks, use of the Ogg Vorbis format is a reasonable choice for legally conscious people. Besides its openness and patent-free characteristics, Ogg Vorbis offers good compression and sound quality, comparable to MP3 and AAC. Therefore, everyone is recommended to create, use and spread Ogg Vorbis music files, instead of MP3 and AAC.


To learn how to prepare a MinGW environment, read this post. Then, download the source for libogg, libvorbis and vorbis-tools from xiph.org.


To build Vorbis tools, libogg and libvorbis should be compiled first. Start the MinGW rxvt console from the Start menu. Unpack the libogg source and compile it as follows:


tar xzvf libogg-1.2.0.tar.gz
cd libogg-1.2.0/
./configure --prefix=/mingw
make
make install


libvorbis can be compiled likewise:


tar xzvf libvorbis-1.3.1.tar.gz
cd libvorbis-1.3.1/
./configure --prefix=/mingw
make
make install


Then, build vorbis-tools as follows:


tar xzvf vorbis-tools-1.4.0.tar.gz
cd vorbis-tools-1.4.0/
./configure --prefix=/mingw --disable-nls --enable-threads=win32
make
make install


When done, the following files are created in /mingw/bin:


libogg-0.dll
libvorbis-0.dll
libvorbisenc-2.dll
libvorbisfile-3.dll
oggdec.exe
oggenc.exe
ogginfo.exe
vorbiscomment.exe


Copy these files whereever you want. To create an Ogg Vorbis file from a .WAV file, use a command like this:


oggenc -q5 audio.wav


Related Posts


Wednesday, April 21, 2010

Using IFOEdit To Dump a DVD Stream

I was using MPlayer to rip a DVD, but had a trouble dumping the third DVD title that was stored in the same VOB stream as the second DVD title. Running mplayer dvd://2 -dvd-device E:\ -vf cropdetect -identify showed the following output:


Playing dvd://2.
ID_DVD_TITLES=3
ID_DVD_TITLE_1_CHAPTERS=2
ID_DVD_TITLE_1_ANGLES=1
ID_DVD_TITLE_2_CHAPTERS=6
ID_DVD_TITLE_2_ANGLES=1
ID_DVD_TITLE_3_CHAPTERS=6
ID_DVD_TITLE_3_ANGLES=1
ID_DVD_TITLE_1_LENGTH=0.800
ID_DVD_TITLE_2_LENGTH=3196.467
ID_DVD_TITLE_3_LENGTH=3167.333


As can be seen, the longest titles are the main titles. I could dump the second DVD title with the following command:


mplayer dvd://2 -dvd-device E:\ -v -dumpstream -dumpfile title2.vob


But running mplayer dvd://3 -dvd-device E:\ -v -dumpstream -dumpfile title3.vob or mplayer dvd://3 -dvd-device E:\ crashed mplayer with the following error:


DVD Seek! lba=0xFFF08207 cell=0 packs: 0x108207-0x11AFA8

stream_seek: WARNING! Can't seek to 0xFFFFFFFF84103800 !

Core dumped ;)


I supposed this error is due to DVD copy protection. In this case, the DVD had two episodes of a show, but the episodes were stored in the same set of *.VOB files, specifically:


VTS_01_0.IFO
VTS_01_0.VOB
VTS_01_1.VOB
VTS_01_2.VOB
VTS_01_3.VOB
VTS_01_4.VOB
VTS_01_5.VOB


The first episode was in VTS_01_1.VOB, VTS_01_2.VOB and the beginning part of VTS_01_3.VOB whereas the second episode was in the latter part of VTS_01_3.VOB, VTS_01_4.VOB and VTS_01_5.VOB. I tried mplayer but couldn't extract the DVD title I wanted.


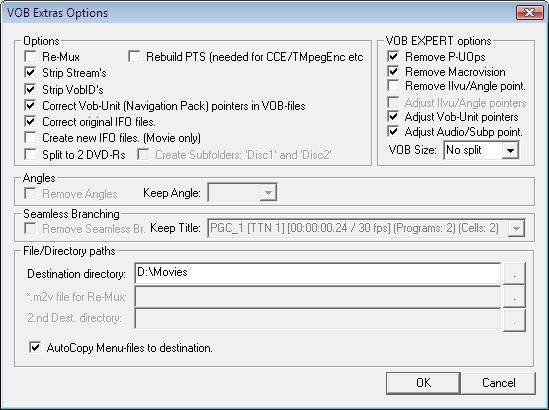
So I started IfoEdit which is useful for DVD authoring and fixing. I opened VTS_01_0.IFO in IfoEdit and clicked the VOB Extras button at the bottom of IfoEdit window. Specify the destination directory and click OK.


VOB Extras Options

In the next dialogs, choose the Audio track and the video stream you want to include in the output.

Sunday, April 11, 2010

Tools for Downloading Stuff from the Internet

You can get a variety of software, music and movies from the Internet. Some of them are legally okay to download like open-source software and free publications, but there are things you're not legally allowed to download, such as most music and movies. However, with the increasing availability of high-speed Internet and P2P software, the Internet is exponentially growing in the number of downloadable stuff.

There are so many software for downloading stuff from the Net, but only a few good ones are listed here.


  • amule

    Multi-platform program for downloading from ed2k or Kad networks.
  • aria2

    Command-line tool for downloading from Web, FTP, Bittorrent and Metalinks. Very Light , Fast and Efficient.
  • eMule

    Old-school ed2k client for downloading from eDonkey or Kademlia networks.
  • Frostwire

    Limewire clone that allows you to download from Gnutella or Bittorrent network.
  • gtk-gnutella

    Open-source Linux/*BSD client for Gnutella network.
  • HalogenWare Retriever

    Java software for downloading from HTTP, FTP, Bittorrent and Metalinks.
  • MLDonkey and Sancho

    Yet another eDonkey client
  • Phex

    Gnutella client that keeps getting better
  • Transmission bittorrent client

    I like to compile transmission-daemon and use it with a GUI frontend, such as transmission-remote-gui
    and transmission-remote-dotnet.
  • wxDownload Fast

    simple wxWidgets application that lets you quickly download from FTP and HTTP. Read my guide to compiling it here.


Once you have P2P software installed, you'll want to know more about how to search for files on the Internet. The following is a list of search engines for P2P users.


Friday, April 9, 2010

MinGW: Building TwoLAME

TwoLAME is MPEG-2 audio encoder. First, compile libsndfile which is used is read sound files in various formats.


tar xzvf libsndfile-1.0.21.tar.gz
cd libsndfile-1.0.21/
./configure --prefix=/mingw --disable-shared --enable-static
make
make install

Then, build twolame.


tar xzvf twolame-0.3.12.tar.gz
cd twolame-0.3.12/
./configure --prefix=/mingw CPPFLAGS='-DLIBTWOLAME_STATIC'
make
make install

When linking a program with a static TwoLAME library, define LIBTWOLAME_STATIC with CPPFLAGS.


CPPFLAGS=' -DLIBTWOLAME_STATIC' ./configure --enable-static --enable-twolame

MinGW: MPlayer와 Mencoder 동적 컴파일하기

MinGW의 GCC 컴파일러를 사용하여 Windows용 MPlayer와 Mencoder를 컴파일해 보자. MPlayer는 동영상을 보는 프로그램이고 Mencoder는 동영상이나 음악을 인코딩하는 프로그램이다. 예전에는 정적으로 컴파일하였지만 이번에는 동적으로 컴파일해 보자.


우선 MinGW를 설치한다. MPlayer는 FFmpeg 라이브러리에 의존하므로 먼저 FFmpeg 라이브러리를 동적으로 컴파일하도록 한다.


시작 메뉴를 열어 MinGW (rxvt)를 실행한다. 노란 창이 나타날 것이다. 그럼 다음과 같이 MPlayer와 의존 라이브러리를 컴파일하자.


  1. LZO 압축 라이브러리 컴파일 (옵션)

    tar xzvf lzo-2.03.tar.gz
    cd lzo-2.03/
    ./configure --prefix=/mingw
    make
    make install


  2. Fribidi 라이브러리 컴파일 (옵션)

    Fribidi는 아랍어와 히브리어의 표시에 필요하다. 솔직히 이 기능은 빠뜨려도 된다.

    tar xzvf fribidi-0.19.2.tar.gz
    cd fribidi-0.19.2/
    ./configure --prefix=/mingw --disable-debug
    make
    make install

    자세한 내용은 Fribidi에 관한 글을 참조.

  3. giflib 라이브러리 컴파일 (옵션)

    tar xjvf giflib-4.1.6.tar.bz2 
    cd giflib-4.1.6/
    ./configure --prefix=/mingw
    make
    make install


  4. Live555 라이브러리 컴파일 (권장)

    Live 라이브러리는 인터넷 동영상을 보는 데 쓰인다. live555.com에서 최신 버전을 받아 다음과 같이 컴파일한다:

    export CC=/mingw/bin/gcc.exe
    cd /mingw/lib/
    tar xzvf live.2010.04.01.tar.gz
    cd live/
    ./genMakefiles mingw
    make


  5. JPEG 라이브러리 컴파일 (권장)

    tar xzvf jpegsrc.v8a.tar.gz
    cd jpeg-8a/
    ./configure --prefix=/mingw
    make
    make install


  6. PNG 라이브러리 컴파일 (권장)

    tar xzvf libpng-1.4.1.tar.gz 
    cd libpng-1.4.1
    ./configure --prefix=/mingw
    make
    make install


  7. FreeType 라이브러리 컴파일 (필수)

    자막 표시에 필요하다.

    그리고 Freetype를 컴파일한다.

    tar xzvf freetype-2.3.12.tar.gz 
    cd freetype-2.3.12/
    ./configure --prefix=/mingw
    make install


  8. 만일 iconv 라이브러리가 설치되어 있지 않다면 컴파일한다. libXML2 그리고 fontconfig 에 필요하다.

  9. libXML2 컴파일

    만약에 fontconfig 라이브러리를 컴파일하려면 필요하다. 먼저 testThreads.c를 고친다.

    --- testThreads.c.orig  2009-09-11 18:09:00.268640135 +0200
    +++ testThreads.c 2009-09-11 18:12:43.412653512 +0200
    @@ -107,7 +107,7 @@

    for (i = 0; i < num_threads; i++) {
    results[i] = NULL;
    - tid[i] = (pthread_t) -1;
    + memset(&tid[i], 0, sizeof(pthread_t));
    }

    for (i = 0; i < num_threads; i++) {

    그리고 컴파일한다:


    ./configure --prefix=/mingw
    make install


  10. Fontconfig 라이브러리 컴파일 (권장)

    SSA 자막 표시에 필요하다.

    tar xzvf fontconfig-2.8.0.tar.gz 
    cd fontconfig-2.8.0/
    ./configure --prefix=/mingw
    make install


  11. Libcdio 컴파일 (옵션)

    tar xzvf libcdio-0.83.tar.gz 
    cd libcdio-0.83/
    ./configure --prefix=/mingw
    make
    make install


  12. Libdca 컴파일 (권장)

    tar xjvf libdca-0.0.5.tar.bz2 
    cd libdca-0.0.5/
    ./configure --prefix=/mingw
    make install


  13. DirectX 7 라이브러리 추출 (권장)

    cd /mingw/include/
    tar xzvf dx7headers.gz


  14. MPlayer, Mencoder 컴파일

    ffmpeg 소스를 받아서 mplayer 소스 디렉토리에 넣는다.

    tar xjvf mplayer-export-snapshot.tar.bz2

    cd mplayer-export-2011-11-25/

    tar xjvf ffmpeg-snapshot.tar.bz2

    CPPFLAGS='-DWIN32 -DHAVE_INT32_T' ./configure --prefix=/mingw --enable-runtime-cpudetection --enable-theora --enable-fribidi --disable-ffmpeg_a --yasm=/mingw/bin/yasm

    MPlayer를 컴파일하기 전에 config.mak를 텍스트 에디터(notepad.exe)로 수정한다.

    EXTRALIBS_MPLAYER  = -lgdi32 -lopengl32 -lwinmm -lfaac -lx264 -lmp3lame -lfribidi
    EXTRALIBS_MENCODER = -lfaac -lx264 -lfribidi -lmp3lame

    MPlayer 컴파일 시작한다.

    make

  15. MPlayer.exe와 Mencoder.exe를 복사한다.

    strip mencoder.exe mplayer.exe
    cp -iv m*.exe /mingw/bin

Sunday, April 4, 2010

Using MPlayer & Mencoder to Rip Blu-ray

Blu-ray discs require new and powerful CPU and graphics card to play high-definition movies on them. Although MPlayer is not yet suitable for playing Blu-ray discs, Mencoder can be used to rip Blu-ray discs in a more watchable format so that you can watch the movie on your average computer, laptop, iPod or iPad. I blogged previously on using Mencoder to rip DVD. Ripping Blu-ray isn't much different from ripping DVD.


Since Blu-ray discs are encrypted, you need to use DumpHD, Clown_BD or AnyDVD HD to dump the contents of your Blu-ray disc to your hard drive prior to ripping it. If you have Slysoft AnyDVD HD installed, right-click on the red fox icon on the right side of the taskbar, and choose Rip Video DVD to Harddisk from the menu. Then, specify the location where you want to save unencrypted Blu-ray contents. Note that you'll need more than 20GB free space.


After saving the huge amount of Blu-ray contents, open Command Prompt and type mplayer commands to play the Blu-ray movie. Here are some examples:


  • VC-1 video and AC-3 audio

    mplayer E:\BDMV\STREAM\00024.m2ts -vo directx:accel -vc ffvc1 -ao dsound -ac ffac3 -aid 4352 -framedrop

  • H.264 video and AC-3 audio

    mplayer E:\BDMV\STREAM\00024.m2ts -vo directx:accel -vc ffh264 -ao dsound -ac ffac3 -aid 4352 -framedrop

  • MPEG video and AC-3 audio

    mplayer E:\BDMV\STREAM\00024.m2ts -vo directx:accel -vc ffmpeg12 -ao dsound -ac ffac3 -aid 4352 -framedrop


To find available audio tracks, type the -identify option for mplayer to create a log file and look for AUDIO_ID strings.


mplayer 00024.m2ts -vo direct3d -vc ffvc1 -vf cropdetect -ss 180 -identify > log.txt


To encode the Blu-ray video with H.263 codec and resize it to 768x432 screen at the same time, the mencoder command would be like:


mencoder 00024.m2ts -o film.h264 -of rawvideo -oac copy -vf scale=768:432,harddup -ofps 24000/1001 -vc ffvc1 -ovc x264 -x264encopts bitrate=1200:subq=4:bframes=3:b_pyramid=normal:weight_b:pass=1:turbo=1

My second-pass mencoder command would be:


mencoder 00024.m2ts -o film.264 -of rawvideo -oac copy -vf scale=768:432,harddup -ofps 24000/1001 -vc ffvc1 -ovc x264 -x264encopts bitrate=1200:8x8dct:me=umh:frameref=4:bframes=3:b_pyramid=normal:weight_b:pass=2:trellis=1:psnr


I like to convert 5.1-channel AC3 audio to 6-channel AAC sound.


mplayer 00024.m2ts -vo null -vc null -aid 4352 -ao pcm:fast:file=audio-en-51.pcm -ac ffac3 -channels 6
faac --mpeg-vers 4 -q 108 -c 16800 -I 2,6 audio-en-51.pcm


Finally, let's put together a Matroska package from the video and audio


mkvmerge --title "Le Film" --default-language fr --chapters Chapters.txt -o le_film.mkv --track-name 0:"Video_Title" --default-duration 0:23.976fps --display-dimensions 0:768x432 --noaudio film.264 --default-track 0 --language 0:fr audio-fr-51.aac

윈도용 MPlayer / Mencoder 사용 및 설정

MinGW로 컴파일한 MPlayer를 시험해 보고 최적으로 설정해 보자. 다음은 내가 컴파일한 MPlayer와 Mencoder이다. bzip2.exe로 압축을 풀어야 한다(bzip2 -d mplayer.exe.bz2).


  1. DirectX 8.1 설치(Windows 95/98/ME Only)


    업데이트: Windows 98/ME 사용자도 아래의 DirectX 9.0c를 설치할 수 있다. 만일 DirectX 9을 설치할 경우, DirectX 8.1을 설치할 필요가 없게 된다.


    Windows 98/ME 사용자는 DirectX 8.0a, DirectX 8.1b 혹은 DirectX 8.2를 받아서 설치해야 MPlayer가 제대로 작동한다. 다음은 다운로드 링크를 여러 군데 모은 것이다.


    DirectX 8.1는 Windows XP에 포함되어 있다.


  2. DirectX 9.0c 설치


    MPlayer의 최신 개발 코드는 기본적으로 DirectX 9와 링크되도록 되어 있다. 그러므로 이렇게 만든 mplayer.exe 실행 파일을 Windows 98/ME/XP에서 실행하면 DirectX 9를 못 찾고 오류가 발생할 수가 있다. 이러한 오류를 방지하기 위해 MPlayer를 configure 할 때 --disable-direct3d 옵션을 주어서 DX9 링크 못하게 할 수 있다. 그렇지 않으면 filehippo.com에서 DirectX 9.0c 2006년 12월 릴리스를 받아서 설치해야 한다.


  3. MPlayer의 간단한 명령행 도움말


    mplayer.exe를 처음 실행하면 검은 콘솔 창이 나타나 아래처럼 짧은 도움말이 나온다.


    MPlayer SVN-r29464-snapshot-3.4.5 (C) 2000-2009 MPlayer Team
    Usage: mplayer [options] [url|path/]filename

    Basic options: (complete list in the man page)
    -vo select video output driver ('-vo help' for a list)
    -ao select audio output driver ('-ao help' for a list)
    vcd:// play (S)VCD (Super Video CD) track (raw device, no mount)
    dvd:// play DVD title from device instead of plain file
    -alang/-slang select DVD audio/subtitle language (by 2-char country code)
    -ss seek to given (seconds or hh:mm:ss) position
    -nosound do not play sound
    -fs fullscreen playback (or -vm, -zoom, details in the man page)
    -x -y set display resolution (for use with -vm or -zoom)
    -sub specify subtitle file to use (also see -subfps, -subdelay)
    -playlist specify playlist file
    -vid x -aid y select video (x) and audio (y) stream to play
    -fps x -srate y change video (x fps) and audio (y Hz) rate
    -pp enable postprocessing filter (details in the man page)
    -framedrop enable frame dropping (for slow machines)

    Basic keys: (complete list in the man page, also check input.conf)
    <- or -> seek backward/forward 10 seconds
    down or up seek backward/forward 1 minute
    pgdown or pgup seek backward/forward 10 minutes
    < or > step backward/forward in playlist
    p or SPACE pause movie (press any key to continue)
    q or ESC stop playing and quit program
    + or - adjust audio delay by +/- 0.1 second
    o cycle OSD mode: none / seekbar / seekbar + timer
    * or / increase or decrease PCM volume
    x or z adjust subtitle delay by +/- 0.1 second
    r or t adjust subtitle position up/down, also see -vf expand

    * * * SEE THE MAN PAGE FOR DETAILS, FURTHER (ADVANCED) OPTIONS AND KEYS * * *


    mplayer -vo help 명령은 다음과 같이 어떤 화면 출력 장치가 사용 가능한지 보여 준다.


    MPlayer SVN-r29464-snapshot-3.4.5 (C) 2000-2009 MPlayer Team
    Available video output drivers:
    directx Directx DDraw YUV/RGB/BGR renderer
    direct3d Direct3D 9 Renderer
    gl X11 (OpenGL)
    gl2 X11 (OpenGL) - multiple textures version
    winvidix WIN32 (VIDIX)
    cvidix console VIDIX
    null Null video output
    mpegpes MPEG-PES file
    yuv4mpeg yuv4mpeg output for mjpegtools
    png PNG file
    jpeg JPEG file
    gif89a animated GIF output
    tga Targa output
    pnm PPM/PGM/PGMYUV file
    md5sum md5sum of each frame

    mplayer -ao help 명령은 어떤 음향 출력 장치가 사용 가능한지 보여 준다.


    MPlayer SVN-r29464-snapshot-3.4.5 (C) 2000-2009 MPlayer Team
    Available audio output drivers:
    dsound Windows DirectSound audio output
    win32 Windows waveOut audio output
    mpegpes MPEG-PES audio output
    null Null audio output
    pcm RAW PCM/WAVE file writer audio output


  4. MPlayer 시험


    일단 명령 프롬프트(cmd.exe)나 실행 대화창(Run...)에서 다음과 같은 명령을 입력하여 MPlayer를 테스트해 보자. 위에 보이는 -vo 도움말과 -ao 도움말을 참고하여 자신의 시스템에 가장 알맞은 옵션을 찾아 보자.


    mplayer -vo direct3d -ao dsound -font C:\WINDOWS\FONTS\Tahoma.ttf -framedrop mymoviefile.avi

    또는 좀 느리지만 기본적인 출력 장치로 GL과 win32를 사용해 볼 수 있다.


    mplayer -vo gl -ao win32 Bear.wmv

    샘플 동영상 파일은 인터넷에서 검색하여 받도록 한다. Vista와 Windows 7 사용자는 C:\Users\Public\Videos\Sample Videos 폴더에 있는 샘플 동영상 파일로 MPlayer를 테스트해 볼 수 있다.


  5. MPlayer 설정


    처음으로 MPlayer를 실행하기 전에 HOME 환경변수를 정하여 자신의 폴더를 정해 준다. 그리고 MPlayer를 처음으로 더블클릭하면 사용자의 %HOME% 디렉토리에 “mplayer”라는 폴더가 생기고 그 안에 "config"라는 파일이 있다. "config" 파일에 다음과 같이 설정 사항을 적는다:


    # Write your default config options here!
    cdrom-device=D:
    dvd-device=D:
    ao=dsound
    vo=direct3d
    font=C:\WINDOWS\FONTS\MALGUN.TTF
    framedrop=yes
    subcp=cp949

    Windows 98/ME 사용자는 화면 출력 장치 설정으로 vo=direct3d 대신에 vo=directx 또는 vo=directx:noaccel 라고 적어야 한다. directx:noaccel은 가속 기능이 없는 DirectDraw 출력 장치인데 화면 출력에 문제가 있을 경우에 사용한다.


  6. MPlayer 코덱


    MPlayer 코덱을 받는 게 좋다. 파일 이름은 windows-essential-20071007.zip이다. 압축을 풀면 "windows-essential-20071007" 폴더가 나오는데 "codecs"으로 이름을 바꾸어 mplayer.exe가 있는 폴더로 옮기도록 한다.


    또한, MPlayer 소스의 etc 디렉토리에 codecs.conf 파일이 있을 것이다. 이것을 사용자의 mplayer 폴더에 복사해 놓는다. 그리고 mplayer를 실행하면 메시지 첫머리에 다음과 같이 코덱 숫자가 표시된다.


    MPlayer SVN-r29464-snapshot-3.4.5 (C) 2000-2009 MPlayer Team
    138 audio & 299 video codecs
    Usage: mplayer [options] [url|path/]filename

    이제 다음 명령어를 실행하면 mplayer 코덱에 관한 정보가 나올 것이다.


    mplayer -vc help
    mplayer -ac help


  7. 다음처럼 동영상을 볼 수 있다:

    mplayer mymoviefile.avi > C:\Windows\Temp\error.txt

    이제 남은 일은 SMPlayer를 받아서 MPlayer 인터페이스로 설정하는 것이다.


Friday, April 2, 2010

MP4Box Usage

To package a MPEG-4 Video


Wrap up the raw H.264 video along with chapters inside a MPEG-4 container.


MP4Box -add video.264 -chap chapters.txt -fps 23.976 film.m4v


To Find Info on the First Track inside a .M4V file


MP4Box -info 1 movie.m4v


To Extract H.264 Video from a .M4V file


MP4Box -raw 1 movie.m4v


To Extract AAC audio from M4A file


Use MP4Box to extract AAC audio from a .M4A file like this:


MP4Box -raw 1 music.m4a

Thursday, April 1, 2010

윈도용 MPlayer와 Mencoder 정적 컴파일

Windows에서 MPlayer/Mencoder를 컴파일하려면 MinGW 컴파일러가 필요하다. 이 글을 읽고 MinGW를 설치하도록 한다. 이 글은 정적 실행 파일(특별한 DLL에 의존하지 않는 단일 프로그램)을 생성하기 위해 쓰여졌다. 동적 실행 파일을 만들려면 이 글을 읽기 바란다.


시작 메뉴에서 MSYS (rxvt)를 오른쪽 클릭하여 관리자로 실행한다. Windows Vista와 Windows 7에서 문제 없이 컴파일하기 위함이다.


  1. LZO 라이브러리는 빠른 압축 기능으로 순수 비디오를 압축하는 데 쓰인다.

    tar xzvf lzo-2.03.tar.gz
    cd lzo-2.03
    ./configure --prefix=/mingw
    make
    make install

  2. Zlib는 압축 헤더가 붙은 몇몇 mov 파일을 보기 위해 필요하다. zlib.net에서 소스를 받아 컴파일한다:

    cd ~

    tar xjvf zlib-1.2.4.tar.bz2

    cd zlib-1.2.4

    ./configure --prefix=/mingw

    make

    make install


  3. PNG 이미지 라이브러리


    영화 보는 데 PNG 라이브러리가 왜 필요한지 궁금할 것이다. 가끔 영화의 인상적인 부분을 한 장면 한 장면 사진으로 저장하고 싶을 때 쓸 수 있다. PNG 라이브러리 소스를 받아 컴파일하자:


    cd ~
    tar xzvf libpng-1.4.1.tar.gz
    cd libpng-1.4.1/
    ./configure --prefix=/mingw --disable-shared
    make
    make install


  4. Freetype 및 Iconv 라이브러리


    Freetype은 자막 표시에 필요하다. iconv 라이브러리에 의존하므로 먼저 iconv 소스를 받아 컴파일하자:


    cd ~

    tar xvzf libiconv-1.13.1.tar.gz

    cd libiconv-1.13.1

    ./configure --prefix=/mingw --disable-shared

    make

    make install

    그런 다음, Freetype2를 받아 컴파일한다:


    cd ~

    tar xzvf freetype-2.3.12.tar.gz

    cd freetype-2.3.12

    ./configure --prefix=/mingw --disable-shared

    make

    make install


  5. Fontconfig 라이브러리는 SSA 자막 표시에 필요하다. expat 라이브러리에 의존하므로 먼저 expat 라이브러리를 컴파일하자.

    cd ~
    tar xzvf expat-2.0.1.tar.gz
    cd expat-2.0.1/
    ./configure --prefix=/mingw --disable-shared
    make install

    그리고 fontconfig 라이브러리를 컴파일한다.

    cd
    tar xzvf fontconfig-2.8.0.tar.gz
    cd fontconfig-2.8.0/
    ./configure --prefix=/mingw --disable-shared
    make install


  6. Libcdio 소스를 여기서 받아 컴파일하고 설치하자.

    tar xzvf libcdio-0.81.tar.gz

    cd libcdio-0.81

    ./configure --prefix=/mingw --disable-shared

    make

    make install


  7. Libogg, Libvorbis, speex, Theora 컴파일


    libogg, libvorbis, speex 그리고 theora 라이브러리 모두 xiph.org에서 받아 다음과 같이 컴파일하자:


    ./configure --prefix=/mingw --disable-shared

    make

    make install


  8. DirectX 헤더를 아래의 위치에서 받아서:


    MinGW의 include 폴더(예를 들어, C:\MinGW\include)에 압축을 푼다.


  9. MPlayer 정적 컴파일을 위한 configure 명령


    pkg-config.exe와 yasm.exe를 받아서 /mingw/bin에 저장한다. MPlayer 소스를 받아서 풀자:


    tar xjvf mplayer-export-snapshot.tar.bz2
    cd mplayer-export-2009-08-02/

    다음과 같이 configure 명령어를 입력한다.


    ./configure --prefix=/mingw --enable-runtime-cpudetection --enable-static --enable-theora --disable-vidix --yasm=/mingw/bin/yasm


  10. configure가 끝나면 config.mak를 열어서 손보자. MPlayer.exe를 실행할 때 검은 로그 창이 나타나는 현상을 원하지 않는다면 EXTRALIBS_MPLAYER= 행에 -mwindows 추가하도록 한다:

    EXTRALIBS_MPLAYER =  -mwindows -lopengl32 -lgdi32 -lwinmm -ld3d9 -lfaac -lx264 -lmp3lame


  11. MPlayer/Mencoder 컴파일


    드디어 MPlayer 컴파일을 시작한다.


    make

    컴파일이 성공적으로 끝나면 mplayer.exe 그리고 mencoder.exe 두 개의 파일이 생긴다. strip 명령을 쓰면 실행 파일의 크기를 약간 줄일 수 있다.


    strip m*.exe

    UPX로 압축한다.


    upx --best --strip-relocs=0 mplayer.exe
    upx --best --strip-relocs=0 mencder.exe

    가령, C:\Program Files로 복사하도록 한다.


    cp -iv m*.exe /c/Program\ Files


mplayer.exe와 mencoder.exe 두 개의 실행 파일이 성공적으로 만들어졌으니, 이제 MPlayer를 테스트하고 설정하는 일이 남았다.

Tuesday, March 23, 2010

Using Icedax and LAME to Rip Music CD

This short guide will help you rip a CD with a few command-line tools. Download the following files and put them in a folder, such as C:\WINDOWS.


Insert your music CD into the CD-ROM drive and open a command prompt (cmd.exe). First, run the following command to find your CD-ROM drive.


icedax -scanbus

The following command will display the contents of your CD:


icedax dev='D:' cddb=1 -J

The following command will save the second track as track2.wav:


icedax dev='D:' cddb=1 track=2 track2.wav

The following command will save each track as track##.wav:


for %i in (1 2 3 4 5 6 7 8 9 10) do icedax dev='D:' cddb=1 track=%i track%i.wav

For brief help on icedax command, type:


icedax -h


Using LAME to encode MP3 from .WAV files


LAME is a free MP3 encoder. I've written how to compile LAME in a previous post. The numerous options of LAME can be confusing to new users. After reading the output of lame --help, lame --preset help and lame --longhelp, I decided to go with one of the following presets and the -h option:


  • fm/radio/tape => 112kbps
  • hifi => 160kbps
  • cd => 192kbps
  • studio => 256kbps

The following is options related to ID3 tagging:


  ID3 tag options:
--tt <title> audio/song title (max 30 chars for version 1 tag)
--ta <artist> audio/song artist (max 30 chars for version 1 tag)
--tl <album> audio/song album (max 30 chars for version 1 tag)
--ty <year> audio/song year of issue (1 to 9999)
--tc <comment> user-defined text (max 30 chars for v1 tag, 28 for v1.1)
--tn <track[/total]> audio/song track number and (optionally) the total
number of tracks on the original recording. (track
and total each 1 to 255. just the track number
creates v1.1 tag, providing a total forces v2.0).
--tg <genre> audio/song genre (name or number in list)

Here's an example LAME command using my favorite preset hifi:


LAME --preset hifi -h --tt "House Party Remix" track3.wav PartyRemix.mp3

This converts track3.wav to PartyRemix.mp3 using ABR 160kbps hifi encoding.

Monday, March 22, 2010

Free Command-Line Audio Encoders (for Windows)

Here you can download free, open-source audio encoders for MP3, OGG and AAC music formats. I compiled LAME and Ogg Vorbis tools with MinGW whereas FAAC was compiled by someone (faac-1.28.7z).


Install MPlayer, Mencoder, MP4Box and Mkvmerge


Download my package of Windows executables, including mencoder and mp4box here.


I built it using MinGW. The package contains the following programs.


  • faac.exe
  • faad.exe
  • lame.exe
  • mencoder.exe
  • MP4Box.exe
  • mpcenc.exe
  • mplayer.exe
  • normalize.exe
  • oggdec.exe
  • oggenc.exe
  • ogginfo.exe
  • speexdec.exe
  • speexenc.exe
  • twolame.exe
  • vorbiscomment.exe
  • x264.exe

It is recommended that you unpack the package into C:\Program Files. If MPlayer and Mencoder were installed in C:\Program Files\MPlayer, start Command Prompt and set PATH to include the MPlayer folder:


PATH "C:\Program Files\MPlayer\bin";%PATH%

Mkvmerge is part of Mkvtoolnix that can be obtained from http://www.bunkus.org/videotools/mkvtoolnix/.


Related Links


Sunday, March 14, 2010

MinGW와 MSYS 설치하기

윈도우처럼 오픈소스가 아닌 운영체제를 사용하면 컴파일할 필요를 별로 느끼지 않는다. 하지만, 리눅스를 쓰다 보면 커널 및 여러 쓸모있는 프로그램을 컴파일하게 되고 자연히 컴파일하는 버릇을 가지게 된다. 리눅스에서 쓰던 유용한 프로그램들을 윈도우에서도 쓸 수 있으면 얼마나 좋을까. 다행히 윈도우에서도 리눅스 프로그램을 포팅할 수 있도록 도와 주는 GCC 컴파일러를 제공하는 MinGW 프로젝트가 있다. 물론, 윈도우 전용 프로그램도 맘껏 만들 수 있는, 아주 쓸만한 대체적 개발 환경이다. 그럼, 이제 MinGW를 윈도우에 설치해 보자.


참고: Windows Vista 또는 Windows 7 환경에서는 파일 시스템에 대한 사용자 권한 제한 때문에 MinGW 사용시 컴파일 에러 같은 문제가 일어날 수 있다. 이러한 경우 다음과 같이 여러 해결 방법이 있다.

  • 자신의 사용자 폴더(C:\Users\Name) 또는 데스크탑(C:\Users\Public\Desktop)에 MinGW와 MSYS를 설치한다.
  • FAT 파티션이나 USB 메모리에 MinGW를 설치한다.
  • C:\MinGW에 설치했을 경우 MSYS를 실행할 때 MSYS (rxvt) 아이콘을 오른쪽 마우스 버튼으로 클릭하여 관리자 권한으로 실행한다.
  • USB 메모리에 PortableApps 플랫폼을 설치한 다음 MinGW PortableApp 받아서 설치하면 MinGW 설치가 쉽게 된다. 이렇게 하면 번거롭게 아래 설명을 따르지 않아도 된다.
  • Safe mode로 Windows를 시작한다.


  1. MinGW 설치에는 다음 3 가지 설치 프로그램이 필요하다. 모두 받아서 차례대로 설치하자.


  2. 먼저 MinGW 자동 설치자(MinGW-5.1.6.exe)를 실행한다. 그러면, Download and install 또는 Download only 둘 중 선택하라고 한다. Download and install 즉, 다운로드 후 설치를 선택한다.


    MinGW installer asks download only?

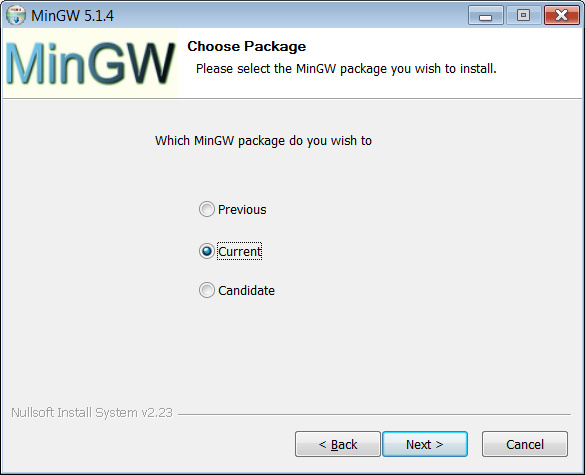
    다음은 MinGW 릴리스를 선택하는 질문인데 Current를 선택한다.


    MinGW installer asks you to choose package

    다음은 MinGW 설치 요소를 선택한다. MinGW base tools, g++ compilerg77 compiler를 선택하기를 권장한다. 나중에 MSYS를 설치하기 때문에 아직은 MinGW make를 선택하지 않는다.


    Select the MinGW components to install

    다음은 설치 폴더를 결정한다. Windows Vista 및 Windows 7 사용자는 기본값인 C:\MinGW 대신 C:\Users\Public\Desktop\MinGW 폴더에 설치하기를 권한다. MinGW는 공백이 포함된 경로와 문제가 있으므로, "Program Files" 또는 "My Documents" 같은 폴더에 설치하지 않는 게 좋다. MinGW 설치 프로그램이 MinGW 요소를 스스로 받아서 설치한다.


    MinGW installer downloading components

  3. MinGW 설치가 끝나면, MSYS-1.0.11.exe를 실행해 MSYS를 설치한다.


    MinGW Destination Directory

    MinGW가 설치된 경로를 묻는 질문이 나오면, 실제로 MinGW가 설치된 경로(기본값 C:/MinGW 또는 C:/Users/Public/Desktop/MinGW)를 입력한다.


    MSYS asks MinGW path

    MSYS가 성공적으로 설치되면, fstab 파일(C:/MinGW/1.0/etc/fstab 혹은 C:/Users/Public/Desktop/MinGW/1.0/etc/fstab)을 텍스트 에디터(notepad.exe)로 열어 내용을 확인한다. 다음과 같이 /mingw 에 대한 실제 디렉토리 매핑이 올바로 되어 있어야 한다.


    C:/MinGW /mingw

    시작 프로그램 메뉴에서 MSYS (rxvt) 아이콘을 더블클릭하여 MSYS를 테스트해 본다. 익숙한 리눅스 명령어를 입력할 수 있는 터미널 창이 나타난다. 다음은 GCC 컴파일러의 버전을 알아보는 명령어인데 현재 3.4.5란 결과가 나올 것이다.


    $ gcc --version
    gcc.exe (GCC) 3.4.5 (mingw-vista special r3)
    Copyright (C) 2004 Free Software Foundation, Inc.
    This is free software; see the source for copying conditions. There is NO
    warranty; not even for MERCHANTABILITY or FITNESS FOR A PARTICULAR PURPOSE.


  4. 다음은 MinGW 개발 도구 모음(msysDTK-1.0.1.exe)을 설치한다. MSYS가 설치된 폴더(C:\MinGW\1.0 혹은 C:\Users\Public\Desktop\MinGW\1.0)에 설치하도록 한다. cvs, perl, ssh 같이 개발에 유용한 도구가 설치될 것이다.


    perl --version
    ssh --version


  5. 그 밖에 MinGW 프로젝트에서 여러 패키지를 받아서 추가적으로 설치한 수 있다. 예를 들어 mingw-utils 받아서 설치할 수 있다.

    cd /mingw
    tar xzvf mingw-utils-0.3.tar.gz

    다음 몇 가지 프로그램도 유용하다.


  6. MinGW 설치 폴더에 쓰기 권한이 없을 경우, 혹은 사용자 이름이 한글일 경우엔 환경변수 HOME을 정해 주는 것이 좋다. 자신의 홈 디렉토리를 따로 설정해 주는 것이다.

    Set your own HOME variable

  7. 마지막으로, 홈 폴더에 .profile 이름의 텍스트 파일을 만들어 컴파일 환경을 설정할 수 있다. 다음은 예제 .profile 내용이다.

    CC='/mingw/bin/gcc.exe '
    CFLAGS='-march=pentium2 -mtune=i586 -mthreads -O2 -g -fomit-frame-pointer -mms-bitfields -pipe '
    CPPFLAGS='-I/mingw/include -DWIN32 -DMINGW32 '
    CXXFLAGS="${CFLAGS}"
    LDFLAGS='-L/mingw/lib -Wl,--enable-auto-image-base -Wl,--enable-auto-import -Wl,--enable-runtime-pseudo-reloc '
    PKG_CONFIG_PATH=/mingw/lib/pkgconfig
    export CC CFLAGS CPPFLAGS CXXFLAGS LDFLAGS PKG_CONFIG_PATH

    CFLAGS와 LDFLAGS를 각자의 취향에 맞게 고쳐서 사용하면 좋다. -march= 옵션으로 자신의 CPU에 최적화한 코드를 만들 수 있는데, i586, pentium-mmx, i686, pentium2, pentium3, pentium-m, pentium4, prescott, k6-2, athlon, athlon-4 따위에서 -march= 값을 고를 수 있다(자세한 정보).


    CFLAGS='-march=pentium3 -mthreads -O2 -fomit-frame-pointer -mms-bitfields -pipe '
    export CFLAGS

Anna Karenina (Russian Novel)

I created an EPUB book containing Leo Tolstory's Anna Karenina in its original Russian language. It is not yet complete. Comments are welcome.


Все счастливые семьи похожи друг на друга, каждая несчастливая семья несчастлива по-своему.

Все смешалось в доме Облонских. Жена узнала, что муж был в связи с бывшею в их доме француженкою-гувернанткой, и объявила мужу, что не может жить с ним в одном доме. Положение это продолжалось уже третий день и мучительно чувствовалось и самими супругами, и всеми членами семьи, и домочадцами. Все члены семьи и домочадцы чувствовали, что нет смысла в их сожительстве и что на каждом постоялом дворе случайно сошедшиеся люди более связаны между собой, чем они, члены семьи и домочадцы Облонских. Жена не выходила из своих комнат, мужа третий день не было дома. Дети бегали по всему дому, как потерянные; англичанка поссорилась с экономкой и написала записку приятельнице, прося приискать ей новое место; повар ушел еще вчера со двора, во время обеда; черная кухарка и кучер просили расчета.

Korean short story: Death of a Prostitute

Death of a Prostitute is a Korean short story about a young prostitute found dead on a street. The ebook is written in Korean and meant for testing Korean on a digital reader supporting EPUB format.


Vietnamese Novel 'Thoi Xa Vang'

Thoi Xa Vang is a Vietnamese novel in EPUB format. It will work with Adobe Digital Editions, Nook and Sony digital reader.


Embedding Russian/Cyrillic/Unicode Fonts in EPUB books

I'd like to read Russian literature in its original language. So I downloaded Leo Tolstoy's Anna Karenina and put it in my Nook.


  1. The original format of the book was a Word document. I had to save it as text file and convert its character set from Windows Cyrillic (CP1251) to UTF-8 using Iconv.

    iconv -f CP1251 -t UTF-8 annakarenina.txt > annakarenina-u.txt


  2. I opened the text file with Sigil, formatted it and saved it as EPUB file.

  3. Put Unicode fonts in the EPUB file that have a cyrillic range. You can do so with 7-zip. I recommend Book Antiqua, MinionPro or DejaVu Serif.

    • antquab.ttf
    • antquabi.ttf
    • antquai.ttf
    • bkant.ttf


  4. Edit content.opf so that it has references to the fonts:

    <item id="font.bold" href="fonts/antquab.ttf" media-type="application/x-font-truetype"/>

    <item id="font.bolditalic" href="fonts/antquabi.ttf" media-type="application/x-font-truetype"/>

    <item id="font.italic" href="fonts/antquai.ttf" media-type="application/x-font-truetype"/>

    <item id="font.regular" href="fonts/bkant.ttf" media-type="application/x-font-truetype"/>

  5. Edit the stylesheet.

    @font-face {
    font-family: "Book Antiqua";
    font-weight: normal;
    font-style: normal;
    src: url(../fonts/bkant.ttf);
    }
    @font-face {
    font-family: "Book Antiqua";
    font-weight: normal;
    font-style: italic;
    src: url(../fonts/antquai.ttf);
    }
    @font-face {
    font-family: "Book Antiqua";
    font-weight: bold;
    font-style: normal;
    src: url(../fonts/antquab.ttf);
    }
    @font-face {
    font-family: "Book Antiqua";
    font-weight: bold;
    font-style: italic;
    src: url(../fonts/antquabi.ttf);
    }
    a {
    color: inherit;
    text-decoration: inherit;
    }
    em, i {
    font-family: "Book Antiqua", serif;
    font-weight: normal;
    font-style: italic;
    }
    strong, b, h1, h2, h3, h4, h5 {
    font-family: "Book Antiqua", serif;
    font-weight: bold;
    font-style: normal;
    }
    p {
    text-indent: 2em;
    margin-top: 0pt;
    margin-bottom: 0pt;
    }
    body {
    font-family: "Book Antiqua", serif;
    margin-left: 5pt;
    margin-right: 5pt;
    text-align: justify;
    }
    .sgc-1 {text-align: center}
    .sgc-2 {text-align: right}


To see how a Russian ebook might look on your Nook or any other reader, download and try my ebook Anna Karerina.

Saturday, March 13, 2010

Windows 7 Installation

I installed the following programs on my Windows 7 machine.


  • Adobe Flash Player
  • Adobe Reader 10.0
  • Avast Antivirus 5
  • CDBurnerXP or ImgBurn
  • Google Apps or Thinkfree
  • Google Chrome
  • IBM Lotus Symphony
  • iTunes
  • Java
  • Microsoft Office 2010
  • NVIDIA Driver
  • QuickTime
  • RealPlayer
  • Skype
  • Windows Live Essentials
  • Zimbra
  • Zumodrive

Creating Korean eBooks in EPUB format

As far as I know, there aren't a lot of Korean ebooks in EPUB format. However, if you have a Korean literature of any kind, you can create an EPUB file for viewing on a digital reader. Assuming that you have a Korean text file in KSC5601 or UHC character set, you should convert your text file into Unicode encoding. You can do so with iconv.


iconv -f UHC -t UTF-8 oldtext.txt > newtext.txt

Open the new Unicode-encoded text in Sigil, edit it and save it as an EPUB file. Now you should add Korean fonts into your EPUB file. I recommend the following fonts.


  • H2GTRM.TTF
  • H2GTRB.TTF

Then, edit content.opf in your EPUB file so that the manifest section contains the following:


<item id="h2gtrm.ttf" href="fonts/h2gtrm.ttf" media-type="application/x-font-truetype"/>
<item id="h2gtrb.ttf" href="fonts/h2gtrb.ttf" media-type="application/x-font-truetype"/>

Start Sigil again and open your EPUB file. Select the dual editing mode and insert the following CSS definitions into the HTML header.


  @font-face {
font-family: HYGothic-Medium;
font-weight: normal;
font-style: normal;
src: url(../fonts/h2gtrm.ttf);
}
@font-face {
font-family: HYGothic-Bold;
font-weight: bold;
font-style: normal;
src: url(../fonts/h2gtrb.ttf);
}
a {
color: inherit;
text-decoration: inherit;
}
em, i {
font-family: HYGothic-Medium, sans-serif;
font-weight: normal;
font-style: italic;
text-decoration: underline;
}
strong, b, h1, h2, h3, h4, h5, h6 {
font-family: HYGothic-Bold, sans-serif;
font-weight: bold;
font-style: normal;
}
body {
font-family: HYGothic-Medium, sans-serif;
margin-left: 5pt;
margin-right: 5pt;
text-align: justify;
}

Test your ebook with Adobe Digital Editions. It should display Korean correctly.

Wednesday, March 10, 2010

How to embed Unicode fonts in EPUB ebooks

I own a Barnes and Noble's Nook and recently had a trouble reading a Vietnamese novel on Nook. But I resolved the issue by hacking the EPUB ebook as explained below:


  1. Get the Unicode fonts that you want for your ebook. The following fonts come with Adobe Reader and cover enough Unicode ranges.
    • MyriadPro-Bold.otf
    • MyriadPro-It.otf
    • MyriadPro-Regular.otf

    With 7-zip, put the Unicode fonts in your ebook.
  2. Extract content.opf from your ebook and insert the following lines in the manifest section:
    <item href="MyriadPro-Bold.otf" id="embedded.font.bold" media-type="font/opentype"/>

    <item href="MyriadPro-It.otf" id="embedded.font.italic" media-type="font/opentype"/>

    <item href="MyriadPro-Regular.otf" id="embedded.font.regular" media-type="font/opentype"/>
    Put content.opt back into the ebook file.
  3. Extract stylesheet.css from the ebook and append the following contents:
    @font-face {
    font-family: "Myriad Pro";
    font-weight: normal;
    font-style: normal;
    src: url(MyriadPro-Regular.otf);
    }
    @font-face {
    font-family: "Myriad Pro";
    font-weight: normal;
    font-style: italic;
    src: url(MyriadPro-It.otf);
    }
    @font-face {
    font-family: "Myriad Pro";
    font-weight: bold;
    font-style: normal;
    src: url(MyriadPro-Bold.otf);
    }
    a {
    color: inherit;
    text-decoration: inherit;
    }
    em, i {
    font-family: "Myriad Pro", sans-serif;
    font-weight: normal;
    font-style: italic;
    }
    strong, b, h1, h2, h3, h4, h5 {
    font-family: "Myriad Pro", sans-serif;
    font-weight: bold;
    font-style: normal;
    }
    body {
    font-family: "Myriad Pro", sans-serif;
    margin-left: 5pt;
    margin-right: 5pt;
    text-align: justify;
    }
    p {
    text-indent: 2em;
    margin-top: 0pt;
    margin-bottom: 0pt;
    }
    Put stylesheet back in your ebook.
  4. Try and read your ebook with Adobe Digital Editions or your favorite ebook reader.

Thursday, February 25, 2010

MinGW: Building GPAC

GPAC is an MPEG-4 multimedia transcoder suite. This post documents my attempt to compile GPAC with MinGW for the Win32 platform.


  1. Compile OpenSSL as shown in this post.

  2. Build FreeType as shown below.
    tar xjvf freetype-2.3.9.tar.bz2
    cd freetype-2.3.9
    ./configure --prefix=/mingw --disable-shared
    make
    make install


  3. liba52 AC3 decoder


    Download the liba52 source from liba52.sf.net and compile libA52 like this:

    tar xzvf a52dec-0.7.4.tar.gz
    cd a52dec-0.7.4/
    ./configure --prefix=/mingw
    make
    make install

    The following files are installed:

    bin/a52dec.exe
    bin/extract_a52.exe
    include/a52dec/a52.h
    include/a52dec/attributes.h
    include/a52dec/audio_out.h
    include/a52dec/mm_accel.h
    lib/liba52.a
    lib/liba52.la
    man/man1/a52dec.1
    man/man1/extract_a52.1


  4. MAD Library


    The MAD (MPEG Audio Decoder) library is a fast fixed-point MPEG audio decoder that doesn't require an FPU numeric processor. Download the libmad source from mad.sf.net and compile MAD like this:


    tar xzvf libmad-0.15.1b.tar.gz
    cd libmad-0.15.1b
    ./configure --prefix=/mingw --disable-shared --enable-fpm=intel --disable-debugging
    make
    make install

    The following files are installed:

    include/mad.h
    lib/libmad.a
    lib/libmad.la


  5. Get DirectX headers from either location below and extract it into /mingw/include:


  6. Download the source for the JPEG library and compile as follows:
    tar xzvf jpegsrc.v7.tar.gz
    cd jpeg-7
    ./configure --prefix=/mingw --enable-static
    make
    make install


  7. Download the source for the PNG library and compile like this:
    tar xzvf libpng-1.2.38.tar.gz
    cd libpng-1.2.38/
    ./configure --prefix=/mingw --disable-shared
    make
    make install


  8. Then, compile GPAC like this:
    ./configure --prefix=/mingw --cpu=i586 --strip --use-png=no --use-ffmpeg=no

    cp config.h include/gpac/internal


    Before compilation, I edited config.mak:


    SSL_LIBS=-lssleay32 -leay32 -lgdi32 -lws2_32 -lz

    Then, I started make:


    make

    make install


    I encountered an error during the final compilation. But I got MP4Box.exe which was all I needed. So I copied mp4box.exe and libgpac.dll from ~/gpac/bin/gcc.


List Of Created Files


The following files are created as a result of compiling GPAC with MinGW:


gm_aac_in.dll
gm_ac3_in.dll
gm_bifs_dec.dll
gm_ctx_load.dll
gm_dummy_in.dll
gm_dx_hw.dll
gm_ft_font.dll
gm_img_in.dll
gm_ismacryp.dll
gm_isom_in.dll
gm_laser_dec.dll
gm_mp3_in.dll
gm_mpegts_in.dll
gm_odf_dec.dll
gm_ogg_xiph.dll
gm_raw_out.dll
gm_rtp_in.dll
gm_saf_in.dll
gm_soft_raster.dll
gm_svg_in.dll
gm_timedtext.dll
gm_wav_audio.dll
gm_xvid_dec.dll
libgpac.dll
MP4Box.exe
MP4Client.exe

Monday, February 22, 2010

Getting Cygwin cdrkit

cdrkit is a CD-ROM authoring utility. If you don't mind typing commands in Command Prompt, cdrkit can prove useful to you. To download cdrkit for Windows, find a Cygwin mirror. I like the Cygwin mirror at
ftp://mirrors.kernel.org/sourceware/cygwin/release


Go to the directory cdrkit and download the packages genisoimage, icedax and wodim at the subdirectories. Other packages are just aliases. Also, don't forget to download the cygwin package which contain cygwin1.dll.

Saturday, February 20, 2010

Fixing Jittery DVD Sound on Windows 7

I've been using Windows 7 happily until I played a DVD movie and heard continuous jittery noise. The picture was fine, but Windows Media Player 12 only uttered the jittery noise instead of words and music.


I think it's a codec problem. To fix the problem, I downloaded Preferred Filter Tweaker for Windows 7 and disabled Microsoft DTV-DVD Audio Decoder.


This renames C:\Windows\System32\msmpeg2adec.dll so that Windows Media Player 12 doesn't use its own codec. Then, I installed AC3Filter. This fixed the jittery noise problem. Alternatively, ffdshow can be used instead of AC3Filter.

Monday, February 15, 2010

Using Mencoder to Rip DVD into AVI/MKV/MP4 movies

Since I compiled MPlayer and Mencoder, I can use the programs for ripping DVD's as well as watching movies. Usually, I use SMPlayer frontend to play movies. Here I summarize how to make AVI, Matroska (.MKV) or MP4 files containing H.264 video and AAC audio.


First, download my Mplayer/Mencoder builds for Windows. MKVtoolnix is also needed.


Finding the Main DVD Title


In most cases, the first DVD title is the movie you want. Often, you can watch the feature title with the following command (Assuming D: is the DVD drive):


mplayer dvd://1 -dvd-device D:\ -ao dsound -vo directx:accel

For Windows Vista and Windows 7, direct3d is recommended as video output:


mplayer dvd://1 -dvd-device D:\ -ao dsound -vo direct3d

However, some DVD's have a feature title on a track other than the first. For such DVD's, trying each track can be tedious. The following command will help identify the main title on the DVD and also find information on available chapters and subtitles.


mplayer dvd://1 -dvd-device D:\ -identify -vf cropdetect > log.txt

Stop the movie after a moment (pressing q) and you'll get the log file log.txt. In the log.txt file, you'll find the main title to be the longest:


ID_DVD_TITLE_15_LENGTH=12.000
ID_DVD_TITLE_16_LENGTH=5513.533
ID_DVD_TITLE_17_LENGTH=0.500

Here, you find that the 16th title is the feature film.


Dumping the Feature Film from DVD


You can use MPlayer to save a DVD title on hard drive:


mplayer dvd://1 -dvd-device D: -v -dumpstream -dumpfile movie.vob

Now you can put aside your DVD. From now on, you can work with the VOB file saved on your hard drive. Alternatively, you can use VLC to dump a DVD title.


Finding Crop Values


If your DVD is widescreen (not fullscreen), look for the crop values from the log.txt file obtained above:


[CROP] Crop area: X: 0..719  Y: 60..417  (-vf crop=720:352:0:64).

In this example, the crop value will be 720:352:0:64. Note that the first two values (here 720 and 352) have to be divisible by 16.


Encoding DVD to an AVI file containing H.264 video and AAC audio


The following command actually creates an AVI file encoded in H.264:


mencoder dvd://1 -dvd-device E:\ -o movie.avi -oac faac -faacopts object=2:br=128 -vf pp=lb,filmdint,crop=704:464:6:10,scale=720:480,harddup -sws 8 -ofps 24000/1001 -ovc x264 -x264encopts crf=20:8x8dct:frameref=4:bframes=3:b_pyramid=normal:weight_b

The -vf scale= filter is used to resize the video stream. The output refresh rate will be 24000/1001=23.976 frames per second. If you're concerned with encoding speed, set bframes=2.


Encoding DVD to an AVI file containing DIVX video and MP3 audio


The following example shows how to create an AVI file encoded in MPEG-4. In the example below, the encoding bitrate is moderately 768 kilobits per second. The crop filter is only for widescreen titles.:


set VENCOPTS=vcodec=mpeg4:vbitrate=896:vmax_b_frames=2:mbd=2:v4mv:last_pred=3:trell:cbp
mencoder dvd://1 -dvd-device E:\ -o NUL -nosound -vf yadif=0,crop=704:464:6:10,scale=720:480,harddup -ovc lavc -lavcopts %VENCOPTS%:autoaspect:vpass=1
mencoder dvd://1 -dvd-device E:\ -o movie.avi -aid 128 -oac mp3lame -lameopts preset=128,aq=2,vol=8 -vf yadif=0,crop=704:464:6:10,scale=720:480 -ovc lavc -lavcopts %VENCOPTS%:autoaspect:vpass=2


Encoding Additional Sound Tracks


The following example command encodes the English sound track (aid 128) to +8dB-amplified 96kbps MP3:


mencoder dvd://1 -dvd-device D:\ -o audio-en.mp3 -of rawaudio -ovc frameno -aid 128 -oac mp3lame -lameopts preset=96,aq=2,vol=8

The following example encodes an AAC file:


mencoder dvd://1 -dvd-device E: -o audio-en.aac -of rawaudio -ovc frameno -aid 128 -oac faac -faacopts object=2:br=128

Another way to encode DVD audio is to save the sound as .WAV file and encode it with LAME MP3 encoder. First, extract the audio as .WAV file. Then, encode the .WAV file to MP3.


mplayer dvd://1 -dvd-device D:\ -vo null -vc null -aid 128 -ao pcm:fast:file=audio-en.wav
lame --preset tape -h audio-en.wav audio-en.mp3

Later, you can mux AVI:


mencoder.exe -ffourcc DIVX -oac copy -ovc copy -o final_movie.avi -audiofile audio-en.mp3 movie.avi


Editing Chapters.txt


In the log.txt file, you'll find a section that looks like:


CHAPTERS: 00:00:00,00:03:37,00:05:42,00:09:12,00:11:24,00:16:18,00:20:21,00:22:56,00:26:14,00:29:31,00:32:26,00:35:13,00:38:13,00:42:14,00:43:47,00:48:25,00:51:45,00:53:52,00:57:32,01:00:04,01:05:44,01:08:29,01:10:45,01:13:53,01:18:21,01:21:10,01:24:45,01:28:53,01:31:32,01:33:36,01:35:36,01:38:57,01:41:44,

With a text editor, create a text file chapters.txt and put something like:


CHAPTER01=00:00:00.00
CHAPTER01NAME=My name is John Connor.
CHAPTER02=00:03:37.01
CHAPTER02NAME=Weight of the future.
CHAPTER03=00:05:42.16
CHAPTER03NAME=T-X arrives.


Extracting Subtitles from DVD


If you look at the log.txt file gotten above, you'll find information on subtitles.


subtitle ( sid ): 0 language: en
ID_SUBTITLE_ID=0
ID_SID_0_LANG=en
subtitle ( sid ): 1 language: fr
ID_SUBTITLE_ID=1
ID_SID_1_LANG=fr
subtitle ( sid ): 2 language: es
ID_SUBTITLE_ID=2
ID_SID_2_LANG=es

To extract DVD subtitles, I ran the following command in the Command Prompt:


mencoder movie.vob -nosound -ovc frameno -o nul -sid 0 -vobsubout subtitle-en -vobsuboutindex 0 -vobsuboutid en

mencoder movie.vob -nosound -ovc frameno -o nul -sid 1 -vobsubout subtitle-fr -vobsuboutindex 1 -vobsuboutid fr

mencoder movie.vob -nosound -ovc frameno -o nul -sid 2 -vobsubout subtitle-es -vobsuboutindex 2 -vobsuboutid es

The sid and vobsuboutindex number can be obtained from the log.txt file above. Do this for each subtitle but remember to name each output file uniquely.


Creating a Matroska file with Mkvmerge


Let's put together the video, audio and subtitles into a Matroska package. For this task, a command-line tool mkvmerge from MkvToolNix project is used.


mkvmerge
--title "Holiday Trip" --chapters CHAPTERS.TXT -o my_movie.mkv
--aspect-ratio 0:4/3
--track-name 1:"English AAC audio" --default-track 1 --language 1:en movie.avi
--track-name 0:"French AAC audio" --language 0:fr audio-fr-51.aac
--language 0:en en.idx --language 0:fr fr.idx --language 0:es es.idx

If there's a problem with audio/video synchronization, use the --sync option with mkvmerge. For example, the following command makes the audio track start at 13 seconds after the video starts:


mkvmerge -o movie.mkv video.264 --sync 0:13000 audio.mp3


Creating .MP4 files


Use MP4Box to create a .MP4 movie.


MP4Box -add video.h264 -add audio-en.mp3:lang=eng -add audio-fr.mp3:lang=fre -add en.idx -add fr.idx -add es.idx -fps 23.976 -chap CHAPTERS.TXT movie.mp4


Related Links


Monday, February 1, 2010

MinGW: To Compile LAME for Windows

LAME is a high-quality open-source MP3 encoder. Even though LAME is open-source, LAME is not freely distributed by some major Linux distributions, including Debian and Ubuntu. That's because there have been uncertain legal issues surrounding the MP3 algorithm. However, you can still download the LAME source and compile LAME using the free MinGW compiler. Following is an easy guide to compiling LAME for Windows.


The configure script of LAME makes use of nasm if found. To produce an optimal build of LAME, download yasm and save it as /mingw/bin/nasm.exe.


Launch MSYS (rxvt) and type the following command to unpack the LAME tarball.


tar xzvf lame-398-4.tar.gz

Go to the new folder lame-3.98.4 and configure LAME.


cd lame-3.98.4

./configure --prefix=/mingw --disable-shared --enable-expopt=full

Start compilation.


make

make install” will copy the following files into /mingw tree.


bin/lame.exe
bin/libmp3lame-0.dll
include/lame/
lib/libmp3lame.a
lib/libmp3lame.dll.a
lib/libmp3lame.la

What you definitely want is libmp3lame-0.dll and lame.exe. Copy them to a folder, for example, C:\Windows\System32 or C:\Windows.


To Make LAME_ENC.DLL


Even though the normal MinGW process creates a dynamic library named libmp3lame-0.dll, many Windows applications require a variant of LAME library called lame_enc.dll. Rather than hacking Makefiles, we can use a tool called a2dll from mingw-utils. mingw-utils is a package of tiny handy programs useful for MinGW users. Download mingw-utils-0.3.tar.gz and extract a2dll with tar or 7-zip.


After compiling LAME as shown above, open MSYS rxvt again and go to the folder that contains libmp3lame.a.


cd lame-3.98.4/libmp3lame/.libs

Then, run a2dll like this:


a2dll libmp3lame.a -o lame_enc.dll

You may append the -s option to get a leaner file lame_enc.dll. I tested lame_enc.dll I got this way with Audacity, and audacity was able to recognize lame_enc.dll and export to MP3 files. Yet, I need to do more testing with other programs, such as WinAMP, etc.


Related Posts


Sunday, January 31, 2010

Use cdebootstrap to install Debian/Ubuntu Linux

Using the official CD from Debian or Ubuntu to install a fresh new system can be tedious if you just want a minimal or customized system. An alternative way to install Debian or Ubuntu is to use cdebootstrap. cdebootstrap is a simple command-line program that downloads packages from a Debian/Ubuntu archive, unpacks them into a mounted filesystem, and set 'em up. But it's not a full-fledged installer, so you need to take care of partitioning and setting up bootloader in order to complete the installation.


In order to use cdebootstrap, you need to have an already-running Linux system. However, any Linux live CD will suffice. Fortunately, I have created my own Debian Live CD with included cdebootstrap. I booted my Debian Live and opened mlterm.


If you don't have cdebootstrap, there are many ways to install it. Download a cdebootstrap-static package from http://packages.debian.org/sid/cdebootstrap-static that matches your architecture. If you are running an rpm-based system, such as Fedora, use ar, tar and gzip to unpack the package. For example:


wget http://ftp.us.debian.org/debian/pool/main/c/cdebootstrap/cdebootstrap-static_0.5.5_i386.deb

ar xv cdebootstrap-static_0.5.5_i386.deb

gzip -dc data.tar.gz > /tmp/data.tar

cd /; tar xvf /tmp/data.tar


Before running cdebootstrap, make sure that you have an empty partition and have mounted it. GParted can be used to create an empty partition. In the following example, I used cdebootstrap-static to install Ubuntu 6.06 Dapper into a filesystem mounted on /mnt.


cdebootstrap-static --allow-unauthenticated --flavour=minimal dapper /mnt http://archive.ubuntu.com/ubuntu


--allow-unauthenticated option is used in case ubuntu-archive-keyring or debian-archive-keyring is not installed. There are three flavours to choose from: minimal, standard and build. For suites other than dapper, you can choose one among etch, lenny, squeeze, sid, breezy, dapper, edgy, feisty, gutsy, hardy, intrepid, oldstable, stable, testing, unstable.. The URL at the end of command line is optional. For Debian, you can type http://archive.debian.org/debian.


cdebootstrap downloaded and installed the following set of packages into the new filesystem mounted at /mnt. This list is for a minimal flavour.


apt
base-files
base-passwd
bash
belocs-locales-bin
bsdutils
coreutils
debconf
debconf-i18n
debianutils
diff
dpkg
e2fslibs
e2fsprogs
findutils
gcc-4.0-base
gnupg
grep
gzip
hostname
initscripts
libacl1
libattr1
libblkid1
libbz2-1.0
libc6
libcap1
libcomerr2
libdb4.3
libgcc1
libgcrypt11
libgnutls12
libgpg-error0
libldap2
liblocale-gettext-perl
liblzo1
libncurses5
libopencdk8
libpam-foreground
libpam-modules
libpam-runtime
libpam0g
libreadline5
libsasl2
libsasl2-modules
libselinux1
libsepol1
libslang2
libss2
libssl0.9.8
libstdc++6
libtasn1-2
libtext-charwidth-perl
libtext-iconv-perl
libtext-wrapi18n-perl
libusb-0.1-4
libuuid1
locales
login
lsb-base
makedev
mawk
mount
ncurses-base
ncurses-bin
perl-base
python-minimal
python2.4-minimal
readline-common
sed
sysv-rc
sysvinit
tar
ubuntu-keyring
util-linux
zlib1g


In order to fine-tune the newly installed system, chroot into it and install additional packages.


chroot /mnt /bin/bash

About This Blog

KBlog logo This blog is about current events and issues concerning general population. Thanks for visiting the blog and posting your comments.

© Contents by KBlog

© Blogger template by Emporium Digital 2008

Followers

Total Pageviews

icon
Powered By Blogger